


Central Station I - Design
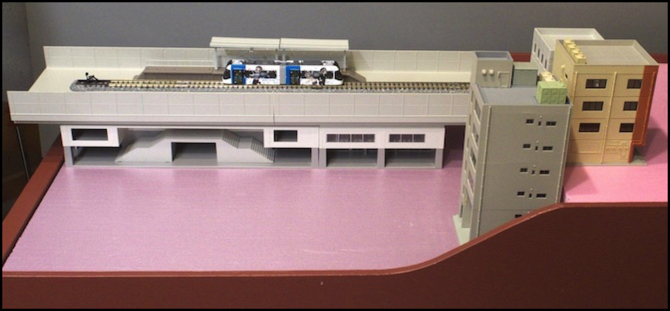
After initially thinking I’d build my own viaduct for the One Point Five Meter Line’s urban station, I’ve decided instead to use Kato’s Viaduct Station Entrance building (I had a spare one), possibly supplemented by one of the Station Shops buildings, as seen above. This will be fine even though I’m using Tomix track and station platforms, since the viaduct station simply creates a flat base for track, and isn’t specific to Kato’s track. The height would be, but I’m not connecting it to Tomix viaduct track, so that doesn’t matter.
I’ve put some station photos from the Toyama Light Rail Toyamakō Line on my Light Rail reference photos page (scroll down to the bottom of the page), while I’ll be using as inspiration for the stations on this layout, although that line does not have any elevated stations as far as I can tell.
I still haven’t named the layout, but I’m thinking of calling the urban station Central Station (or the Japanese 中央駅, Chūō-eki, or both since many Japanese station signs are bilingual), due to it being the “urban center” station of the three on the layout. I haven’t decided what to name the others, but the one in the center, being in a commercial district, could be named after a large business. Some railroads, including apparently Toyama’s, sell station naming rights to businesses, and a common name is the name of the store suffixed with “-mae” (“前”), which means “in front of”.
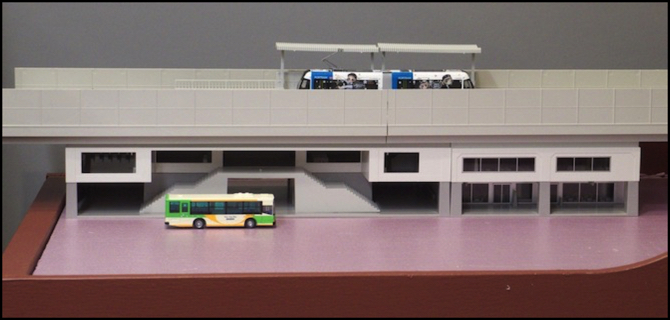
I do have a slight problem, in that I brought the raised foam over a bit farther to the left than perhaps I should have. I may cut it back to allow two full lengths of viaduct to fit without overhanging the end of the layout table. This would also give me more room for a road next to the shops. The other alternative is to omit the shops and cut a notch in the foam for the end of the viaduct. As you can see in the photo below, I’ll have a relatively small platform atop the station, as if space is being left for future expansion. Gravel ballast will fill the unused area, and I’ll scratchbuild some kind of end wasll for the left side of the viaduct. The combination of tall buildings on the lower level and shorter buildings on the higher level will somewhat conceal the transition from one level to the next, since the platform and track will be hidden behind them (unless you’re up close and looking down, or viewing from the “rear” side).
The more I look at this mock-up, the more I think eliminating the shops is a good idea. Although they’re a nice structure, they make the station look too large for a single-tram station. Simply using the station entrance building is probably going to look better with the small platform (or a pair on either side of the track).
In the photo above, the platform shown is the one I’d originally planned to use, but it’s a high-level platform, suitable for commuter trains and my Setagaya trams, but not for low-platform trams like the Portram shown here.
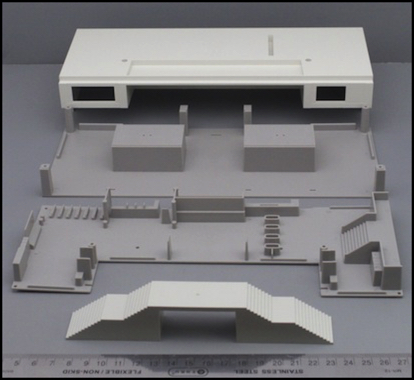
The station model is an interesting one. It’s basically a 100mm x 248mm (4” x 9 3/4”) box that fits underneath a flat platform. The platform has clip-on sides that come in a couple of shapes. The wall type is seen here, and this is typical of urban Japanese viaduct used for commuter and similar lines. The station building, like the shops next to it, is a two-story structure. The lower level appears to be a largely open area, perhaps with some shops implied in the large blocks holding up the top, with a couple of areas on the back that could serve as shops, although the lower level has no molded-in detail.
There are three parts to this building: the base, providing a ground level and supports for the upper section, the upper section which is a single casting providing a floor and molded interior for the upper level, and a body shell. Screws through the base into the body shell join the whole structure together normally. My plan is to glue the base to the foam, and simply slip the two upper parts on top, where they’ll be held in place by the viaduct above them (and allow me to take the building apart for repairs). I’ll need to create some way to attach the viaduct to the top that keeps things from moving around, but this may be as simple as a bit of tubing glued to the viaduct that plugs into a hole in the roof of the station (and a hollow tube would let me use it for routing wires down inside the structure).
The upper level is a ticketing mezzanine, with stairs at the far right leading up towards the platform. Well, actually the stairs dead-end into the wall, implying that they continue through the adjacent structure up to the platforms, but the upper level of the shop building appears to contain a restaurant (or several, there are interior walls). Even with a lit interior, which I plan, the stairs won’t be very visible, although you can see the edge through the window near the right end of the building. I’ll need to work out some kind of stairwell for the platform (or platforms) above, and probably also an elevator, as Japan is increasingly building “accessible” stations, in part because their population’s average age is increasing rapidly.
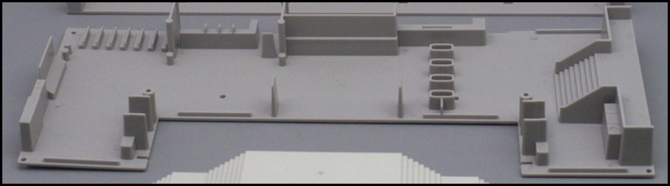
The mezzanine - waiting area at left, turnstyles center-right, stairs to platform far right
I want to do a couple of things with this building. First, light it, and probably the platform above. I’ll also want lights where the street crossed under the viaduct on the right. Second I’ll have wires from the track for both power and the IR LED and optical sensor used to detect the train, which somehow need to be routed down through the structure to get below “ground”. The problem is that neither of these two buildings really has a way to do that. I could run the wires sideways on the underside of the viaduct to the elevated ground, but it would be hard to keep them hidden. And they’re be quite long if I did that, which I’d like to avoid for the really small-gauge wire (it probably wouldn’t affect electrical operation, but the wires could be fragile).
So my thought is to kill two birds with one stone, and install an elevator shaft on the mezzanine level above one of the supporting blocks, and below where I’ll put platforms. On the mezzanine level this would be a solid box that I could route wires through vertically. Up on the platform, even a low-level platform is going to be several millimeters high, leaving room inside below the “elevator” to route wires sideways.
First steps will be to plan the elevator shaft placement and construct it from styrene. I also need to install any lightblocks needed to hide LEDs (I’m planning to use LED strips). Then I’ll attach any signboards and glue them in place securely. Once that’s done, I’ll paint the structure. The interior will get my usual interior treatment: two coats of flat black as a light barrier, followed by at least one coat of white to make the interior reflective. Walls may get some additional treatment, but more likely that will involve glued-on photos of appropriate colored walls with signs, rather than paint, and those will be added later.
After that, the exterior will get a couple of coats of white paint as a primer (mostly to hide any black that leaked out while I was painting the interior, and then some kind of color coat, likely a very light gray, as that’s typical of newer train stations (older ones tended to be more beige).
Now that I have a plan, I just need to get started working on it. Yet another project begins, but this one is realatively simple and straightforward, and my goal is to complete it before the end of October so I can start work on the track above it. Three weeks to go; we’ll see how that works out.