


Track Lighting
What Color is my Light? That question, when I was making the first photographs of the layout, led to an extended investigation of room lighting as it pertains to photography, and the kinds of available lights I could use. Along the way, I made more than a few mistakes, and while the final system works, in the end I think I could have done better (and will on some future layout).
Note: the material here describes the original “Track Lights” used to illuminate Sumida Crossing, and some tests I did in early 2010 regarding what kind of lights to use with them. I’m in the process of creating a new lighting system, described on my Lighting Valance page.
There is also a section about Layout Lighting, which covers this topic in more general terms.
Most books about model railroad construction that talk about lighting at all are mainly concerned with providing even lighting, rather than photographic-quality color accuracy and either recommend ceiling-mounted full-size fluorescent fixtures, or for multi-level railroads where the level above would block that light, small fluorescent fixtures behind a panel (called a valence) above each level of track. The ceiling above my railroad is not high, and there are pipes and ducts that hang below the joists. This made it difficult to use large ceiling fixtures. In addition, traditional fluorescent tubes are very poor light sources for photography, and I find the 60 Hz flicker of the older fluorescent fixtures to be very annoying, and that dissuaded me from investigating them more closely. In hindsight, I made a mistake there and have since decided to use fluorescents in a suspended lighting fixture.
Previous Lighting
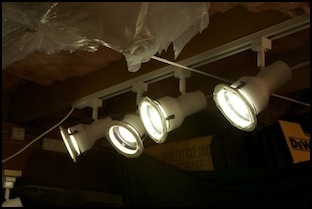
Back when I was building my HO railroad (a number of years ago), I settled on using several sets of R20 track lights mounted directly to the ceiling joists, equipped with ordinary R20 incandescent “flood” bulbs. I liked these for several reasons, including the ability to rearrange lights on the track to light scenes even when a bulb can’t be placed above them, their compact size, and what I considered at the time to be low power (50W per bulb vs. 100 for a typical omnidirectional incandescent bulb that threw less light on the railroad itself).
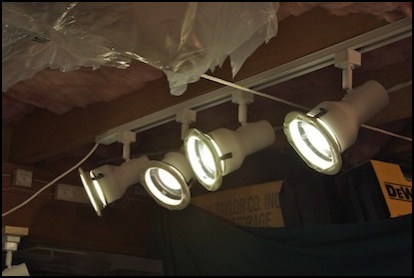
R20 Track Lights, with hand-made UV filters
If I knew then what I know now, I’d have done this differently. In order to get enough light to take good photos I had to add many more fixtures. And the power/heat (as well as some color issues) eventually led me to use compact fluorescent lights (CFLs) in the fixtures. And that brought in concerns about Ultraviolet (UV) light, which can fade paint. I decided to modify my track lighting with material to screen ultraviolet, but never actually did this for all the fixtures (it was a lot of work, and I had other priorities). In the end, this took more time, and cost more money, than doing it right with tube fluorescent fixtures would have.
Modern fluorescent fixtures are much better light sources than they used to be (you still need to hunt to find bulbs with a high Color Rendering Index), and a fixture with an opaque plastic diffuser (cover) eliminates any chance of stray ultraviolet. Plus, a couple of 4-foot tubes throw a heck of a lot of light at close range. I would still have had to search for a light I liked (most “daylight” fluorescents are too “blue” for my tastes) and not all colors are available in all tube sizes, so there would still have been some complexity in selection and testing of fixtures and tubes, and so what I learned from the track-lighting project wasn’t wasted (and I think is still worth reading). But I’m fairly sure it would have been less work, and cheaper, than what I did.
Anyway, if you’re interested in the full story, and what I ended up with for my first lighting system, read on.
New Layout Lighting Needed
When I started construction of the new railroad, I decided I needed more light, and without giving it much thought added new R20 fixtures with the brightest bulbs I could find, PAR20 Halogen “flood” bulbs (which gave 550 lumens per bulb, about 100 more than the old incandescents had been rated). This worked okay for construction, but as I began to take photographs that included painted backdrops, track, and foam terrain, it became obvious that I had several problems.
First and foremost, the light blue backdrop appeared too dark if I used flash (the original dark blue one was even worse), and gray if I used the halogens or incandescents. Eventually I traced this to a problem with the camera’s “auto white balance”, which was being thrown off by the large expanses of pink foam and blue backdrop, but not before I started experimenting with new lighting.
The second problem was that the halogens were less diffuse than the incandescents, creating “hot spots” (very bright areas) that were annoyingly bright to the eye, and even worse in photographs. The incandescents had a similar problem, but much less pronounced.
Finally, the power consumption was quite high: twenty fixtures at 50 Watts each is 1000 Watts, close to the 1440W that’s a safe maximum on a 15 Amp circuit. This wasn’t so much a problem with cost (the lights aren’t turned on often or for long), but I was concerned about overloading the circuit (which will be shared with the layout power and the eventual computer used for automation). It also produced quite a bit of heat, which was noticeable during warmer weather.
I could probably adjust the color problems in the photo-editing stage, but I really don’t want to have to do that for every photo, and I do want to eventually take movies as well, which I wouldn’t be able to adjust (well, maybe there’s software for that, but I’m really not interested in learning how to use it).
The obvious idea was to try some new lighting, and since modern fluorescent lights have improved significantly, I decided to consider them, even with the problems I’d have mounting the fixtures. However, I had a substantial investment in the original R20 fixtures I didn’t really want to abandon, so I also wanted to look at other options. Then I found Compact Fluorescent (CFL) bulbs for track lighting at the local home supply store, in several color temperatures, and that looked like a solution. The idea of reducing my power use to around 280 Watts and solving my photography problem in one fell swoop was an attractive one.
Unfortunately, it wasn’t quite that simple...
Photography and Lighting
Before I go too much further, I should note that I’m strictly an amateur photographer. I learned on a manual 35 mm camera back in the days of film, so I have a fairly solid understanding of basic lighting and exposure, and can puzzle my way around image-editing and adjustment software now that I’ve entered the digital age, but I’m no expert, and I don’t want to spend a great deal of time on photographs of my trains, I want to run them. But I do want to take good pictures of them, with the minimum amount of effort required to make them look good.
Note: in the end, I found post-processing to be inescapable. In fact, I’ve turned off the JPEG-generating portion of my camera. Now it only captures RAW (and more photos will fit on a card) and everything needs a minimum amount of post-processing in software, although I’m trying to keep that to a minimum.
I began my testing of bulbs without giving “color” any thought. The results, as you might guess, weren’t very good (there’s a summary of that first test below), which led me to do a lot of reading, and a more rigorous second round of tests.
For a summary of the attributes of light that I’ll be discussing in the testing, see the Qualities of Light page.
Camera Considerations
Film for “daylight” use is typically balanced for about 5500 K. On my digital camera, “daylight” white balance equates to 5200 K. My camera also has White Balance settings of “tungsten” (3200 K) and “white fluorescent” (4000 K), as well as the option to manually set it in increments of 100 K. I turned up some testing indicating that 10% variation from manufacturer specifications is fairly common, so without a photographer’s color meter, it’s probably pointless to get too specific about what color I’m trying to match in advance, and just find something that produces good results by trial and error.
What Color Should the Light Be?
Knowing that lights have a color, and that while the results depend on a high CRI, they also depend on that color, the obvious question is: what color of light is best to reproduce colors on models? Anything that is colored by reflective light (i.e., any solid object) has different colors depending on the color of the light bounced off of it (just look at the same light-colored object at noontime and late afternoon to see the difference).
A model is a reproduction of an original object. That original object had a certain color (or, more likely, colors) when viewed in daylight that people would consider its “true” colors. These would actually vary over the course of the day, as morning and evening light is much redder than mid-day light. But a model train (or building) isn’t normally viewed outdoors, so to get the same result with different color light, the creator had to select paints or other pigments that looked “the same” (likely to a well-lit mid-day photo) under a different color light than the original. That means the colors of the model were designed to look good under incandescent (or perhaps fluorescent) lighting, and probably evaluated by the manufacturer (to the extent they were at all) under incandescent or photographic light around 2700 K - 3400 K. But that’s not certain (and it could even vary by model or manufacturer).
There’s probably no single, simple, answer to this question. It seems unlikely that “daylight” (6500 K) light would create accurate colors on models, and the “cool white” (4100 K) light of typical office lighting seems like a poor choice for critical color decisions, although that doesn’t mean it couldn’t have been used. And since the original wasn’t really a specific color, but rather a range of colors, the ultimate answer is going to be subjective: does the lit model look the way you recall or think the original did? That’s the real question.
The only way to judge this is by eye. For trains, comparison to photographs of the original will help, assuming those are themselves accurate. The question I needed to ask when I looked at models under each light was “does this look correct/realistic?”. My suspicion was that 3000 K lights would look best. While that was somewhat true of halogen lights, things weren’t as simple as I’d expected. In the end I wound up with “cool white” compact-fluorescent lighting that’s in approximately the 4000 K - 5000 K range (although some places appear closer to 3500K, but I think that those are the ones contaminated by external incandescent lights). That’s a bit warmer than true mid-day light, but close to it.
Initial Testing: Evaluating the Options
When I first looked for bulbs that fit my halogen track lighting fixtures, I had to work with a subset of possible types, but for reference here’s a broader list of the kinds of lights available:
- Ordinary incandescent bulbs and “warm white” fluorescents, some halogens: 2700 K - 3000 K (a warm, red/orange color)
- Specialty tungsten bulbs and Halogen bulbs, photography lights: 3000 K - 3400 K
- “cool white” fluorescent bulbs: 4100 K (3600 K - 4900 K)
- Some “daylight” or “natural light” bulbs, including fluorescents: 4500 K - 5500 K
- Other “daylight” bulbs, electronic flash: 6000 K - 6500 K (a very cool, icy, blue)
However, ordinary “warm white” and “cool white” fluorescents typically have very low CRI values (e.g., 62), and aren’t suitable for any situation where color fidelity is important. These tend to create a greenish cast in photographs, and while that can be fixed with filters, camera settings, or post-processing, it’s not ideal. Fluorescents with high CRI values (86 - 92) are typically available at the higher color temperatures (5000 K and 6500 K). Also, I need continuously-lit lighting with a long lifespan, so typical photography lights aren’t an option (they tend to be short-lived).
Note: with newer T5 fixtures, fluorescent tubes with CRI 85 are available at all of these colors, but that wasn’t the case when I did this testing.
This meant that the ranges I could use were:
- Incandescent and common halogens: 2800 K - 3000 K
- Halogen: 3000 K - 3400 K
- Daylight or Natural: 4500 K - 5500 K
- Daylight (cool): 6000 K - 6500 K
Note: the above ranges are approximate, and lights from different manufacturers can differ significantly.
Testing Round 1
I initially tested with several “50 Watt”-equivalent R20 form-factor bulbs, both incandescent and compact fluorescent; all are “reflector floods”. The incandescent bulbs actually are 50W bulbs, and the CFLs are 14W. All produce about 400-500 lumens per bulb.
Note: photos for this and subsequent tests are provided in larger form in the Lighting Test Photos album.
Bulbs used in this test:
- Incandescent: Phillips DuraMax R20 flood (50R20/LL), 385 lumen, 2700 K - 2800 K, CRI: unspecified
- CFL: EcoSmart ES5R2142 (soft white) R20, 465 lumen, 2700 K per EnergyStar database, CRI: unspecified
- CFL: EcoSmart ES5R214235K (bright white), 420 lumen, unspecified (but likely 3,500 K), CRI: unspecified
- CFL: EcoSmart ES5R214250K (daylight) R20, 420 or 450 lumen, 5000 K (written on bulb), CRI: unspecified
The DuraMax was one of my original bulbs, the three CFLs I picked up at the store for this test.
Note: EcoSmart is apparently a Home Depot house brand, previously sold under the n:Vision name. They appear to be made by a company called Technical Consumer Products (aka TCP). The color temperature is not specified by the manufacturer, but for two of the bulbs it appears to be encoded in the model number (and for the “daylight” bulb it’s also written on the bulb itself), and for the third I found an online database (Excel download) at the EnergyStar website that listed the part number (598-833) under the n:Vision brand.
With those bulbs in hand, I made some test images with a number of objects of known color to see how they photographed in different light. These used the Auto White Balance of the camera (and as noted above, I think it got confused).
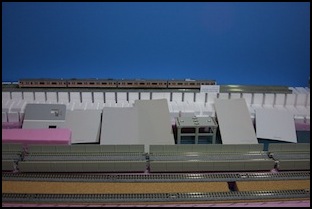
L: incandescent DuraMax R20 flood, f4.5, 1/60, 800 ASA, estimated WB 4469 K; R: CFL R20 flood (bright white) f4, 1/60, 800 ASA, estimated WB 4513 K.
L: CFL R20 flood (soft white) f3.5, 1/60, 800 ASA, estimated WB 5160 K R: CFL R20 flood (daylight) f3.5, 1/60, 800 ASA, estimated WB 5448 K
In my first round of tests, I omitted the halogen bulbs (since I didn’t like the bright spots they produced), and let the camera set the white balance (“auto” setting). The results led me to do some research, and to look more closely at the color temperature.
Note: None of the CFLs seem quite as bright as the incandescent bulb, even though their lumen ratings are higher. Perhaps because the CFLs had a more diffuse light (note the “hot spots” from the incandescent lights on the backdrop in the top-left photo). In some ways that’s a plus for the CFLs, but it does create a problem for photography due to the lower overall intensity of the light.
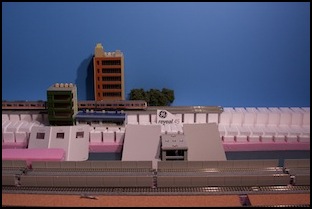
The test used a pair of bulbs to light one four-foot table (about half what I ended up with on the layout), which included the backdrop, a train with an orange stripe, and several color samples I’m considering for “concrete”, there’s also viaduct and normal track, cork, pink and white foam, and a bit of the blue-green river showing. Although I’m reproducing them here in small size, I looked at the full-size images to compare them. One of the bulbs was aimed at the center of the scene, the other 3’ off to one side, providing some sideways fill lighting from reflected light, as well as some lighting of the left edge.
I set my camera on shutter priority (letting it adjust the f-stop) with a shutter speed of 1/60 and an ASA of 800 (not all cameras work well at ASA 800, but mine does). All photos were taken with the exposure meter showing an acceptable light level. In all cases I let the lights warm up for at least 5 minutes before taking photographs. None of the photos have been adjusted from what the camera used as the default.
When I looked at the photos in my image processing software (Aperture), the estimated white balance from that software (see the captions above) didn’t agree at all with what my later research suggested it should be. It’s unlikely that the bulbs are that far off-spec, so my suspicion is that the composition of the scene (dominated by the blue backdrop) is confusing the software, and skewing the “tungsten” values higher than they really are. This likely accounts for the poor colors with the cooler bulbs.
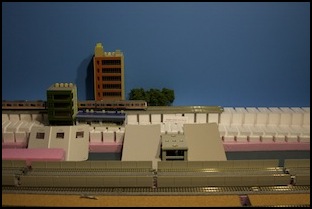
As you can see, there are substantial color shifts with the incandescent bulb, and a somewhat reddish cast to the “soft white” and “bright white” CFLs, while the “daylight” CFL has a blue cast (not obvious, unless you know what color the backdrop should be, although the pink foam shows it slightly). Part of the problem may be that the “soft white” bulbs were slightly dimmer than the others, and the camera could only go down to f3.5, so the picture isn’t as bright.
Of these, I find the “bright white” CFL to be the most natural-appearing in photographs (i.e., showing colors that look the same as what I see when taking the photographs). It’s not perfect, and the white foam shows a slight red cast, but it’s less of a problem than the strong blue cast of the “daylight” CFL. I’m guessing that that’s because it’s closest to the “tungsten” color of typical photography lighting. That’s subjective, and some may prefer the “daylight” CFL. Still, I wasn’t satisfied with this test, so I made some changes to my methodology, and added a few more light sources to the second round of more rigorous testing.
Testing: Round 2
In the second round of testing, I added a few more light sources and removed all extraneous lights from the room while taking photographs. I also used manual white balance settings (I gave “auto white balance” a try too, and it failed). The camera was set on manual, and shutter speed and f-stop were adjusted to keep the on-camera light meter as close to centered as possible for each photo. Photos were taken at a number of white balance values appropriate to the source being tested. A tripod was used to ensure the same distance and angle were used for each photograph (although I took additional CFL photos from a slightly different position and with a wider zoom).
I also used more objects in the scene being photographed, to give me other colors to compare.
Bulbs under test:
- Incandescent: Phillips Natural Light Plus PAR20 flood, 480 lumen,CRI: unspecified
- Halogen: Phillips Halogena PAR20 flood, 550 lumen, 2900 K, CRI: 100
- Halogen: Phillips Halogena R20 flood, 420 lumen, 2815 K, CRI: 100
- Halogen: GE Reveal 45 R20 flood, variously reported as 2950 K and 3200 K - 3400 K, CRI: unspecified
- CFL: EcoSmart ES5R2142 (soft white) R20, 465 lumen, 2700 K per EnergyStar database, CRI: unspecified
- CFL: EcoSmart ES5R214235K (bright white), 420 lumen, unspecified (but likely 3,500 K), CRI: unspecified
- CFL: EcoSmart ES5R214250K (daylight) R20, 420 or 450 lumen, 5000 K (written on bulb), CRI: unspecified
- Fluorescent 15-inch T8: Phillips Natural Sunshine, 5000 K, CRI: 92
The T8 was a single bulb, which was rather dim. Actually using these would require me to find a way to mount fixtures for larger T12 tubes to the ceiling, which would probably be hard to do given the obstructions and clearance issues. I also couldn’t easily find high-CRI T12 bulbs except in “daylight” (there were some 85CRI in “bright white” that might have worked).
Of the ones that provided some fidelity of color, the R20 Halogena did the best, at a White Balance (WB) of 3400 K. The Phillips Natural Light Plus bulb, also at 3400 K, looked okay (not great), and the GE Reveal 45 Halogen, again at 3400 K, looked acceptable but with a pink cast and a poor sky color. All of the fluorescents failed, although the “Bright White” (set on Auto White Balance, which seemed to equate to about 4500 K, a value I hadn’t tested) was close to acceptable (with a blue cast, and a tinge too much green). I’ll include the two best fluorescents at the end of the list,
Using “Auto White Balance” with any of the Halogens produced radically wrong results. The large blue backdrop appears to have confused it, as it set a WB of around 5000 K every time it was used, turning the sky gray.
Of these, the GE (and T8) had very poor intensity, and the PAR20 bulbs suffered from extreme “hot spotting” (not that the R20 bulb was much better); only the CFLs had a nice, diffuse, light.
The following are the first set of the second test ranked from best to worst:
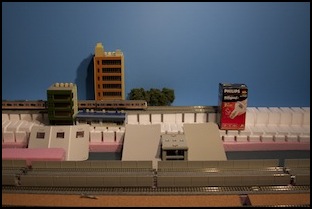
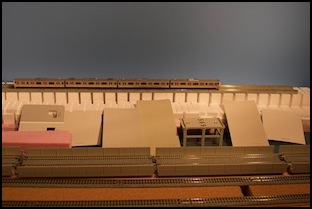
L: (best): Philips R20 Halogena f4.0, 1/60, 800 ASA, WB 3400 K; R: (#2): Philips PAR20 Halogena f4.5, 1/60, 800 ASA, WB 3400 K
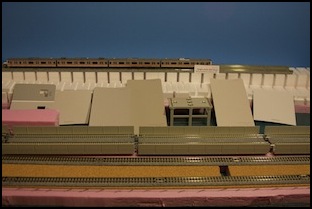
L: (#3): Philips Natural Light Plus PAR20 f4.0, 1/60, 800 ASA, WB 3400 K; R: (#4): GE Reveal R20 f4.5, 1/30, 800 ASA, WB 3400 K
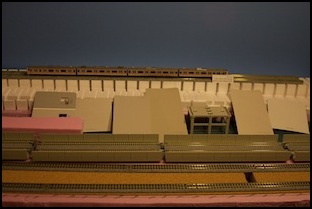
L: (#5): EcoSmart “Bright White” f3.5, 1/60, 800 ASA, Auto WB (est. 4500 K); R: (#6): Philips Natural Light T8 f4.0, 1/30, 800 ASA, WB 5000 K
Aside from the hot-spot issue, the R20 Halogena looks like the best solution for strict color accuracy. However, I did some more testing with the Bright White CFL to see if manually setting the white balance to values around 4500 K would produce a better result (I liked the more even lighting it produces, although the color cast shown above was a problem).
Testing: Bright White CFL
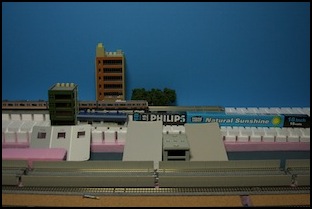
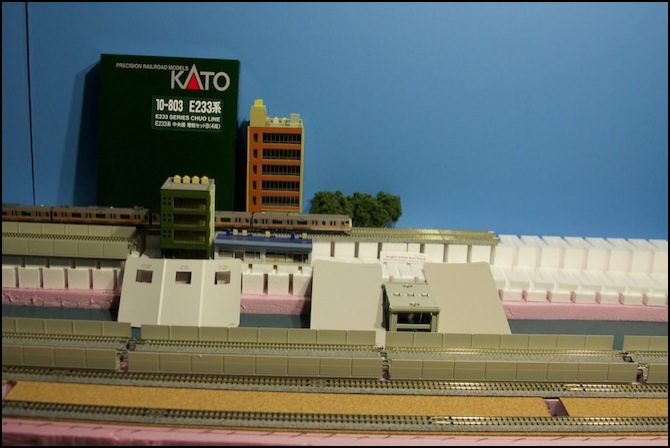
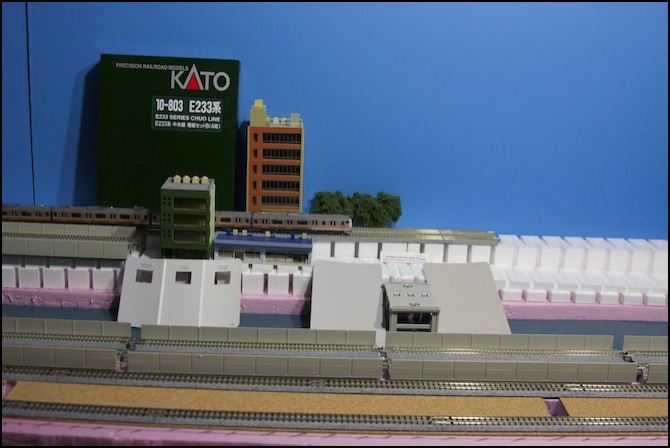
For the final set of photos, evaluating the Bright White CFL from the second test, I added a large green Kato box to the scene to make it less blue, and rearranged the lights to more directly illuminate the center of the scene with both bulbs, hoping a higher and more even lighting would help. I then took a bunch of photographs at manually-set white balances from 4000 K to 4900 K. I could probably have just taken one raw photo and played with the white balance in software after the fact, but I wanted to get a feel for how the camera worked with manually-set balances.
In person, the lighting isn’t perfect. The sky has a slightly “chalky” light blue color, like a mild overcast, which is close to what I wanted. The white foam has a very faint pinkish tinge. However, the dark greens and the red/orange brickwork, as well as the orange stripe on the train all look “right”, and the light-blue/dark-blue building looks good. The cork looks correct also, as does the gray of the unitrack and the viaduct left of the green building (the viaduct in the foreground as a reddish tinge, which it seems to be picking up from the cork in front of it.
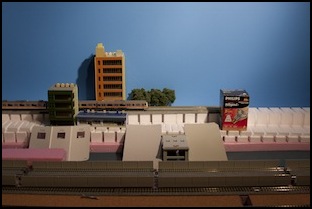
EcoSmart “Bright White” f4.5, 1/30, 800 ASA, WB 4100 K (software says “4030 K”)
Of these pictures, the 4100 K and 4200 K looked best, with 4200 K having a very slight tinge I didn’t like. The 4100 K (above) doesn’t exactly replicate what the eye sees, as the greens come out darker, and the pink foam is slightly pale. There also appears to be a tinge of green in the viaduct gray, but the even to the eye it isn’t exactly a normal concrete color.
Testing Summary
In the end, the best color fidelity came from the Halogen R20 flood, with a white balance around 3400 K (a normal “indoor” setting). But the hot-spotting was a significant negative. None of the high-CRI fluorescents gave good colors at any white balance value I tried (all were too blue, likely due to their higher color temperature than the environment the models were intended to be viewed in).
The Bright White CFL, while most likely having a CRI at the low end of acceptable (which probably accounts for the problem with dark green in the photo above) seems to me to be fairly good. It provides good color accuracy on the blue, orange, pink and gray objects. It also gives the backdrop and river surfaces colors close to the original. I’ll need to manually set the white balance when photographing it to 4100 K (Auto White Balance guessed around 4500 K, which didn’t look as good) or make sure I have a gray swatch in the photograph to calibrate it, but that’s a relatively minor price to pay. It’s interesting that something with a white balance this high gives nearly as accurate colors as the 3400 K halogen. I suspect the reason lies in the very different kinds of spectra produced by the sources (and maybe in some good choices by the model painters for pigments that would look good under a range of lights).
While 4100 K is close to the “white fluorescent” setting on my camera (4000 K) I saw sufficient variation between the two that I’ll actually use the manual mode to set 4100 K when I take photographs.
After thinking about it for a couple of weeks, I eventually replaced the original bulbs with the CFLs. One the plus side these produce an even, good-color light that’s bright enough for most photography. On the minus side, the bulbs weren’t cheap and I had some concerns about ultraviolet that led to more work.
Note: I later found 4100 K not to be very accurate (the pink foam and blue sky may have been misleading my eye, both in these tests and later, as things changed once I had real scenery and backdrops). I eventually settled on adjusting white balance for all photographs in software, something I could do since my camera is an SLR that can output RAW images. This tends to end up with white balances around 3500 K, but there’s significant variation depending on the scene.
Later Conclusions
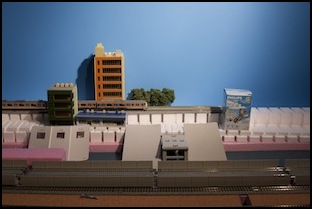
After I’d done these tests in January of 2010, construction proceeded and I noticed that my “4100 K” photos didn’t look very accurate. The pink foam and blue sky may have been misleading my eye, both in these tests and later, as things changed once I had real scenery and backdrops. I eventually settled on adjusting white balance for all photographs in software, something I could do since my camera is an SLR that can output RAW images. This tends to end up with white balances around 3500 K, but there’s significant variation depending on the scene and some end up looking best close to 4000 K. I took the 4100 K test photo above and performed that kind of post-processing on it (long after the original tests), ending up with a 3600 K white balance, and the result is shown below.
As seen here, it makes the backdrop too blue. I think that’s because the CFL tends to emphasize blue. Since I’ve switched to photo backdrops, this is less of an issue, and it’s offset by more correct (at least to me) colors on non-blue objects.
EcoSmart “Bright White” f4.5, 1/30, 800 ASA, WB manually post-processed to 3600 K
Another thing I noticed retroactively is that most of these test photos were too dim. I fixed this in later photos by adjusting exposure. Most of the original tests were done at 1/60-second exposures, and I now routinely use 1/30-second (or longer with a tripod) and also adjusting exposure in digital post processing (which I can do since I use RAW images). I can get away with that in part because I have an image-stabilized camera. But it’s clear that for photographic purposes my designed “500 lumen per foot” lighting is really inadequate, although it looks fine to the eye. See the Second Thoughts section at the bottom of this page for a comment on that.
Addenda: CFLs and Ultraviolet Light
There is conflicting information online about fluorescent lights and ultraviolet (UV) light emission. After reading a number of contradictory statements, I did some digging. And what I found was that even the authorities contradict each other, but that there is recent evidence that some fluorescent lights, including CFLs, do produce a harmful amount of ultraviolet (UV) light.
All fluorescent lights use UV internally. This is a consequence of how the bulb produces light: mercury vapor or amalgam is ionized by an electric current, this emits UV, which is absorbed by the coating of the tube, and re-emitted as visible light. Depending on how the coating is made, some UV may leak out. What’s less well known is that Halogen lights, and even incandescents, also produce UV. Both produce a fairly minor amount compared to sunlight, but can still cause fading in painted objects and dyed fabrics.
Modern fluorescents have been engineered to minimize the amount of ultraviolet emitted, in part because this is wasted energy (UV is invisible, and the purpose of a bulb is to produce light that can be seen). Older fluorescents produced more, and in straight-tube fluorescents there was often a clear area at the end of each tube, where a significant amount of UV could escape. As an interesting statistic: typical office fluorescents c. 1993, when used in an open fixture without a diffuser (which would absorb most of the UV) produced a UV exposure in eight hours equivalent to one minute of mid-day sun. In other words, not a lot.
In terms of the amount of light produced, a CFL is reported to produce “50-140 microwatts per lumen” of UV, or worst 59 milliwatts per CFL bulb. An incandescent bulb can product “over 100 microwatts” per lumen, so they are roughly equivalent. This suggests that the risk of color fading for CFLs is roughly the same as for incandescents.
However, that’s not the full story. A separate report notes that CFLs that have an exposed fluorescent tube (as opposed to the tube being contained within an outer, frosted, bulb) can emit a much larger amount of UV. Enough in fact to be, “equivalent to that experienced outside in the UK on a sunny day in the summer”, and considered hazardous if used in close proximity to a human for extended periods. The encapsulated form of CFLs “do not emit significant amounts” of UV according to the same report.
So, if you use fluorescents for lighting a layout, it is probably a good idea to either use a fixture with a plastic diffuser in front of the bulb (for tube fluorescents) or to use the enclosed form of CFLs. You can also get Ultraviolet filters for some light fixtures (although I couldn’t find any for the R20 fixtures I use) that go in front of the bulb, to block any UV that gets out of the bulb.
Since model railroads are not illuminated continuously (at least not normally), and UV from most modern bulbs is relatively low, special UV filters are likely not required if these basic precautions are taken.
“Fixing” the UV Problem
I’m not sure I even have a UV problem, but I won’t know until years from now when the paint on my buildings and trains has faded if I do. So I looked for ways to block any UV that might get out of the CFLs I am using. My solution was to use a protective gel (actually plastic) filter designed for studio lighting applications (Rosco UV #03114 2024). This is a very thin plastic sheet, which I was able to buy in a 20-inch by 24-inch sheet from a photography supply store for only a few dollars. Then came the problem of how to attach a square of it to the track lighting fixture in a way that would allow replacement of the bulb (I was tempted just to superglue it to the front, and replace it if/when the bulb failed, but I decided to be more creative.
The solution came from a fixture designed for recessed ceiling lighting, which had a plastic circle with spring clips just the right size to clamp to the fixture. Simply unsnap the central cone, glue a square of gel to the front, and done. I actually chose to cut a small square of acrylic, glue the gel to the fixture, and then glue the acrylic in front of it, as the gel alone was quite fragile. This takes quite a bit of work (mostly cutting the acrylic), but the end result should be worth it. I only got part of the layout done before I set this aside to finish later, but it’s the River Crossing part with the most scenery right now.
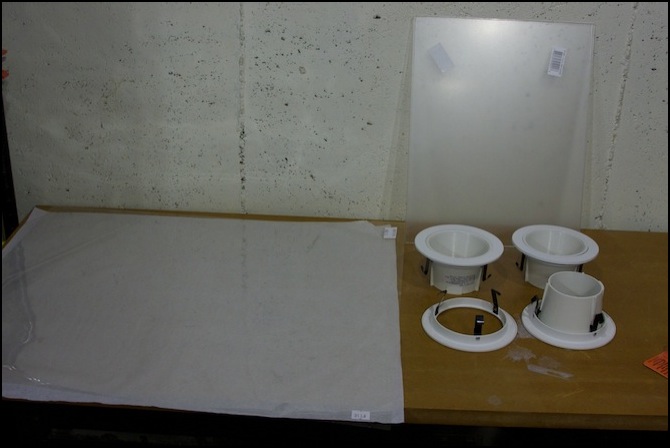
UV filter material (left), acrylic sheet (right rear), and recessed lighting fixtures (right front)
The UV filter material is easily cut with scissors (the hard part is keeping it from crumpling, as it’s very thin). Cutting the acrylic is like cutting any kind of plastic: it’s easiest to scribe it with several passes of a sharp knife (I used a scribing tool designed for this purpose) and then snap it against a straight edge of a work-table or similar. Rather than make a circle, I made squares and then cut off the corners (scribe, then snap with pliers). The acrylic looks opaque in the above photo because it has protective plastic on each side; this needs to be peeled off, but I left that as late as possible to avoid scratching the surface.
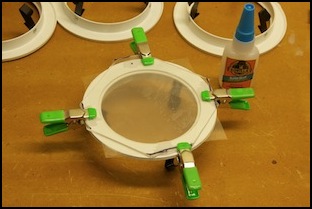
Once both are cut, the UV filter is super-glued to the ring with four small drops and held in place until the glue sets, then four more drops are placed on the ring (where it’s not covered by the filter) and the acrylic (with the protective plastic removed) is clamped to it to set (which takes a couple of minutes).
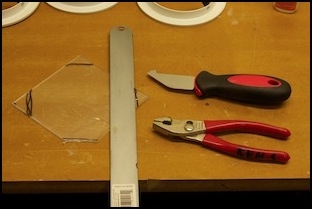
Scribing the acrylic (L) and gluing (R) the acrylic, filter, and clamp together.

Filter assembly clipped to light (L) and filtered lights mounted above layout (R).
I think I’m done with the lights (although I’m not yet done with making filters: it’s slow work and I’m in no hurry to finish).
This was sufficient work that I’m regretting not working out a way to use 4-foot fluorescent tube fixtures up front. It’s a bit late now. On the plus side, now that all this is done, the light is pretty good for photography, so at least the work was worth it.
Second Thoughts
If I had it all to do over, I’d take a very hard look at T12 fixtures. A single 4’ T12 can put out 2,835 lumens with a CRI of 82. If I wanted to use 8’ tubes, there are some with a CRI of 92 and 4,650 lumens available from Phillips. That’s about 3x to 4x my current lumen level, so those could be even better for photography. It’s also less electricity. A single T12 bulb is 40W for 4’ or 75W for 8’. My current lights are 14W each, or 56W per 4’ with four bulbs. I can get 1.5x the light for 67% the power with a single 8’ bulb. I may lose some due to the diffuser and reflector (a tube isn’t directional the way my R20 bulbs are), but it’s probably at least close to the current lighting.
I think what I’d really want is a real valance with two separate 8’ bulb fixtures. I could turn one on for normal operations, and turn the second on for photography (allowing for faster shutter speeds or more depth of field). That’s something to remember for the next layout.
Note: this is a bit dated although the numbers for light quality and intensity haven’t changed, newer lights are much more efficient and T12 fixtures and bulbs are being phased out by the industry. T8 is now the standard size, but T5 is in many ways superior and can produce 2,900 lumens at CRI 85 in a 4’ fixture with just 28 Watts. Also, I have decided to make use of the new 4’ T5 lights, and that’s documented on the Lighting Valance page.
