


Detailing a Kato Commuter EMU
The Kato E231 series commuter EMU models are essentially ready-to-run, with only two small antennas to add to each cab car, and some route destination and other stickers to add to the cars. However, while the cars come with interiors molded to look like the benches of the real trains, these are made of a beige plastic, and unlit. Kato sells lighting kits, but these just highlight the beige interiors. There’s some work to be done here.
Adding the Kato interior lighting is described on my DCC Ready Kato EMU page. This is relatively straightforward. The updated version is described on my Kato Interior Lights page.
Opening the Cars
The first step is to take off the body. Other than the cab cars, this is trivial. The floor assembly snaps into the body, and all you need to do to release it is to gently spread the body from the bottom. Hold the car upside down in one hand, and use fingernails of two fingers on the other to spread the sides just towards the middle from one wheel assembly. The floor will pop free on one or both sides, and a little gentle encouragement will get both free. Then work towards the opposite end to free the whole thing. Putting it back together is just the reverse, with a little extra care to avoid moving the lightboard or the plastic diffuser if those were added.
If you want more detail on this, there's a long write-up with photos on the EMU Disassembly page, but that also covers removing things you won't need to remove for interior lighting.
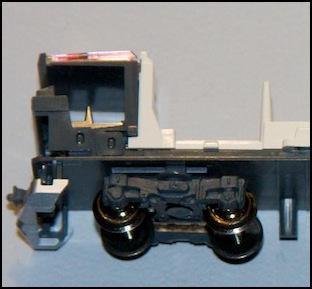
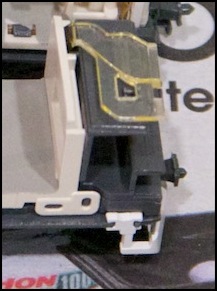
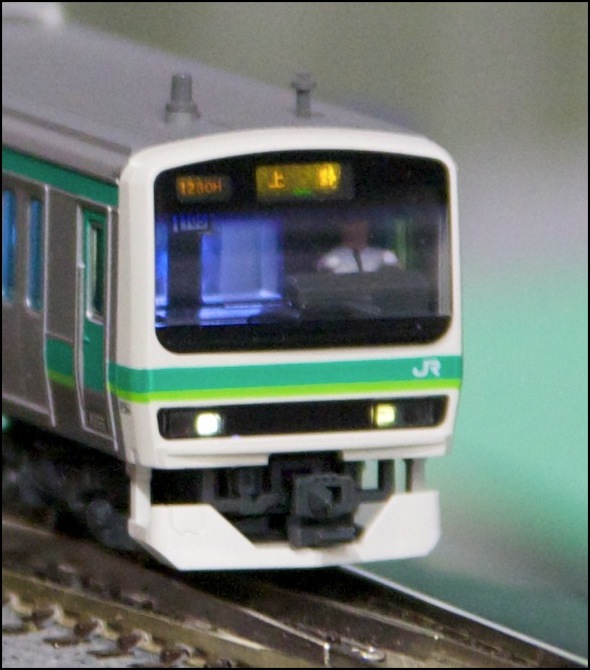
The cab car is a bit more trouble. As you can see in the photos above, the cab has a top section. This includes a formed piece of transparent tinted plastic that acts as a light pipe to the destination sign for the LED that operates the head/tail lights (or perhaps there’s another LED). The two front prongs of this sometimes catch in the slots of the destination indicator (which is part of the roof assembly). If the body comes free except at the very front, this is the problem. Sometimes you can free it by pushing the roof assembly forward relative to the lower part of the train, but sometimes it just stays stuck. The solution is pretty simple: pop off the front of the cab: it’s attached to the roof assembly (see photos below), but can be pried off with your fingernails; caution, it’s reluctant to come off but don’t force it, just keep prying gently and it will work free.
Once the cab front is off, you can stick a flat jewelers screwdriver into the slot and gently push the light-pipe out the back, and then the roof assembly should come away. When the roof is off is also a good time to add the interior lighting, as described on the Kato DCC Ready EMU page (you don’t need to add the headlight or motor DCC at this time, as those use hatches that are accessible without removing the roof. But if you want to install the interior light DCC decoder, it replaces the interior light board (you still need to buy the lighting kit for the other parts), so this would be the time to do that. Note that Kato’s interior lights will work just fine (if a bit bright) on DCC without the expensive DCC board, you just won’t be able to turn them off. I skipped the DCC board, which is going to save me a couple of hundred dollars per train.
About the Kato Stickers
Kato includes a few stickers for their commuter EMUs, including destination signs. There’s an illustration showing exactly where to place these on the pamphlet that comes with the train. What the instructions don’t make clear (well, maybe they do if you read Japanese) is that these are not water-slide decals or rub-on transfers, but stickers that need to be cut out and peeled off the paper backing.
These are made of thick plastic, so it’s hard to cut them out with a razor knife (it didn’t work for me, but perhaps I needed a new blade). I ended up using a pair of very good scissors that can cut a clean, sharp line through heavy paper. I also used an X-acto knife as a prying tool to separate the edge of the sticker from the backing paper, bent-end tweezers to carry and place them, a pointy tool used with soldering to poke signs into recessed spaces, and the plastic screwdriver Kato supplied as a burnishing tool to rub down the stickers that were applied to recessed windows so they had no air bubbles. This was a lot of work, but once I got used to it, I could do a complete car (four stickers) in about 15 minutes.
Adding a Driver and Front-Panel Sign
Inside the cab is a molded seat and control panel (the triangular black plastic in the middle of the left photo above is the seat back, and the black bump in front of it is the control panel). A driver figure can be added if you remove the legs from a seated figure (such as one of the drivers in Kato’s Motorman/Conductor sets: 24-273, Winter Clothes/Beige; 24-274, Summer Clothes/Dark Blue; 24-275, Summer Clothes/Light Gray or 24-276, Winter Clothes/Beige). I used the dark blue set, and put drivers in both cab cars; not prototypical, but it means either end can be the “front” of the train.
I used sandpaper held in tweezers to rough up the smooth plastic of the seat, then applied Woodland Scenics Accent Glue (a form of white glue suited for plastic figures, among other things), let it sit until it became tacky, and then carefully placed the figure and set the car aside for several hours to dry.
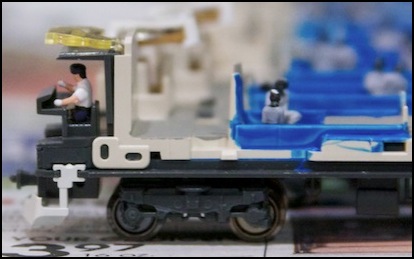
The photo above shows the cab with the driver installed, and some passengers on the painted benches in the main part of the car.
The photo below shows the four parts that make up a cab car (the body comes apart into a number of other pieces, but disassembling it isn’t required). In this photo the destination sticker has been added to the window, and a driver installed in the cab. Note that the sign, which is one of the stickers supplied by Kato, is applied to the front of the window in this photo. I later decided that it was better to apply it to the front of the roof assembly so that only the two lit portions showed through the untinted part of the window. Also note that the little tab that descended below the brown part of the sticker is a train number, and should be left on (it’s missing in this photo, but present in the big one below).
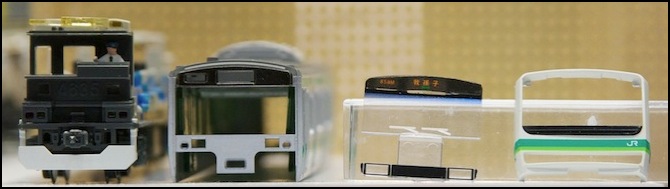
Elements of the Cab (L to R): body with cab, roof assembly, window, cab surround
Finished Cab Assembly
Painting the Interior and Adding Passenger Figures
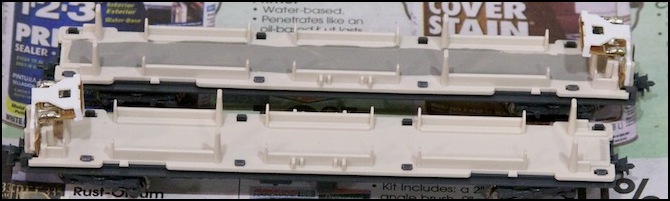
The beige floor molding is quite visible once the interior lighting is installed, and this only highlights how unrealistic it looks. A little paint goes a long way in creating an impression of a more finished interior, and had the effect of dimming the light, which is needed. I couldn’t find a reference photo of the specific train I was painting, but several different ones used blue upholstery, so I went with that, as shown in the photo below. I also used gray to darken the floor area from the default beige, but I left the uprights and ends of the bench seats beige. Some newer trains have yellow textured flooring in front of the doors, to make the exit clear to visually-impaired passengers, but this is missing from the E231 photos I could find.

Interior of a commuter-style “Suburban” E231with along-the-wall seating
Photographer: Cassiopeia_sweet
The following photo contrasts the original look (bottom of the first photo) with the addition of some gray paint for the floor. The paint was applied carefully, to avoid getting any down the clip holes (black dots on the beige floor) where it might interfere with the electrical pickups or the wheel assemblies. Since the edges won’t be visible when the roof assembly is added, I didn’t paint the very edge, although I did paint the backs of the seats where they might be visible through windows. I used Tamiya Flat Gray acrylic for the floor, which worked well. I used a different paint for the seats as I didn’t have blue Tamiya paint, and it didn’t come out as even, despite multiple coats. The next train will get Tamiya blue (or green, as used in some trains) as it covers adequately with just one coat, which is much less work, although I may mix in some white to lighten the color. On the other hand, “even” coloring really isn’t required; you can’t see that kind of detail through the windows. As long as there are no white spots, it’s good enough.
Two E231 cars, one with a bit of gray paint
And with more gray for the door areas, as well as some blue “upholstery”:
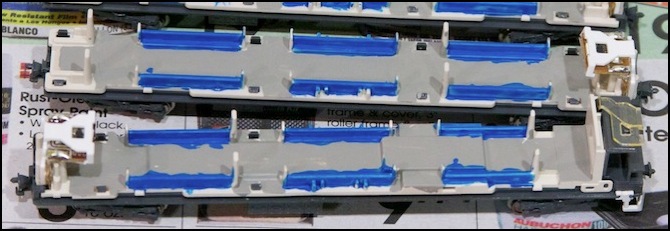
Two fully painted E231 cars
Note how the cab car (lower car in the above photo) has a higher floor, particularly in the portion to the right where the decoder fits beneath the floor. This meant that “seated” figures needed to have all of the legs removed, rather than just some, and be glued to either the raised floor or the seat backs (or both). The motor car is even worse, and has no molded seating. I painted blue where the seats should go, but just cut off all of the figures below the torso and glued those to the floor.
From any normal viewing distance figures inside the train can’t be seen in detail, and with light coming from the lightboard and light-pipe in the middle of the car they’re somewhat silhouetted. So rather than spending the money it would take to install hundreds of painted figures, I used sets of unpainted Preiser figures (such as PR79007, 120 Seated Persons, and PR79008 120 Unpainted Passengers, which mixes seated and standing passengers; both are US$36 list but available for less from many stores). These are 1:160 rather than the 1:150 of Japanese N-Scale, but it really doesn’t matter in this application, they’re close enough.
An alternative I could have used was a set of painted figures from China via the Ebay store Everydaygoodz, which sells packs of simple and somewhat brightly-painted figures 1:150 (and 1:160) figures at very low costs (currently below US$25 for 500 figures). I learned about this from an old posting on the JNS Forum, after I’d already bought my first sets of Preiser figures. I haven’t bought from them, but others have reported doing so without any problems. These don’t have detail, but they do have color, which is probably going to be more visible here. I’ll probably try these for a future train. One problem is that these lack seated figures in large quantity (one thing that attracted me to the unpainted Preiser set), so you have to cut the legs off entirely to have seated figures, but that’s probably not a big problem.
After washing my unpainted figures (still on the sprue) with mild soapy water and a toothbrush, then rinsing to remove any mold-release chemicals and letting them dry, I spray-painted these with flat gray model paint as a primer coat, then set them aside to dry.
Later, I painted the heads black, to provide a bit of contrast for “hair” (I didn’t worry about precision), but I didn’t bother with more; if the end result doesn’t look good I might do more painting on future trains, but I expect this will be sufficient for my needs. Then I cut figures from the sprue as needed, removed any bits that would be a problem when gluing the figure in place (flush-cutting clippers are a very useful tool here), and glued the figures onto the bench seats (using the same WS Accent Glue as with the driver figure). I had to cut off most of the legs below the knee, due to the non-scale height of the floor, but you can’t really see the legs anyway. Those were left to set overnight, and then I glued standing figures into the doorway areas.
One downside to cutting them off the sprue at the last minute is that the attachment point (typically the top of the head) turns white where the plastic is exposed from the cut. A quick dab of black paint was needed to fix this as it was otherwise somewhat visible through the window on the seated figures.
The standing figures needed more “adjustment”, as there is only about 8 mm available between the floor of most cars, and the overhead transparent light-pipe (this is the height of the uprights on the floor molding, so that’s a convenient reference). All standing figures had the legs below the knee removed (female figures had legs below the skirt removed, as that provided a good base for gluing) and the resulting surface rubbed against fine-grain sandpaper a couple of times to smooth it. Adult male figures were tall enough that in most cases the head had to be removed also, but since the figures are placed near the center of the car, and the head would have been above window height anyway, this isn’t visible.
Glue was applied and left to dry for about a half hour before placing the figures, to allow it to become quite tacky. Trying to install the figures too soon leads to them falling over, which is really hard to fix once you get glue on the sides of the figure and your finger tips. Patience is called for here.
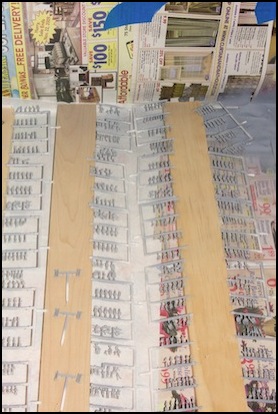
Each car received about 12 seated figures, and around 6 standing ones (the cab cars and motor car didn’t get standees, due to the very high floor height). All told, the 10-car train took about 150 figures.

Cars with seated figures, before adding standees (except a couple)
External Details
Before you put the roof back on the lower section, there’s a bit more to do, and it’s much easier with the train apart.
In addition to the destination sticker on the front, each cab car has two antennas that need to be added to the roof. These are really hard to get in. I finally did it by placing the roof assembly on my workbench (separate from the train so it couldn’t move, and carefully positioned each item using tweezers. When they’re correctly positioned, a firm (but not hard) push of a finger will seat them. Note that the smaller one has a thin bit that’s smaller diameter than the main shaft. Don’t cut that off by accident (I did; fortunately there are spares). You can see the results in the Finished Cab Assembly photo above.
If you have a very small diameter tube that will fit over the end of the object, that can be used instead of a finger to push it down. I didn’t have a tube small enough for the smaller antenna, but I did have one that fit the larger one and it worked very well (positioning was still important, the tube just makes a convenient handle to push with.
Note: some Kato trains come with a small tool for installing these on the same sprue as the antennas, but my E231 wasn’t one of them. If you get one, save it.
Besides that, there are a pair of stickers for each side of each car. A small one goes in the route window in the middle of the train (just set it into the slot with the tweezers, then push it into place while holding the window plastic in position from behind with a fingertip.
Assembly and Testing
Before putting the cars back together, I placed each on the track to check the lightboard function. In some cases it had been bumped and needed to be reseated. It’s also important to confirm that the top of the lightboard assembly is horizontal (sometimes it gets tilted down). After you reassemble things, if the lights flicker when the train is stationary, the lightboard is not making good contact. If they flicker only when moving, that’s normal, and there’s not much you can do about it (I have some ideas, but they involve capacitors; that’s a project for another time).
Note: if only one end of a car is lit, the problem is that the lightboard isn’t properly aligned with the diffuser (the long bit of clear plastic installed with the light board). Either you cut the diffuser too short and the end isn’t near the lightboard, or perhaps you left it too long and the two hit, rather than being close but not touching.
The results of all this are cars that are fairly empty by Japanese train standards (but I didn’t feel like trying to pack around 200 figures per car to represent a rush-hour crowd, even aside from the cost). Still, they provide a reasonable crowd for an off-peak train, and it’s a vast improvement over an unrelieved beige interior. I may tried the painted Chinese figures mentioned above for my next train, both to add more passengers and to have a bit of color.
Summary
So, was it worth it? Definitely. An unlit train looks “wrong” to me. The dark windows could represent heavily-tinted glass on a sunny day, but it just doesn’t seem right. At the same time, lighting without an interior is too bright on DCC voltage, and what little interior detail exists wasn’t at all obvious without paint. That said, the result seems too “blue”, and I’m thinking I might need a more muted seat color, although perhaps painted passengers would add sufficient variety.
The following video contrasts unlighted, lighted, and lighted with figures trains. Note that the flickering of the lights is most pronounced on uneven track, and seems to stem from problems in the wheel pickups (and perhaps is due to the cars being too light; I discuss this a bit on the adding lighting page).
