


Solderless Wiring
I don’t particularly like soldering. It’s the right method for things that are under mechanical stress like DCC decoders, or track feeders which are relatively difficult to access for repair. But for wiring inside a building for lighting, where currents are low and you don’t want to risk melting the model or have overly obtrusive wires visible from the outside, I’m looking at doing something a bit more subtle.
The two key parts of this plan are self-adhesive copper foil tape and conductive glue. The copper tape is sold for use in electrical shielding or circuit-board repair, and comes in a variety of sizes, although for my purposes 1/4” (6 mm) and 1/8” (3 mm) are what I most likely would use. The glue comes in several forms with varying properties and cost.
Note: if you want, you can make your own conductive glue and paint. Personally, that sounds like too much work as the commercial stuff is cheap enough.
One of the concerns I needed to address for my own peace of mind was what kind of current the foil tape and glue could carry, and how much it would heat up when doing so. This is a particular issue when working with building lighting or under-street feeders when the streets are made of sheet styrene. This all comes down to resistance really; if the resistance is low, voltage loss will be low, and thus power dissipation (heating) will be low. If it’s high, heat, melted plastic, and at worst fire could result.
Credit where it’s due: I learned about foil tape from a posting about adding lighting to buildings by Inobu on the JNSForum, and about conductive glue and paint from several postings by Jeff (cteno4). Bernard has done some interesting work wiring lighting inside buildings using copper tape and LED Strip lights (he’s using solder to attach tape to the LEDs before installing them though).
Suppliers
I’ve linked a few typical suppliers below. That’s not intended as an endorsement, just the ones that came up first in a search or which I’d normally use for convenience reasons. Some of these things may be available at a better discount if you shop around. And in unlikely places: for example both copper tape and conductive paint are used by guitarists to add noise shielding to electric guitars, so a music store or supplier might have them.
Copper Foil Tape
This is relatively inexpensive, and sold in a variety of forms. I specifically bought the kind with conductive adhesive (the version sold as a garden slug repellant may not have this) but it’s still only $13 for 100 feet of 1/4” tape on Amazon. The 1/8” size is harder to come by as it’s not a standard 3M size. I found some in a local electronics supply store, but Amazon doesn’t list it, and Digikey says it’s a non-stocked product (which seems to imply that they can order it). You could just buy the larger version and cut it down as needed, since it’s most useful for in-building wiring, which is going to be short.
Copper tape, the good stuff anyway, is a 3M product with a conductive acrylic adhesive that will bond to plastic and other substances. Technical information on it is lacking, so I did some testing to characterize its resistance and ampacity for my applications. However, this is primarily intended for use in electromagnetic shielding and low-power circuit board repair applications, so it probably can’t carry a lot of current. I don’t expect an individual building to need more than 100 mA, but used as an under-street feeder for several buildings (one of my planned uses) this could be problematic, although testing suggests that it will work fine in this application.
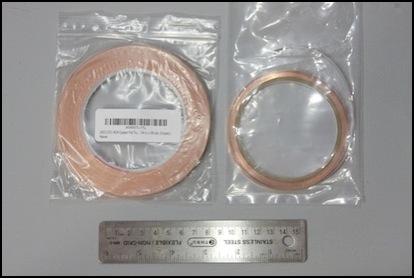
Copper Tape in 1/4” (left) and 1/8” (right) spools
Conductive Glue
There’s more than one kind of glue/paint that can conduct electricity. Wire Glue, available from many sources, is a water-based glue (some kind of PVA, I think) that has conductive material (carbon of some form, probably graphite) spread through the glue. It’s water-soluble, although I don’t know if that’s still true once it dries. Still, you probably shouldn’t use it where you’re going to be adding water-based scenery.
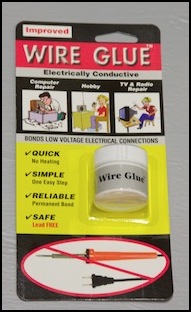
Wire Glue, used to attach lead to foil tape
One drawback is that it takes several minutes to set up, during which you have to hold everything in place (and it tends to run, which means the surface has to be level) and curing takes about 24 hours. On the plus side, it cures at room temperature and it’s very cheap.
One tip I’ve read is that once it’s dry, you can coat it with super-glue to make a stronger bond. However, that’s risky in a building or railcar model, as super-glue will cause the windows to craze (become opaque) due to the vapors it emits. There’s probably some interval after which that’s no longer an issue, but I don’t know that for certain and from what I read super-glue can emit fumes strong enough to damage plastic long after you stop smelling it.
The other main form of a conductive glue is Silver Epoxy. This is expensive stuff, and it needs heat to cure properly which makes it problematic for use in plastic models. It will cure in a warm room (75°F/24°C) in several hours, but otherwise requires the use of a heat gun or blow dryer. It will cure eventually at lower temperatures, but will have a higher resistance when it does than then heat-cured version.
Conductive Paint
An alternative to foil tape is conductive paint. I don’t have any experience with this. It’s available in aerosol form too, although I’m not sure how useful that would be. More useful, but quite expensive by volume, is a pen that draws conductive lines. As with copper foil, the principal use is shielding, and the one spec sheet I found listed much higher resistance than copper foil, so this probably isn’t a very good choice (but it might be useful for short spaces where tape or glue was unsuitable). I don’t have any immediate plans to use it.
Another form of conductive paint is sold by Bare Conductive in the UK. I don’t have details on it, but it appears to be similar to Wire Glue in that it’s a black material and non-toxic (it can be used on skin!), however it reportedly dries in just five minutes. This is available in both pen form and for brush-painting. I have not yet tried it.
Testing a Circuit
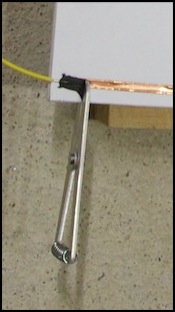
I built a simple test circuit consisting of 10” (25cm) of 1/8” (3 mm) foil tape attached to a sheet of styrene, with two short 22ga leads glued to it, allowing the glue to set for 16 hours. I clamped the leads to the foil while the glue dried to ensure a smooth bond, and had about 1/4” (6 mm) of lead touching the foil, liberally coated with the wire glue. I left the clamps on during testing to eliminate any risk of pulling it apart, which might bias the tests somewhat, but probably not significantly. Checking this with my multimeter showed less than 0.1 ohms of resistance (the minimum my meter will show) end to end.
Then I set up a 2 Amp, 12V DC power supply and connected it to a 180 ohm, 2 Watt, resistor. When power was applied, I measured a 12V drop across the resistor (as expected). Per Ohms law, this means that a 67 mA current was flowing through the circuit, dissipating 0.8 Watts across the resistor. My IR thermometer showed the resistor rapidly heating to about 90°F (32°C) due to this power dissipation (the reason I’d used a 2W resistor). All tests were left to run for 5 minutes.
Note: I did this testing on a concrete floor just in case flames ensued. The resistors get hot too: see the small white breadboard with the gold power resistors on it in the picture below? The top of it melted into the outline of the resistor used in my 1.2A test.
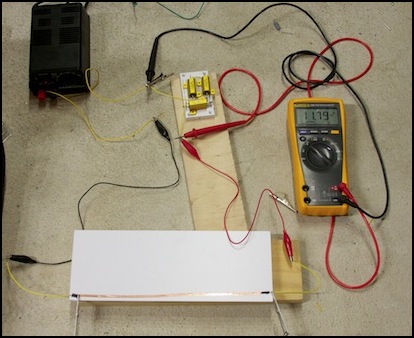
Test Circuit with 3x 10 Ohm, 25 Watt resistors
I then connected the foil circuit into this loop, in series with the resistor. With 67 mA flowing through the foil, I detected no perceptible heating of the foil or glue after several minutes (less than a couple of degrees above ambient; the error range of my thermometer), while the resistor again went to 90°F. This is in line with the very low resistance noted, but also indicates that the resistance does not rise significantly with that scale of current. And that means that even this narrow foil is more than adequate for wiring a 6-8 floor building equipped with 8 mA surface-mount LED strips (one per floor).
Next I tried some testing using a set of 10 Ohm, 25 Watt resistors to permit higher currents. First with 30 Ohms, creating a 400 mA current (4.8 Watts power dissipation). The resistors heated to about 115°F (46°C). Then with two resistors, creating a 600 mA current (7.2 Watts), which heated the resistors to 142°F (61°). Finally with a single 10 Ohm resistor, creating a 1.2 Amp current (14.4 Watts), with the resistor heating to 340°F (171°C). In all three cases the foil tape carried the current for five minutes with no apparent heating (the third test might have shown a 4 degree increase over ambient, but several readings showed none so that’s probably not the case).
The conclusion is that even the 1/8” foil with glued connections carrying a substantial current for a LED lighting application is more than adequate for use in plastic buildings, and probably even sandwiched between two layers of plastic. That’s a very positive result, and is going to simplify my building and street lighting.
Follow-up
A year plus on from the test described above, the sheet of styrene has been sitting atop my very cluttered workbench, getting bumped and shoved around by other work. The copper tape has started to peel away from the styrene at one end, which tells me that the glue isn’t all that reliable, and a supplemental bond may be needed in places where the tape isn’t held in place by other things.
However, the wires are still solidly attached to the copper tape by the Wire Glue, even where the whole thing has peeled away from the styrene. I’m very impressed, as I expected that to be a fairly weak joint, but it’s not too weak. I have noticed in other work that if you use too thin a solution of wire glue, the glue will just run off the copper due to surface tension. You need to ensure that there’s enough of the solid stuff (which tends to settle to the bottom of the jar between uses) when you daub it on to make a good joint.
I eventually used this tape and glue procedure for the bus that supplies power to the lights on my elevated expressway, and for the pickups on the underside of the individual sections. For some pictures showing the construction of these, see my JNS Contest 2011 page.
