


Estimating Intensity
Light sources are measured in lumens of output. Light levels, as noted above, are usually measured in the metric unit of lux, although some older U.S. texts will use the English unit of Foot-candles. I’m going to work in lux, and most sources online use lux. However, if you really want to work in foot-candles, you can. A foot-candle is 10.764 lux, but typical lighting numbers are only approximate anyway, so just divide lux numbers by 10 to get a rough foot-candle number (e.g., good room lighting of 250 lux is about 25 foot-candles).
A lux is, technically, one lumen per square meter (a foot-candle is one lumen per square foot), and you can estimate lux from lumens with a bit of math, but this depends on knowing how the light reaches the surface being illuminated, which depends on a lot more than distance. The math is trivial: lux = lumens divided by area (in square meters). If you know what your surface area being illuminated is, you can approximate your lighting level based on your sources.
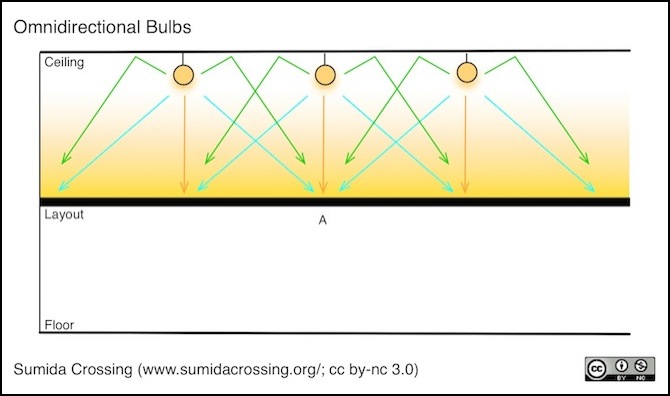
If your light source were a bare spherical bulb hanging from the ceiling (i.e., a typical cheap basement light), a 100W light bulb producing about 1600 lumens, hanging 4’ (1.2 m) above the layout is illuminating a sphere of radius 1.2m and an area of about 18 m^2. Thanks to this handy calculator, we can see that this produces about 88 lux directly below the bulb. However, off at a 45-degree angle from the bulb (i.e., 4 feet to the side of the point directly under it) this drops to just 44 lux due to the longer distance. Some additional light would reflect off the ceiling, although in a typical basement of dark wood, that wouldn’t be a large portion, and it would have a much longer distance to travel. I’ll ignore it here, but with a white ceiling it could be a more significant source.
There’s one other factor: with enough bulbs, light from more distant bulbs is also making a contribution. This falls as the square of the distance, so it’s not a large amount, which is why I’m only counting the two adjacent bulbs in this example, but space them closely enough and it could matter.
Even if you spaced the bulbs every four feet along the layout, you’d be getting about 176 lux (one bulb directly above plus one on each side is 88 + 44 + 44 = 176). And you’d be using 25 Watts per foot of layout to produce that. As we’ll see, that’s not very efficient.
But normally this approach would space bulbs several feet apart, if not more, and no matter what a large portion of the light is wasted against the ceiling or room walls and never hits the layout at all. This is why typical basement lighting isn’t a good choice. This is why typical basement lighting is rather dim, since bulbs are much more than 4’ apart.
A light level of 176 lux (bulbs every four feel) is a typical level for residential lighting, and suitable for “infrequent work”, but well below the level recommended for doing even basic paperwork (250 lux). An extended operating session under these conditions is likely to lead to eyestrain (and eventually headaches), as well as making it hard to see what you’re doing. This is also going to use a lot of electricity. Assume a layout of 24 linear feet (7.3 m). This would have a total of 6 bulbs, and use 600 Watts for lighting it, or about 0.3 lux/watt. Putting the bulbs every two feet would provide a more useful light level, around 350 lux, but would be using 1.2 kW of electricity. That’s getting close the limit of a single 15A, 120V electrical outlet (those on higher-voltage power systems, as in Europe, wouldn’t be as close to the limit). So larger layouts would need multiple light circuits.
Note: layout lighting probably isn’t going to be turned on for too many hours over the course of a month, so extra power use will have a relatively small impact on your electric bill, at worst a few dollars per month. This might lead you to believe that the added expense of other systems isn’t worth it in terms of savings. But all the bulbs needed to produce even this much light are going to produce a lot of heat. In a basement with poor air circulation, that can get rather stifling over the course of just a few hours. This is probably a more important reason to be efficient of power use when designing lighting than saving money on your electric bill.
Optimized Can Lighting
One of the problems with the system outlined above is that the light isn’t all sent in the direction of the layout, so much of the electricity is wasted producing light that never gets used. It is unlikely that anyone would light a layout by stringing bare bulbs above it, so this is really just an example for comparison purposes. Typical layout lighting has either ceiling fixtures that produce directional light (can lighting or fluorescent ceiling fixtures) or purpose-built lighting) or use bulbs within a valence that reflects light that was going away from the layout back onto it.
Can lights normally contain bulbs that have silver reflectors built in, to ensure that all the light is going in a useful direction. However, the big problem with can lights is that they point straight down. If you place them directly above the layout, objects at the front will be backlit, however if you place them in the aisle, they’ll be throwing most of their light on the floor. Fluorescent fixtures aren’t as focused, so placing these above the aisle would probably be more effective. But first, let’s consider optimizing the “can lighting” approach.
My layout, Sumida Crossing, was originally lit using R20 spotlight bulbs in track-lighting fixtures, which behave similar to can lighting except that you can aim them. A slightly larger (R50) fixture might seem like an obvious choice, but most of the bulbs for this size are actually dimmer (350 lumens) than my R20 fixtures (420 lumens). In my case I put the light track in front of the layout, and angled them towards it.
These are very focused sources: the bulbs have internal reflectors and produce a well-defined “spot” in front of them even when the bulb has a surface designed to diffuse the light. There’s some spill to the sides, beyond the central spot, but it’s noticeably dimmer. In my experience this produced “bright spots” in front of the bulb. That may be a plus for some modelers: if you have small scenes you want to highlight, having the light dim slightly to the sides can help, and overlapping spots can illuminate larger scenes. But for me, with my “scenes” being large stations over 8’ (2.4m) in length, the spots were a bit problematic.
The light from one of these fixtures can be assumed to be mostly focused on one circular area. At my mounting distance, 37” (95 cm) from the center of the layout table, I found this to be about 16” (41 cm) across before the intensity fell significantly, although this may be due to the bulbs and fixtures I chose. So I tried to mount my fixtures about 16” apart to overlap the spots. The original 45W halogen bulbs I used had a tendency to make the center of the spot very bright. I later switched to using compact fluorescent light bulbs (CFL). These lacked the reflector, but the white fixtures still did a good job of aiming them, and the result was more diffuse. These were also 420 lumens, although it’s likely that a bit more was lost due to the lack of a reflector.
With these, I found the light level at the middle of the layout directly in front of the bulb to be 220 lux, dropping to about 200 lux halfway between bulbs. If we assume that the spot was a circle of radius 16” (41 cm), its area would be about 0.5 m^2, so the light level should be 420 / 0.5 = 840 lux. As you can see, the real light level was about a quarter of that, suggesting much of the light was falling well outside the bright central region. An error of 4x makes it very hard to estimate real light levels from fixture size and distance with can or track lighting.
We could do even better with LEDs, as 50W-equivalent R20 LEDs are now available with just 8 Watts, producing 530 lumens (when new) with a CRI of 82. That’s just 144 watts, or 6 Watts/foot. Those are currently (2014) running around US$16 each, so the bulbs alone would cost US$288. Still a bit steep, compared to about US$116 for halogen or US$108 for CFLs.
Still, track lighting itself is expensive, about US$440 for that example layout, and the irregular illumination pattern eventually convinced me that even this “ideal” version of can lighting really didn’t do what I want. Also, while 220 lux was fairly good for viewing, and might be acceptable for most people, I found it a bit dimmer than I wanted. And my layout was also closer to the ceiling than most would likely be, due to a combination of a high table and a relatively low ceiling. With more distance, the spots would be larger and I’d lose more light to the floor, making it dimmer even with the same spacing of lights. That’s not to say that can or track lighting can’t work, but it’s not providing what I wanted.
Fluorescent Tubes
After that, I tried using a single 4’ fluorescent tube in a valence. The tube was a T5 tube rated as 28W (so just 7W/foot) with a light output of about 2400 lumens. Further, this was inside a white-painted valence that put most of the light onto a four-foot length of layout at an average distance of about 27”, or 0.7m. If the light was evenly distributed over the surface of a cylinder of that radius (an area of 8.19 m^2), the light level would be just 2400/8.19 = 293 lux. However, I used a white-painted valence, positioned so that the light went onto the layout surface and backdrop. Assuming little was lost to the aisle or out the ends (and some was), this put the light onto the 2’ wide table and the 29” high backdrop, a length of 53” (1.35 m), and along the 4’ length of the table (1.2 m), or a total area of just 1.35 x 1.2 = 1.62 m^2. So the ideal light level would be 2400 / 1.62 = 1481 lux. The reality, of course, will be somewhere between these two numbers.
Now I did lose some out the ends and into the aisle, and more was lost because even white paint isn’t a perfect reflector. When I actually measured the light, however, it was only 700 lux, or about half what I’d estimated as the best case, but a bit more than twice my worst case. Now 700 is still plenty, but it illustrates just how hard it is to make reasonable estimates. While estimating light levels can give approximations, they’re not always very good approximations because you can’t consider all of the factors involved. This can be used in initial planning, but to really understand your light levels, you need to build the lighting and then measure it.
