Plywood Subroadbed
In the past, my layouts have been rigid box structures with a sheet of plywood laid flat atop the box. In some cases I’ve taken the “cookie cutter” approach to raise part of that flat table on risers, but most of them were flat and supported on all four sides. Sometimes even with a support under the middle as well. Now that I’m thinking of something more sparing of wood, like L-girder, I’ve needed to give more thought to just how I want to do the subroadbed, and what kind of limits I need to be sensitive to.
The “subroadbed” is the structural portion of the layout that holds the roadbed (foam, cork or similar) in place. Track goes on the roadbed, which helps to dampen vibrations, but the subroadbed keeps it level and in position. It’s an important part of the layout structure, and needs to be rigid over the long term, and not subject to warping or sagging.
Many different materials can be used for subroadbed. Insulation foam is something I’ve made extensive use of, and for bridging short gaps I’ve even used 2mm sheet plastic. But when building roadbed across a girder-style support structure, the subroadbed needs to span large distances while supporting the weight of itself and the track and scenery attached to it.
One warning: while plywood, unlike dimensional lumber, is nominally the actual size it says (i.e., a two-foot panel really is two feet wide and 3/4” plywood is close to 3/4” thick) there is some variation, up to 1/8” (3mm) on the long dimensions, or a bit more. For subroadbed that won’t normally be a concern, but it can be a problem when making a flat table surface for a module or similar. It’s a good idea to measure carefully before buying if the exact size matters.
When working with wood, a good pair of heavy leather or specialty gloves is important, otherwise you’ll end up with a lot of painful splinters (I speak from experience). This is particularly true of plywood, as the edges seem to splinter much more than dimensional lumber. Long pants (jeans) and long-sleeved heavy-cloth shirts are also good for similar reasons, as is wearing shoes rather than sandals.
Things Not to Use
What you really don’t want to use for subroadbed are materials that can easily bend or warp. Simple “dimensional lumber” like 1x3 boards might seem to be a good material, but even if you can find one that’s straight, they’ll often warp with time. Some people do use this material. I wouldn’t, except to make L-girder structures.
Some people also use small dimensional lumber stood on edge and glued together to create “splines” for roadbed. These resist warping because they’re essentially multiple layers of different wood, similar to plywood. Splines curve well horizontally (i.e., for curves), but don’t bend up or down very much, so creating grades is more complicated than using plywood (which bends up and down, but not sideways; curves in plywood are cut, not bent).
Homasote, a fiberboard designed for wall panels, is popular as a roadbed material, as it’s relatively inexpensive (if you cut it yourself) and takes both nails and glue well while still being flexible enough for absorbing vibration. But there are some who promote it as a subroadbed also. While it is moderately strong, it is essentially compressed paper and subject to deformation. It’s not a good long-term option as a structural subroadbed.
You also don’t want to use “engineered wood products” like MDF or OSB (see the Choosing Wood page for more on this topic).
Plywood
And that brings us to plywood. While this is an engineered wood product, similar in many ways to particle and fiberboard, plywood is made of layers of relatively thin veneers of wood strips laid across one another at an angle and glued. This use of long wood elements crossing each other produces a material that’s very resistant to warpage, although that depends on the number and kind of layers.
Note that even plywood can warp. And some low-grade plywood may be warped when bought. You still need to pay attention at the lumber yard, even with plywood.
Plywoods are sold in a variety of grades, given as two letters (e.g., BC or CD) describing the quality of the outer faces. The interior plys are typically grade C or even D no matter what the faces are. Since subroadbed isn’t visible, and you can work around imperfections when cutting out pieces to use, there’s little reason to pay extra for premium-grade plywood. However I’ve actually seen interior-use AB plywood sell for less than structural CDX plywood in the same size, so shop around. It’s certainly going to be easier if the roadbed surface doesn’t have gaps (voids) where knots fell out that need to be filled.
For more about the available types of plywood, see my Choosing Wood page.
Using Plywood
Plywood can be used as a sheet, to make a flat table, or cut into “boards” of a standard size using a table saw (or at the lumber yard), or custom shapes can be cut out with a saber saw “cookie-cutter” style. I’ve used both table and cookie-cutter methods as appropriate in the past, and am considering also adopting the board method for the new layout.
The “board” form can also be used to form L-girders or joists and risers (vertically-oriented simple boards) in the structure supporting the subroadbed.
Plywood Thickness and Load
Plywood subroadbed of any kind needs to be supported to prevent sag. The spacing of the supports is going to vary depending on the thickness of the plywood and the weight it needs to support. If you’re building a 4x8 table for your kids, which they’ll end up climbing on, you need a lot more support than if you’re building cookie-cutter strips of subroadbed supported by risers from L-girder benchwork, which will never support more than trains and some plaster scenery. A typical recommendation is to space supports 16” to 18” apart with 1/2” plywood, and slightly wider spacing is acceptable for 3/4”. I’m not sure that’s entirely accurate though, although I don’t have any personal experience to contradict it. I did decide it was worth looking for some more information.
Since plywood is used for construction, it is possible to get data sheets for specific products that let you calculate things like span deflection under load. This is going to vary from one manufacturer, and even one specific version of panel, to another. So don’t take the following as more than a rough guide.
Two things affect the rigidity of plywood: thickness and number of plys. Based on some rough numbers I did based on a manufacturers data sheet, increasing subroadbed from 1/2” (12 mm) 3-ply to 1/2” 5-ply will add about 20% to the allowable span between supports. And going from 1/2” 5-ply to 3/4” (19 mm) 5-ply will increase span by about 15% more.
It’s usually easier to find plywood with greater thickness, and a typical cost difference is around 15% to go from 1/2” to 3/4” for sheathing-grade plywood at my local store, so the economics favor using thicker wood with more plys, assuming the increase in span length saves money on the supports.
More specifically, a 16” (41 cm) span using 1/2” 3-ply will deflect about 1.5mm (a bit over 1/32”) under 5 lbs (2.3 kg) of weight. That’s a reasonable weight for the wood itself, plus some track, scenery and a train. Increasing this to 5-ply probably gets you around 21” (53 cm) between supports (assuming weight goes up proportionally with length). And going to 3/4” 5-ply gets you to around 24” (61 cm).
However, you always want to build in a safety margin, so I’d be reluctant to use 16” spans without 5-ply at a minimum. And using 3/4” 5-ply, I’d probably keep my span under 20” (51 cm), and maybe even limit myself to 16” (41 cm) for added rigidity.
Now the above is for a flat beam (subroadbed) supported at two endpoints. Things aren’t that bad if the beam extends across multiple supports and is locked down on each, since a sag in one section tries to cause a rise in the adjacent ones. And if the beam isn’t a simple flat length of plywood, but is on edge (as in a joist) or is formed into an L-girder, then it gets quite a bit stronger.
In How to Build Model Railroad Benchwork, by Linn Westcott (2nd Ed, Kalmbach, 1996) there’s a table on pg 35 showing sag and other limits for vertical joists and L-girders (not for flat subroadbed). It has some pretty large numbers for spans, and I think it’s factoring in supports not being at the ends (which improves load capability considerably) and probably allowing for more deflection, although that isn’t stated.
I did some numbers for a joist (vertically-oriented wood) under the same assumptions used for the subroadbed and came up with spans up to about 30” (76 cm) assuming a bit of safety margin. However, I’m not as confident in those numbers being accurate.
Unfortunately, I expect subroadbed to be the problem area. The joists supporting it need to be spaced based on the sag limits of the subroadbed material (presuming that the joists extend out from the wall, and the subroadbed runs parallel to it). Which means they’d need to be fairly close together (16” or less) for 1/2” plywood. Even with 3/4” I’m not likely to be able to space them 24” apart.
Also keep in mind that if joists are 16” apart, but track doesn’t cross them at a right angle, the length along the subroadbed between supports is longer. For example, 16” spacing and track at a 45-degree angle results in a distance of 22.6” between risers supporting the subroadbed.
Tony Koester, in his book Realistic Model Railroad Design, notes that he uses 3/4” plywood (19 mm) (as both boards and subroadbed) because of past problems, and comments that he’s had 3/4” plywood that wasn’t supported every 16” (41 cm) warp over time. That’s a very strong recommendation for stepping up to 3/4” plywood and keeping an even closer joist spacing than my own numbers had been suggesting. He also uses birch 3/4” (19 mm) plywood for the subroadbed (but ordinary plywood for joists) to further reduce the risk of sag.
I’m giving very strong consideration to following his approach. It seems over-done, but this probably is a place where “better safe than sorry” applies, particularly since I’m going to try to build fairly open L-girder benchwork.
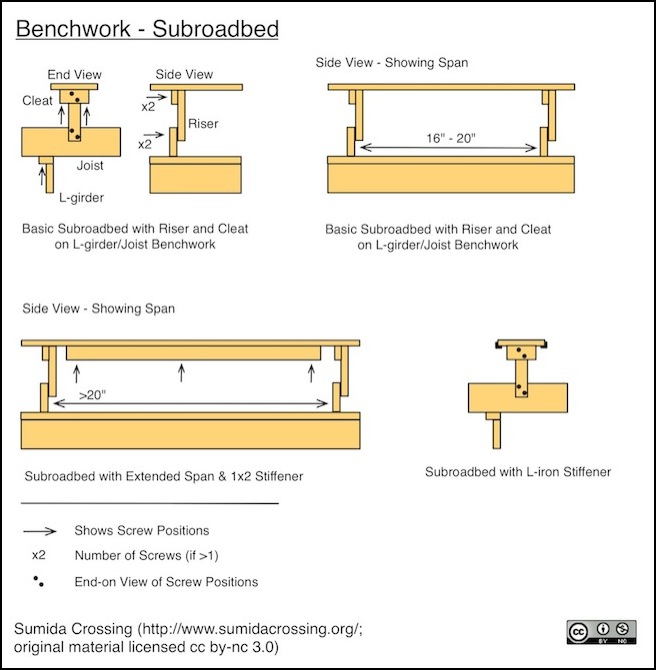
Another option, if you need to span a greater distance than usual, is to stiffen the roadbed by attaching a 1x2 edge-on to the underside of the roadbed, creating a “T” shape. This is going to be more expensive than simply using thicker roadbed, but if you only need to span one long space it’s probably easier than using two different roadbed thicknesses. This won’t work if the space below the roadbed is visible (e.g., if you’re building a bridge). For that, you might need to conceal risers in bridge piers, or use angle-iron (or aluminum angles) to reinforce the subroadbed.
Installation Preparation
One thing recommended in Tony Koester’s book that I think is very good advice is that wood from the lumber yard needs time to dry out as it will shrink somewhat as it dries (assuming your layout is in a dehumidified environment and not an unheated garage or some similar environment). Wood stored indoors may have less of a problem, but there’s no way to tell how long it was indoors. It might have come off a truck yesterday, and been stored outside for months before that. In any case, your room may be drier or wetter than where it was kept. It’s probably a good idea to get the wood into the layout room long before you’re ready to use it, or nearby, if you have space where you can store it.
Subroadbed Structure
Plywood subroadbed is basically a long and relatively narrow strip of plywood laid flat, supported periodically. Exactly how this is done will depend on the benchwork. As noted above, it needs to be supported every 16-20” (41-51 cm) when using thicker subroadbed.
The following diagram shows some typical arrangements of subroadbed supports used with L-girder construction. This is by no means exhaustive.