


Model Railroad Layout Photography
I’ve written about this topic in several past Musings, but I’m going to collect the details here and keep them updated.
But I also want to take this opportunity to point out a very handy layout photography guide aimed at beginners. It’s well worth reading.
My approach to layout photography is somewhat different than the usual one, and not necessarily better although it works for me. I throw lots of light at the layout, and try to keep shutter speeds fast enough that I don’t need to worry about vibration (I even hand-hold the camera at times). A more conventional approach, and one that will yield better photos if you put the necessary time into it, is to use long exposures (still with “bright” light) and large apertures to get greater depth of field.
Basics of Photography
For photography, any photography, three things go hand-in-hand: “film speed” (image sensor sensitivity in digital cameras) represented by the ISO setting, exposure time (in fractions of a second) and the size of the aperture letting in light (described as an “f-stop” number, like f/13). These all work with and against each other to regulate how much light hits the sensor, and how, and that affects several things of importance.
To get more depth-of-field, you need a smaller aperture (which confusingly means a larger f-stop), a small aperture limits your light, which means you need a slower shutter speed to gather more of it (smaller denominator, e.g., 1/30 is slower than 1/60) or a more sensitive sensor (higher ISO) to make use of what you can gather. But slow shutter speeds lead to blurring from vibration or movement, and high ISO leads to grainy pictures (from amplified “noise”). And all three have to be in balance to avoid over- or under-exposure, which leads to loss of information no post-processing can fix. Let’s review these quickly.
ISO
ISO is what used to be called ASA. Originally a rating of how sensitive film was to light that depended on the roll of film used, now it’s a rating of how sensitive a camera’s sensor is to light that you can change for each photo. Ideally, you’d probably want to use an ISO of 100 or 200 (what’s “best” depends on the camera model), but unless you plan to light the layout with expensive photofloods (which have a very short bulb life for the most part) that’s not an option. At higher ISOs the sensor is doing more amplification of collected light, and that means that noise gets amplified too, creating little speckles on the image.
Most cameras will do “okay” at ISO 400, and some at ISO 800 (newer DSLRs work well at even higher ratings). You have to strike a balance here. My original camera worked well at ISO 800, so most images were taken that way. If I could sacrifice depth-of-field, I might drop to ISO 400 to get a cleaner picture. I’ve used ISO 1600 (which is visibly grainy with that camera) when circumstances required it, but I try to avoid that. My new camera does better in low light, with very little noise at ISO 1600 and possibly acceptable levels at 3200. Unfortunately it’s a full-frame camera, so it has less depth-of-field than the old one for the same settings, and I basically need to up the ISO just to stay where I was. I didn’t buy it for layout use, and that’s good, as in some ways the old one is better.
But the bottom line is that the ISO setting is one of the three things you trade off against each other: higher ISO means more margin to increase f/stop (make the aperture smaller) for more depth of field, or to raise the shutter speed to control vibration or speed blurring. So knowing how your camera works at different ISOs, and using the highest one that produces acceptable image quality for your purpose, is fundamental to capturing the best images you can.
Aperture or F-Stop
On an SLR, the f-stop rating is a number from about 1.4 (on lenses few of us can afford) to around 22. Small numbers create shallow depth of field, which is useful for blurring the background. But unless you only want the front of the train in-focus, that’s not an option in most model-railroad photography, and maximizing depth-of-field is more important. On smaller cameras the numbers will typically be smaller for the same effect, because they ultimately relate to the lens size.
SLRs use the same f/stop numbers regardless of the sensor size in the camera, because it’s a characteristic of the aperture of the lens (there’s a relation of that to the sensor size, but that’s secondary). So APS-C or full-frame, an f/8 lens is described as f/8. A good rule of thumb is that for a point-and-shoot with one of the better sensors (1/1.7” or 2/3”), the f/stop numbers are about half that of an SLR for the same depth of field effect, so f/4 will be crisp, f/5.6 acceptable, and higher f/stops might be prone to diffraction loss of resolution (although in a point-and-shoot, there will be other things affecting the quality of the image so this may be less important). Note that there are now some point-and-shoot cameras with APS-C sensors, and those will have f/stop depth of field behavior closer to that of an SLR, although probably not identical. There are also cheaper point-and-shoot cameras with sensors smaller than the 1/1.7” size, and these will need lower f/stop numbers for the same effect.
For a very good description of how f/stop and sensor size is related, along with a calculator showing how this works for different cameras (keep the white disk between the grid lines), see this tutorial. For additional information, see this article on lens design for a few comments on this. And for a more theoretic discussion of diffraction, see this article.
With my original DSLR, which has an “APS-C” sized sensor, I found f/8 to be a reasonable compromise for most layout photography. And that matches the conventional wisdom of 35mm photographers for decades: f/8 is a good default f/stop to use. Higher numbers just weren’t practical with my lighting, and that gave me about a one foot (30cm) depth that’s of reasonable sharpness in an online image, for my typical focusing distance and focal length. I took some images as low as f/5 when I needed more light or a faster shutter (like for moving trains) and could live with less depth.
Now one foot is less depth of field than most people would use for photographing large scenes, and it worked for me because my photographs up to that point had been oriented at isolating a particular model (a train or building). There were times I used larger apertures (and longer exposures) to get more depth of field.
The relation of aperture to depth-of-field is a very complex one (here’s a nice tutorial if you want to know more) but the bottom line is simple: use the smallest aperture (largest value of f-stop) you can make work. To do that, you’ll likely need longer exposures. This normally means using a tripod and a remote shutter release or a timed shutter release to avoid the camera moving when you press the button. As mentioned above, image quality can degrade significantly above f/11 or so on an SLR due to diffraction. This is very dependent on camera model as it depends on how close the lens is to perfect. You may have other problems than diffraction affecting sharpness at larger apertures, and a smaller aperture can avoid them. Bottom line: don’t use a larger f/stop (smaller aperture) than you need. A setting of f/8 is usually optimal for an SLR, but f/11 will normally produce very good results with more depth of field than f/8. In layout photography you may be able to go higher than f/11 on an SLR or higher than f/5.6 for a point-and-shoot camera.
Some simple cameras (like smartphones) have fixed focal length lenses, that can’t be adjusted. For example, the iPhone 4S has a lens of f/2.8 (the iPhone 4 lens was f/2.4). For the size sensor it has, this is about the optimal size (it’s equivalent to a small point-and-shoot in terms of sensor) so that isn’t a substantial negative, but it does mean that you can’t set f/4 on an iPhone to gain more depth of field in exchange for some (perhaps theoretical) loss of sharpness.
BTW, you’ll often hear about “pinhole cameras” as a way to take layout photography. This is essentially using a tiny aperture and depends on a long exposure to work. A true pinhole camera has no lens, and avoids some of the image quality issues lenses have with high f-stops.
Shutter Speed
A fast shutter speed is required to freeze motion, otherwise moving objects will blur. A slow shutter can work if you use a tripod and photograph still models (and that’s a way to get lower ISO and/or more depth-of-field). Actually freezing a moving train requires very fast shutter speeds (likely 1/250 of a second). So all of my “action” photos are actually of parked trains. I often use shutter speeds as low as 1/30 or even 1/15 of a second, but for that you need a tripod or an image-stabilized camera. Photos that are in focus across a large distance (depth of field) require use of a tripod and special measures to avoid vibration, with shutter speeds of several seconds.
Features
Some other features, while important, are characteristics of cameras rather than fundamentals of photography.
Aperture Control
At a minimum, a camera needs to give you some control over depth of field (which is fundamentally control over Aperture). However, even a camera with “creative” presets rather than manual controls can do this, to an extent. A “landcape” or “scenery” preset will maximize depth of field (however it may also select a low ISO or a “sunlight” white balance; depending on the camera model, using “landscape” mode could be problematic). Clearly a camera where you can set everything manually will be preferable, as it gives you the maximum control, but that isn’t absolutely required.
Aperture Priority mode is a setting where the camera will let you specify the aperture to use (f-stop) and it will figure out the other settings for a correct exposure. This is second-best after a fully manual camera, and actually easier to learn with. You can get cameras that have Aperture Priority without full manual, and that represents a step up from one with nothing more than a landscape preset. But I’ve never seen a modern fully-manual camera that didn’t also have Aperture priority mode, so you don’t need to give that up for future flexibility.
Sensors and Depth of Field
The next most important thing is going to be sensor size, but not in the way you might think if you know anything about cameras. This is, paradoxically, a form of photography where smaller is better. Not only because it’s easier to place the camera within the layout to take photographs (either on the scenery or on a small tripod placed on the scenery), but also because smaller sensors provide greater depth of field.
Most photographers tend to believe that bigger cameras (and sensors in them) are better than smaller ones. SLRs are better than pocket-sized “point and shoot” cameras, and larger, professional “medium format” cameras are better than SLRs. There’s a lot of truth in that. Big lenses need to be less precisely ground to have the same visual resolution as small ones. Large sensors are less prone to noise (meaning they support more amplification and thus use of higher ISO settings) and will excel in other ways. As a general rule, bigger is better when it comes to cameras. They also cost more, but you do indeed get what you pay for.
But there’s one thing for which this isn’t true, and that’s depth of field, which is larger, assuming the same field of view, for a smaller sensor than for a large one. In portrait photography, that would be a negative feature, as you often want the foreground and background out of focus to make the subject stand out. And there are times when you want to photograph a train in the same way. But in general for model railroad photography, you want a lot of depth of field so that the photograph looks more like a photograph of the real world would, with only the most distant (or nearest) objects out of focus.
This isn’t an absolute, and there are things you can do to gain the needed depth of field with a larger sensor (long exposures on a tripod coupled with larger aperture values, which works up to a point). And there are negatives with smaller cameras (often less control over the mechanics of taking or post-processing an image, poorer low-light sensitivity, lesser quality optics). But it’s not a slam-dunk that you need something like an SLR for layout photography, and a cheap SLR may not actually be as useful as a good point-and-shoot camera. Which won’t necessarily save you money, as a good point-and-shoot may cost more than an introductory SLR. And if you want to do other things, the overall flexibility of the SLR may serve you better.
But understand that cameras with larger sensors do have their downside for layout photography. And a high-quality point-and-shoot with the requisite features may be a more suitable camera. If you want to know more of the details, see the Depth of Field page for more on this topic.
Focus Distance and Macro Photography
Some lenses are designed for photographing small objects up close, greatly enlarged. This is called “Macro” photography. You might think this was a useful feature to have for photographing trains, but unless you want side-on photographs of trains for a roster shot, it probably isn’t. The problem is the depth of field at “macro” distances is extremely shallow. This is nice if you want to isolate one flower out of a field, but that’s not the usual goal in photographing model trains.
Technically, the term “macro” means that the object on the sensor is approximately the same size as the object in the real world (for small-sensor cameras that’s almost never true, and as usual this term is literally true only for full-frame cameras). In real-world use, the term just means “can focus really closely”, and while you want to be able for focus a foot or two in front of the camera (30 - 60 cm), you don’t need to be able to focus 6-10 inches (15 - 25 cm) in front of it. So unless you want to do some other kind of photography, you can give “macro” capabilities a miss.
That said, pay attention to the minimum focusing distance in camera specs. Many SLR lenses have minimum focusing distances measured in feet (meters), and that’s too far. It would be good to have a minimum distance of one foot (30 cm), but two feet (60 cm) is likely to be acceptable. Longer distances would not. Many cameras only list the closest focusing distance for Macro mode, which is deceptive as that may be a few centimeters, and non-Macro mode more than fifty cm (18”+).

An 11cm toy photographed at 20cm distance in Macro: both claw and back of body are out of focus (50mm lens @ f/6.4, both 35mm equivalent)
Megapixels
With megapixels, more is generally better than less, but don’t get caught up in it. The difference between 12 MP and 14 MP is irrelevant. Basically, you need four times as many MP to double resolution. Since any modern camera should give you at least 8 MP (which is acceptable) and most good cameras are in the 12 - 24 MP range, there’s not a whole lot of difference between them when you come right down to it. There are some advantages to the larger ones, in particular they let you crop away more of a poor image to salvage a good one, but proper thought, and perhaps re-photographing the scene, can do much the same.
Megapixels can also be stated in confusing ways, often intentionally by Marketing types to make their camera sound like it has a higher number than a competitors. One model I looked at had a maximum resolution of 4608 x 3456 pixels. If you multiply those, it’s 15.9 million pixels, which is a measure of how much information the photo contains. The specs for this camera noted that it had 17.5 megapixels of “sensor photo detectors” and 16.1megapixels of “effective pixels”. I’d round that camera to “16 MP” and ignore all the rest.
Keep in mind that a typical onscreen JPEG is perhaps 1024 x 768 pixels. That’s about 0.8 MP, so anything more than that is just going to get thrown away in the end. Unless you’re shooting for a magazine, where a large photo is probably around 4 MP and a cover perhaps as much as 11 MP, any modern camera does more than you need.
Focal Length
The “focal length” of a lens is a measure of the distance light travels to reach the point of focus on the sensor in the camera. But it is also implicitly a description of the characteristics of the lens that affect the size and shape of the image presented to the sensor. Short focal lengths produce wider-angle views, and very short ones tend to have distortion in the corners (“fisheye” lenses are very wide lenses with very obvious distortion). Long lenses (also called “telephoto”) have narrow views, and tend to make close and far objects look closer together (called “telescoping”). They also have very shallow depths of field. So in general for photographing models, you want a wide, but not too wide, lens.
But what is “wide”? The actual focal length for a given behavior depends on the size of the sensor. Most cameras simply give focal length in “35mm equivalent”, which means that their lens at “50mm” (or whatever number) will work like the 50mm lens on a 35mm film camera. The only modern camera that doesn’t need this kind of correction is one with a “full frame” sensor, meaning a sensor that’s the same size (24mm x 36mm) as a frame of 35mm film. You mostly find those on semi-pro and pro DSLRs.
For layout photography, some ability to vary the focal length of the lens is desirable, as it makes it easier to compose a scene that fills the sensor even if you have to place the camera somewhere other than you might want to due to scenery. A fixed-focal-length lens can still work, just place the camera where it will take a wide photo than you need, and use image editing software to crop away the excess. But the optimum choice is probably a camera than can be adjusted in roughly a 30 - 70 mm (equivalent) range, as 50 mm produces a field of view (image width) roughly equivalent to that of the human eye, and going wider or narrower can be useful. Failing that, something with a 30 - 50 mm lens is a good choice.
There’s no one right answer. I’ve used much longer lenses (up to nearly 200mm equivalent) in some of my photographs. I don’t tend to like really wide-angle lenses due to the distortion, but it can be an acceptable style (and if you post-process photos in something like photoshop, you can correct for the distortions of a wide-angle lens).
Zoom
In camera descriptions, “zoom” describes the camera’s ability to change focal lengths (or the range over which it can change), usually expressed as a multiplier (like “2x zoom”). Zoom is really just another way of stating the focal length range, and you’re better off looking at that instead. However, it’s important to know the difference between “optical” zoom and “digital” zoom. The characteristics of less expensive cameras are often inflated by describing their zoom range with a combination of optical and digital zoom. Optical zoom is the actual change in the focal length of the physical lens. That’s the part that matters.
Digital zoom is really just another word for cropping, meaning to throw away some of the pixels on the sensor and use a smaller portion of it. This produces an effect like a longer focal length in terms of magnification, but it doesn’t alter depth of field or “telescoping” of near and far objects, as both are characteristics of the physical lens, which were already fixed when the light hit the sensor. You can get the same effect by taking the JPEG, and using photo-editing software to select a smaller portion of it, then printing that at the same size as the original photo. It looks like you used a longer lens, but there’s less detail (real pixels) in what you see.
Sensor Size
The size of the chip used by the camera to collect light from the lens matters in several ways. Larger chips will, in general, produce superior images even if they have the same megapixel count. This is because each pixel “well” on the sensor will be larger, and collect more photons for a given exposure, making the “signal” (real light) much larger relative to the “noise” (electrical misinformation that creates speckling on images in low light). There’s one exception, regarding depth of field, mentioned earlier in the Sensors and Depth of Field section, but for most purposes, larger sensors are better. In any case, it’s important to understand just what sensor is in a camera. And while “low light” might seem like something you could avoid, what it really means is that larger sensors will handle a wider range of light-to-dark (“dynamic range”) than smaller sensors, and that is often important in real-world (and model) scenes.
A full-frame sensor is 24 x 36 mm in size, the same as a frame of 35mm film. This is the baseline against which sensors are usually measured. But real full-frame sensors aren’t very common, being found only in pro and very advanced semi-pro cameras today (although that is gradually changing as costs come down). Most DSLRs use “APS-C” sensors (although there are differences from one manufacturer to another as seen in the chart below). Most small “point and shoot” cameras use relatively small sensors, although there are some recent changes, including the “four thirds” sensors used in some cameras, as well as a few “point-and-shoot cameras with APS-C sensors.
One thing you’ll often see mentioned is “crop factor”. With a smaller sensor, a specific lens is going to create a focused image that’s larger than the sensor. This causes the camera to effectively discard the pixels outside the sensor, “cropping” the edges off the image. The effect is much like the smaller angle of view created by a zoom lens when it is zoomed out to a longer focal length, and so one way to describe the effect of a small sensor is how it alters the effective focal length. This is most important where specific lenses can be swapped between cameras. So, for example, taking a 100 mm focal-length lens from a full-frame camera, and mounting it on a Canon APS-C camera with a 1.62 crop factor (individual cameras will vary slighting), yields an effect much like using a 162 mm focal length lens on a full-frame camera. Size DSLR lenses are only described in full-frame focal length, even if they are restricted to only being used on APS-C cameras, this is very important for people using most consumer DSLRs. Smaller cameras, particularly ones with permanently-attached lenses, may simply describe the lens in “full-frame equivalent” focal lengths, with the crop factor for the specific camera already taken into account.

Relative Sensor Sizes. Artist: MarcusGR as modified by Lesqual
So what size do you need? Most point-and-shoot are 1/2.3” or 1/1.7”. Both will work and produce good depth of field. The 1/1.7” is, in theory, going to work better in low-light and is typically found in more expensive cameras that are better in other ways, so it’s probably the sweet spot. A 2/3” sensor isn’t likely to be much worse. Stepping up the Nikon CX or the Micro Four Thirds sensors is going to sacrifice some depth of field, and wouldn’t be my first choice.
Rear Screen
If you’re putting the camera “in” the layout, a viewfinder won’t be any use. This is where having a screen on the back of the camera, and particularly an articulated screen that you can see from off to one side or above, will be a big plus. Screens are fairly universal now (even SLRs typically have them along with a “Live view” mode to use them for composing an image). But articulated ones are less common, so that’s something to consider. This is something that changes from model year to model year, so if the camera you want doesn’t have an articulated screen, wait a year and maybe they’ll add one.
Manual Focus
There’s an advantage to being able to manually focus where you want, although that’s a feature typically not found on less-expensive cameras. Auto-focus will tend to pick what it thinks is an important object in the scene and try to put it in the best focus. Even if it picks the subject, you might actually want the focal point to be in front of the subject (this tends to produce a better-composed scene) and cameras aren’t really all that good at focusing anyway. With the shallow depths of field you are likely to be working with, any error can be obvious. You may not be able to get manual focus, and even with it I often use auto-focus, but it’s a very desirable capability and I’ve been glad to have it more than once.
What Camera to Use?
In many cases, it’s the camera you have, and you need to figure out how to maximize its capabilities. I use a fancy Digital SLR (DSLR), but it’s not actually the best choice for this purpose, I just happen to have it for other reasons. I’m considering buying a camera specifically for layout photography, but haven’t found one I like (and am willing to pay for) enough yet.
And while digital cameras provide a number of benefits, there’s nothing preventing the use of film-based cameras. Places that develop film will typically provide a CD of JPEG images for an added cost. The quality won’t be quite as good as you could get yourself with a good scanner and some time to scan the negatives, but they will likely be fine for online and small print use. Digital, of course, provides instant feedback, and you don’t need to wait until you fill a roll to get results, and the image quality of even an inexpensive digital camera will likely be superior to all but very good film cameras.
But if you are in the market for a new camera, this is a good time to get one; at a cost. With smartphones taking over the casual photography segment, manufacturers are putting more and more “enthusiast” features on point-and-shoot cameras. Features such as manual control over exposure and focus, better quality optics, larger and better sensors, and RAW output. Cameras with 1/1.7” and 2/3” sensors and lots of capabilities formerly found only on SLRs are becoming fairly common. At a cost. Often the good ones run US$500 or more, the same cost as an entry-level DSLR. But unlike a DSLR these have the compact size and depth of field that make them good layout cameras. They’ll also fit in a pocket, making them good general-use family and vacation cameras.
If I were buying a camera for layout photography purposes (and I did, which is why I spent the time assembling the info on this page), right now my criteria would be:
- small but not tiny sensor (1/1.7” seems like a good size but 2/3” would work; I think 1/2.3” may be too small).
- physically small camera
- a zoom lens covering about 30 - 70 mm equivalent
- fully manual control including focus, ISO and white balance as well as exposure
- tripod mount and self-timer for slow exposures
- articulated rear screen
- focusing to 10” (30 cm) desirable, 18” (45cm) acceptable.
- RAW export (I could live without it, but I don’t see any reason to do so).
Note that I haven’t mentioned MP (anything on the market will do) or a viewfinder (unnecessary). I also haven’t mentioned shutter speed, as while it’s important I don’t think any of the cameras that fit the other criteria will lack the needed range speeds. As noted, there’s a cost to that.
Also, manual control over white balance only matters if you’re using JPEG from the camera. If the output is RAW, you can change white balance as you like in the RAW processing software.
In summary, and to repeat what I said on the depth-of-field page: a cheap point-and-shoot probably isn’t going to do the job, because camera presets just aren’t designed for this kind of photography, nor is a smartphone the right tool for the job. A point-and-shoot with greater control (aperture priority) or a fully-manual camera is going to work better. That said, even a ten-year-old 4 MP dumb point-and-shoot produced wonderfully crisp photos used with a timer and tripod and adequate lighting. You can make a dumb point-and-shoot work acceptably if not perfectly. And you don’t really need a whole lot of camera to take this kind of photo.
The Camera
Having done all that, I did buy a camera. My expectation is that I’ll use it for things other than layout photography, and I’d been thinking of getting one for those other purposes for some time. But it was the need for something for layout use that tipped me over the line.
What I ended up with was a Samsung EX2F. This ticks most of my checkboxes:
- 1/1.7” sensor
- physically small
- 4.4 x 2.4 x 1.1" (11.2 x 6.2 x 2.9 cm) excluding lens when extended
- zoom range of 24 - 80 mm (equivalent)
- full manual control (see comment below)
- tripod mount and timer
- articulated rear screen
- focusing to 50 cm (plus a macro mode I haven’t tried yet)
- RAW export (see comment)
It’s not perfect. Right now I can’t get manual focus to work with manual exposure (Samsung is noted for locking out modes when manual is selected, but that’s an odd one; I need to research it more). It’s RAW mode is also not supported by my software (Aperture), and while they supply a RAW processor, its output is an 8-bit TIFF rather than a 16-bit TIFF (that may be because the image sensor only has 8 bits of resolution, although I thought it had more).
Now comparing it to an SLR (other than depth of field) it does come up a bit short. Beyond the above, the simple fact is that it’s not as easy to use. Setting ISO requires using a menu (and it’s not a touch screen, so you have to use a tying little four-way tilt pad that’s really too small). But you can set Aperture (f/stop) and shutter from the dials, and for layout use you can probably work with a fixed ISO once you find one that works for your lighting. And at ISO 400 there is some speckling visible in a 1024 pixel-wide image, although you’d be hard pressed to see it in the 650-pixel images I use on the website. At the same time, the image looks slightly sharper where both are in focus (this may be an artifact of different levels of default sharpening in the different software I have to use for the two).
Still, it works pretty well, and I like the images it’s producing. At ISO 400 it works well under my lighting (the lens is quite fast). And as you can see in the two photos below, it has a wider depth of field than my old 40D: both the wooden ruler and the front of the silver train are in focus, although the rightmost cars of the train are lightly blurred. Contrast that with the 40D, where the wooden ruler is clearly out of focus, and the train looks subtly not quite as crisp. Clearly the small sensor has an advantage over even my old APS-C SLR in depth of field.
Note: both images below were processed from RAW, with white balance, exposure, black point and contrast adjusted to make the best possible image. In hindsight, I ended up with a slight green tint in the 40D image (look at the beige embankment), and should have been more careful there.
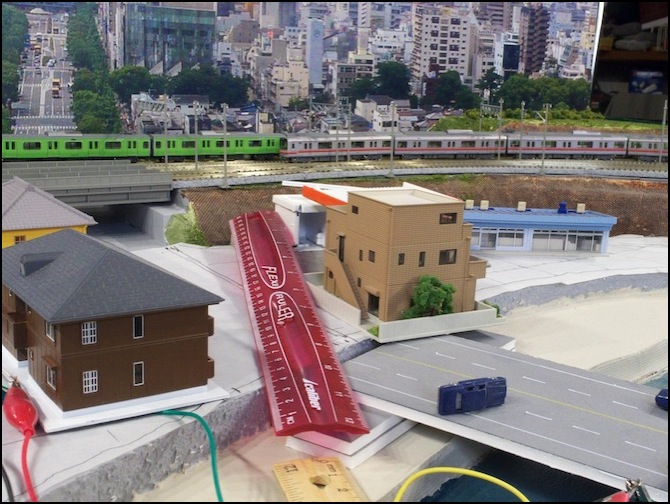
Samsung EX2F, autofocus at about 18-24”, f/6.7 (f/13 equiv), 1/20-sec, ISO 400, 41mm (equiv.) lens
Note: while this is f/6.7 rather than f/5.5 (which would be an f/11-equivalent setting), the results are similar at that setting. I thought I was taking this one at f/5.5, but the camera changes the focal length when you zoom, and I forgot to reset it after going from the default wide-angle to the 50mm-equivalent zoom.
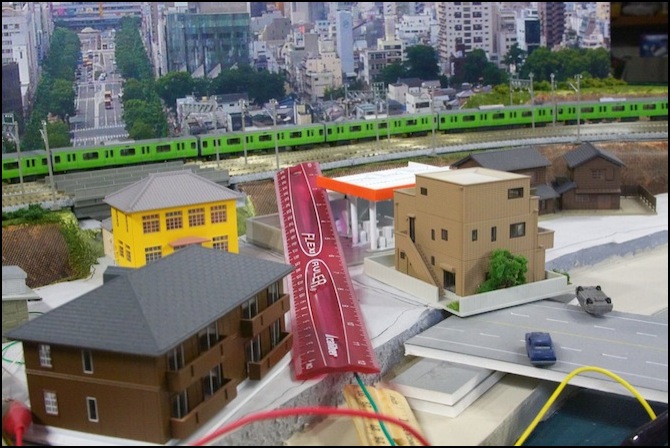
40D 18” focus, f/11, 1/25-sec, ISO 1600, 45mm (equiv) lens
