


My Layouts
This section contains subsections about each of my Japanese-themed model railroad layouts.
At present, Sumida Crossing remains my primary layout, but construction has ceased (and really ceased some time ago) and I’m planning its successor. If you want to know more about the plans, they’re detailed in the “New Layout” pages (I really need to come up with a name for it). And if you want to know why I decided to change, see my Rethinking Sumida Crossing post in Musings.
While Sumida Crossing was the focus of my attention from 2009 until sometime around 2013, there was a precursor, the Kitchen Table Layout that existed from my introduction to Japanese trains in 2007 until I took it apart to make Sumida Crossing in 2009.
Along the way, I’ve also had a few side projects, which never were completed for one reason or another: I built a small Urban Tram Layout as well and a short back-and-forth layout known as the One Point Five Meter Line (for its length).
And I'll sometimes draw up track plans I haven't built, but which I think are worth sharing, although so far only the Shelf Layout has been drawn up.
This section is for all of those; click the links to the left to see them.
Ancient Times
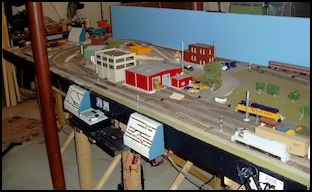
Before my interest in Japanese model trains, I had a sectional “contemporary” (early 1990’s, which was contemporary when I started) HO-scale North American freight layout for more than 15 years. This used primarily Walthers/Shinohara flex track and switches in code 83, which I weathered and ballasted myself (which was enough to convince me that weathering and ballasting track is not an aspect of the hobby I enjoy, although the results can look quite good).
This layout modeled a branch line with a small interchange yard at one end, operated by a fictional shortline. It was based on a real, though long-abandoned, northeast railway branch that had not served enough industries to survive into the Conrail era.
The layout was built of 1/2” plywood over a box frame 4’ x 3’ (some sections were other sizes), with removable backboards. Each section had its own legs, but otherwise the structure was similar to what I used later for Sumida Crossing, and it held up well. The plywood was done “cookie-cutter” style though, to allow for elevation changes, with wire-mesh and plaster scenery. It was designed to come apart for apartment moves, and it survived one of these quite well.
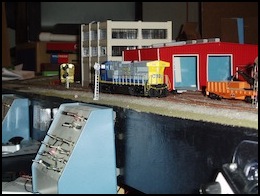
This layout was created with a friend, who lost interest (or at least time to work on it) later, and partly as a result of that it never really was finished. Of the five sections, only three had scenery, and that was incomplete on all and very sparse on the third. A few model buildings were made, but without interiors or lights, and signals were installed but never wired. After ten years, it was converted to DCC with the addition of a Digitrax Zephyr (the old block wiring panels seen in the photo below were kept) and sound added to a couple of locomotives.
The layout was wired for double-block operation via power packs using DPDT center-off min-toggles in small metal box control panels. There were an incredible pain to construct, but had the virtue of being removable so work could be done on a proper work-table. And they worked very reliably. The original power pack was my old MRC 501 (described on my Power Pack Testing page) and later I added the MRC Control Master II. About half the switches were motorized with Tortoise switch motors, also controlled from the panels.
Running stock was eclectic. Most of the freight cars were ready-to-run models, although a few were kits. Locomotives included a couple of brass models, several read-to-run models, and two scratchbuilt B23’s (the cabless white one in the left front corner of the left photo is one) that I never finished although they ran and sounded nice. Unfortunately the introduction of sound proved how unready the pre-DCC track was for DCC (the decoders lost power and rebooted when crossing each switch, leading to rather odd start-up noises coming from a running freight).
The DCC problems led to another period of stagnation, while I contemplated the unattractive possibility of ripping out every switch and re-doing them. Then I decided to do something else.
Old HO Layout (photos c. 2005)
But if you want to go back to the beginning: it all started with a cheap Tyco-brand HO starter set back around 1972. It had brass track and a simple power pack with a rather poor rheostat control. It had a permanent home on a table in the basement built from a 4x8 sheet of plywood by my dad. Structures were mostly repurposed Christmas display houses I “borrowed” from a box my mother stored in the basement, supplemented by tanks made from various bottles and cans, sometimes spray-pained. I did the ground and “backdrop” painting as well; as you can see, my modeling skill hasn’t improved any.
I don’t recall what engine it came with (I ended up with several), but the apple of my eye was the Penn Central RS11 visible in the photo below (one of two photos of that layout that survive, but the other is tiny). And yes, the oil refinery is made from the bottom of a bleach bottle and two beer cans painted silver. That layout lasted for five years, until I went off to school, and then I pretty much forgot about the hobby until my parents cleaned out the basement and sent me several boxes of old buildings and corroded track. Around then I started the HO freight layout.
There was no roadbed or much scenery: the table was painted green, and then the outline of the tracks was traced and painted brown to make a roadbed. The sectional track was just laid atop that, not nailed or glued or anything. I’d forgotten that until finding this photo recently. It’s surprising how similar it is to parts of Sumida Crossing with painted-on scenery.
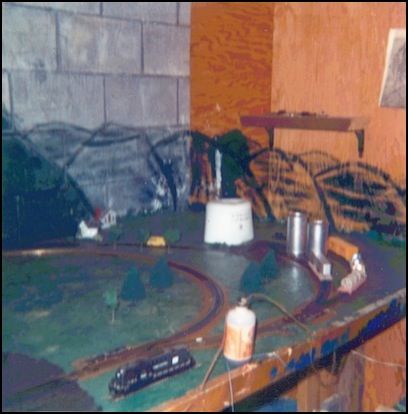
In the Beginning: an HO freight layout
