


An Urban Tram Layout
After purchasing a couple of Tomytec’s new Moving Bus System sets in the spring of 2011, intending to use them as accents on the big layout’s Urban Station scene, I was inspired to create a layout featuring them, as well as my small collection of Tōkyū Setagaya Line articulated two-car light-rail vehicles, known as “trams” in International English. In the U.S. these would more commonly be called “trolleys”, although they use pantographs rather than a trolley pole, as do other modern light-rail vehicles.
I think it’s important to say right up front that while I’m using Tōkyō as the setting, and the buses will be Toei (Tōkyō Metropolitan Bureau of Transportation) Hino Blue Ribbon Hybrid City Buses, there’s not going to be any attempt to be strictly prototypical. The Setagaya line itself runs in medians and private right of way, and Tōkyō’s other tram line (the Toden Arakawa line) has limited street running. And I wanted street-running trams. It’s a fantasy layout, ‘nuf said.
I’ve moved the comments about construction over to a new Urban Tram Construction page, to keep this page more focused on the layout design.
Note: photo credits for the backdrop photo can be found on the Backdrop Scenery reference images page, and details on how I made it can be found on the Making Backdrops page in the Making Things subsection of the Model Railroad section.
Initial Concept
I started with the idea of something roughly coffee-table size, and decided to use 2’ x 4’ as a starting point, partly because it was an easy size for lumber and insulation foam structural materials, and partly because this fit the same sectional footprint I was using on the big layout, and this might become incorporated into some future basement-filling around-the-wall layout built from that.
I wanted something with two tram lines, and one bus line (I would have liked two, but I knew it couldn’t be done and not crowd everything else). And the tram lines needed a minimum radius of 140mm as I know my equipment can manage that, and I’ve read reports that they can’t manage Tomix’s 103mm radius curves reliably. And to be compatible with the bus roadway (103mm radius and 140mm radius) I wanted to use Tomix’s Wide Tram street trackage. Finally, I wanted it to be DC and make maximum use of pre-built structures, as the intent is to have this as an operational layout, while the other one goes through its periodic “take it apart for three months to make it better” upheavals.
This layout was also an opportunity to experiment further with Tomix’s track, both the Wide Tram Fine Track and ordinary Fine Track. I’m still only scratching the surface, as Tomix’s product line is much richer than Kato’s, but this will help me decide if I want to make more use of this in the future.

Trams and Buses in an Urban Setting
While there have been many small tram layouts that fed into my desire to build one of my own, one stands out as a particular inspiration: Mike Sharp’s Keitown (photos, write-up). The images of Portrams negotiating narrow streets and the use of Tomix street track and foam-core both fed my imagination.
Track Plans
With the concept and size decided, I fired up Rail Modeler, made a couple of railsets for bus roadway and wide tram sections, and proceeded to work on a track plan. And it was really uninspired. And after staring at it for a couple of days, I posted the latest iteration to the JNS Forum, and asked for help.
Many suggestions later, I was beginning to feel comfortable about a revised track plan, and the first order of track (it wouldn’t be the last) had arrived. I was ready to start testing the placement of track and buildings.
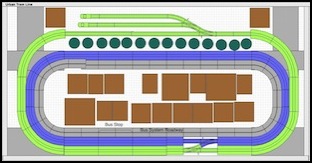
Original track plan V3 (left) and revised V7 (right)
In the above images (larger ones available in the Urban Tram photo album) the green and blue lines are the two tram loops, which will be independently powered, and the gray loop with the black line down the center is the bus loop.

The basic table, before painting, with the first track order
The table doesn’t have legs, as I expect it to sit atop a small chest in my living room. It will need some kind of support for that, to prevent it from marring the furniture, but that’s just some horizontal bars underneath, and some cloth atop the chest to prevent scratching. For the initial construction phase it lived in the basement shop area and I just rested it on the floor. A small photo-backdrop will go on the back (see below).
Revising the Design
After some thought, I decided that as much as I liked track plan 7, it was just too boring to have a double-track tram line. I wanted something more complex, with more variety. I was also still hoping to work in a non-functional commuter train station to have an intermodal bus/tram/train station. This resulted in version 9 of the track plan, which was revised slightly to make a 9b revision when I added signals to the outer train line:
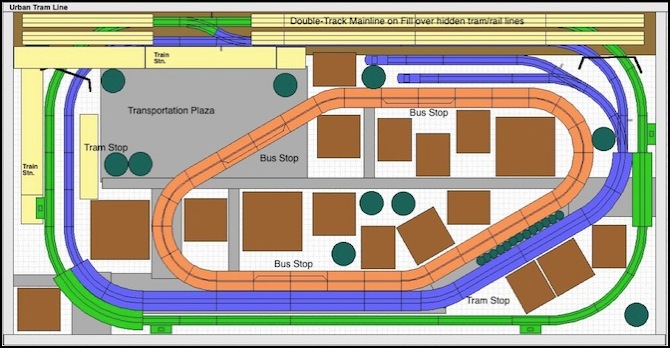
Track Plan V9b
In this design, the outer loop changes to a small commuter line, operated with a one-car EMU. I’m planning to use the Greenmax JR West 125 series for this. There was originally a crossover between the lines hidden under an elevated line (appearing to be on a fill) at the back, but I eliminated the crossover from the final design, keeping the two tracks fully independent. The elevated line does nothing today, but could be used in the future to integrate this scene in a larger layout.
Note: I did some testing, and while Kato commuter cars have a problem with R177 curves, even when run alone, the MicroAce and Greenmax cars will go around on their own, and a Greenmax pair will go when coupled with Rapido’s (although it does seem to bind a little). However the JR West 125 uses a drawbar close connector between cars, so the two-car set I bought can’t be used. This means I’ll need to use my 125 series as a single-car train, but that’s really all I have platform space for, and the prototype does operate in one-car sets at times, so I’m okay with that.
With this plan I get my intermodal (train, tram, bus, elevated train) station in the back, left corner, my diagonal avenue in the front, right corner, some dense, narrow streets in the center and a broad avenue at the front. While it’s not perfect, it’s a lot closer to what I envisioned. And best of all, all of the track curves meet up without any forcing.
Also, with the roads structured the way they are, the bus will run counter-clockwise, stopping in the middle of the transportation plaza and at a couple of other places. At the same time, the blue tram line will run clockwise, which makes all switches trailing-point, and less likely to cause derailments. The green line can run in either direction, or as an out-and-back line with the car reversing direction when hidden under the elevated line.
The following list shows the parts as reported by Rail Modeler (it’s Tomix database uses German, I think, names for a number of the parts). Note that these are counts of the actual parts used, and not the sets you’d need (usually sets of the basic track parts include two or more elements).
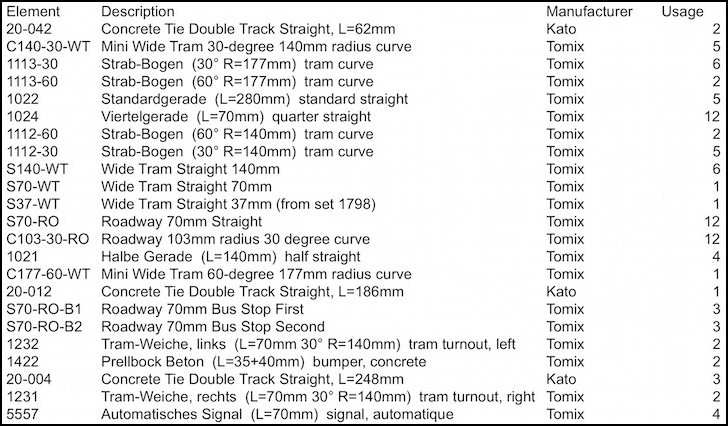
V9b Parts List (Kato track if for non-functional mainline across rear)
I also decided to add signals to the outer loop using the Tomix signal system. I have picked up a pair of Tomix power packs for that track, so I can use their TCS accessory system (which appears to be just 12 V DC anyway) and I’m curious to find out how well it works.
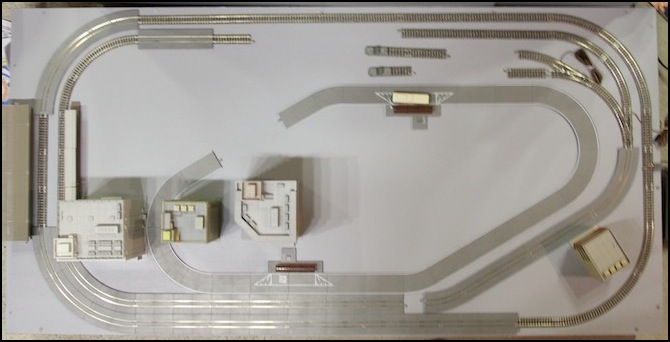
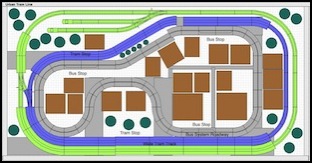
Track and building placement test
Construction had started as of late June 2011, but stalled when I got involved in working on the main layout’s expressway.
Power Systems
Since I’m using Tomix power packs, I need to deal with the question of power for them. Tomix packs aren’t sold for use in the U.S., so they’re designed for Japan’s power supply. That’s similar to the U.S., using either 50Hz or 60Hz, but at 100V instead of the 120V (in practice 110 - 130V) found here. They’re also not U.L. rated, and while it’s unlikely that they’re in any way unsafe, I’m not going to take any chances.
So, I have two things: first is a heavy-duty (metal cased) circuit-breaker equipped surge protector with a lighted switch, that turns off all power to the system in a very obvious way. Any serious problems with the Tomix units should trip the circuit-breaker before things get out of hand. Second is that plugged into that is a variac (variable transformer) I can set to provide 100V output from my 120V input (a Philmore model 48-1205). The two power packs plug into the variac. Any future lighting power supplies will plug into the surge protector.
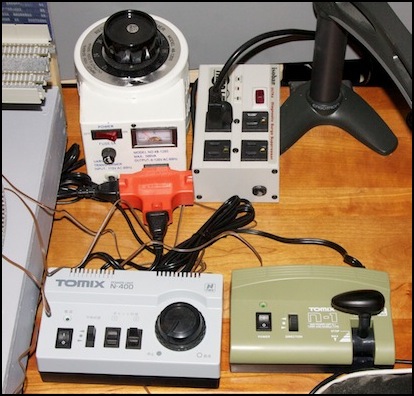
Tomix Controllers and 100 Volt Power Supply (the black thing at top right is a support for a computer monitor unrelated to the layout).
My first Tomix power pack (shown above, on left) is an N400 that came as part of their Wide Tram Railway Operation Set 2. This has a maximum power of 400mA at a voltage of up to 9 volts, suitable for the small trams I’m running. The second (on right) I bought separately, and is a (now discontinued) N-1 power pack, which uses a lever designed to look like a train throttle. This has a maximum power of 500mA at 12V, more suitable for small trains. In truth, I doubt I’ll need half the power of either, and normal running voltages will probably be under 7 volts. These are both simple throttles, with just an on/off switch, a direction switch, and the throttle.
The Tomix N400 supply in addition provides two controls switches, which I’ve used for the storage tracks. Both this and the second power pack provide 12V DC TCS (accessory) outputs I can use to run the signals. The two power packs and the variac were each about US$70, and the surge protector another $50, so my total cost was around $260, not counting shipping for the two power packs.
Backdrop and Temporary Placement
After weeks of neglect, I decided that further work on the tram layout wasn’t going to happen anytime soon, and I needed to reclaim the section of basement floor it was occupying for other work. I was also due to get the last bits of track and equipment I needed, and wanted it somewhere I could run trains on it. So I added the backdrop photo, and put the table in it’s semi-permanent home in my living room, with just track and buildings to serve as scenery. Now I can run trains (I have two power packs now) and play with it, and the scenery is no worse than what I was looking at on the big layout for the first year or so. See the above-noted construction page for a couple of photos of the backdrop construction.
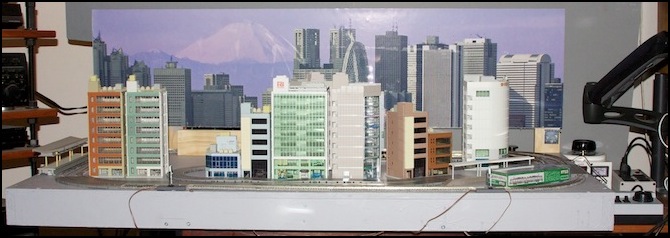
Tram layout installed in living room
