


An Urban Tram Layout: Construction
I started planning my Urban Tram Layout with the idea of something roughly coffee-table size, and decided to use 2’ x 4’ as a starting point, partly because it was an easy size for lumber and insulation foam structural materials, and partly because this fit the same sectional footprint I was using on the big layout, and this might become incorporated into some future basement-filling around-the-wall layout built from that.
Table Construction: May/June 2011
I considered a lightweight frame holding 2” insulation foam as the base, but weight isn’t a major factor and I’ve found having a solid plywood base useful for attaching things like overhead structures and wiring in the past, so I just knocked out another of the same 2’ x 4’ boxes of 1/2” birch plywood and 1” x 3” pine boards that I’ve used for my large Sumida Crossing layout. The only differences are that I omitted pre-drilled holes for wiring and the foam layer and added two wide 1” x 4” cross-supports sticking down about 1/8” (3mm) below the frame, that will serve as legs to hold it up off whatever table it’s placed on.
I’ll drill wiring holes as needed, and the two “legs” will have felt or something placed on the bottom to protect the furniture surface. Handles will be placed on the ends to make it easier to move.

Once built, it was given two coats of gray primer paint to seal the wood (the underside got one coat, as I didn’t care about the woodgrain being visible). I expect this to be entirely covered by roads and scenic material, but the gray makes for a nice urban pavement color if anything shows through.
Backdrop
Behind the raised tracks at the rear there is a backdrop. This suffers from the usual problem that the backdrop ends on the scenery, and the edge needs to be concealed. I deliberately chose a distant view that was somewhat washed-out and will conceal the join with a fence and some shrubbery, to give the impression the land falls away behind the tracks. I chose a size of 12” (above the tracks, to the top will be 15” above the layout surface) as a reasonable height for a small layout that wouldn’t affect my ability to carry or transport it, and at the same time being tall enough to rise above any buildings I plan to use on the layout.
The photo used was an excellent photo of Mt. Fuji over the Shinjuku skyline, by photographer Sam Gao (sarmu), posted on Flickr with a creative commons license that allows non-commercial use and derivative works as long as the original photographer is acknowledged. While Fair Use would likely permit use of a copyrighted image for my model railroad, by using an image with this kind of license I don’t have to worry about that aspect at all. Note: Mt. Fuji’s size is somewhat exaggerated by the use of a telephoto lens, but the image does not appear to be a composite.
Aside from cropping out a 1x4 strip to use on the 1-foot by 4-foot backdrop, I also used Photoshop Elements to interpolate some extra pixels (see my tutorial on backdrops) and I used its Clone Stamp tool to remove a bit of the foreground brown skyscraper that wasn’t was as washed out as the buildings it was in front of. The strong vertical lines of the skyscrapers made that kind of cloning trivial to do. I’m left with a backdrop that gives the impression of a distant skyline, as well as the clear view of a recognizable Japanese landmark to place the layout.
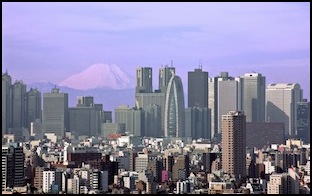

Original image (left, click for Flickr original) and modified backdrop version (right)
Source: Flickr, Photographer: sarmu
The structure of the backdrop is 3/16” (5mm) hardboard, with the shiny side forward. This was glued to two 1x3 uprights using yellow carpenters’ wood glue and clamped overnight, then painted with two coats of gray primer to seal it. I do this so any acids in the wood won’t leak through and age the photo once it’s glued in place. It also keeps the wood from swelling in high humidity and shrinking in low humidity, which could loosen or damage the attached photo. The photo was printed at a local print shop, and both it and the painted backdrop were left aside for a week to fully dry before being glued together with acid-free Paper Mod Podge scrapbooking glue. The backdrops I made a year and a half ago in this manner look the same today as when I made them, so this seems to be a viable technique.
Elevated Track Support: June 24
The non-functional track that runs along the back needs to be raised above the track running under it, not too high, but high enough to ensure clearance and allow easy access (from the back) to fix derailments. I’m going to use 2mm (0.080”) styrene sheet for this, as I’ve used it similarly elsewhere. To support this, I needed some wood supports. I used 1x3 on its side to make the front support, which places the top at 2.5” (American lumber, except for sheet material like plywood, is measured before drying in a kiln, so a 3” board is really 2.5” wide). That’s a good clearance to use for the hidden track.
Of course, I decided to make these early one weekend morning, and made all the rear supports 3” tall because I can’t add. And didn’t discover this until a day later, after attaching them to the layout. Fortunately they were attached with screws, so I could remove them and cut them down to size. Some days I amaze myself.
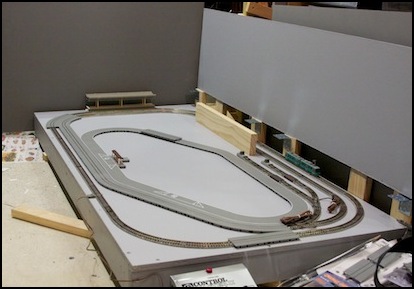
Final Track Placement: July 1
With the arrival of my remaining track order, I finalized the placement of the track, which will eventually be followed by drilling holes for the wires, and attachment of scenic materials to the elevated track at the back (supports and something that looks like a retaining wall). I expect to be cutting the foamcore that will go between the tracks and roadway to form a foundation for the buildings as well. None of this actually happened for a very long time however.
I had previously acquired a Tomix power pack with a TCS output (but without their CL feature for constant lighting of Tomix cars; since I’m not using Tomix cars, this would have just complicated matters). But that assumes a Japanese power supply, which is 100 volts AC, not the 120 volts AC typical in the U.S. (it can vary from 109 to 130, but mine is usually 120). While this might not be a problem, I decided to buy a variable power supply so I could drop this down to 100 V, which added about $100 to the project cost.
After playing with that a bit, I did some testing of the Tomix signals, and decided I wanted to use a pair of 4-lamp signals on the front track, so you could see the lights run through their sequence as trains passed, and a 2-lamp signal in the station as a starting signal. This left one remaining 2-lamp signal, which I may place in the station facing the other direction, unpowered (since you can’t see it) as a starting signal for the other direction.
Backdrop Construction: August 6, 2011
I’d made the backdrop image back in June (see Making Backdrops for details on how these are done), but set it aside to let the ink fully dry, and to allow the paint on the backdrop to which it would be glued to fully cure (which takes a couple of weeks). I finally decided I wanted to move the layout into the living room since I wasn’t going to be working on it, and for that I might as well have a decent backdrop before I ceased all work for the time being. I’ve documented backdrop construction before, so I won’t go over it in detail again.
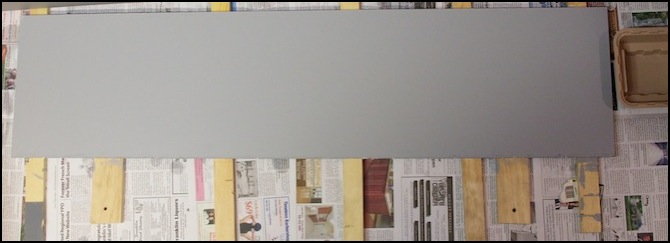
Here’s the painted backdrop awaiting the image

And here’s the finished backdrop 24 hours later
The Long Pause
And with that, the 2011 build season came to an end. I got caught up in working on the big layout, and and after moving this into the living room, set it aside as it stood to play with. I have bought additional materials for it, and have gradually been accumulating buildings, and will return to it, one of these days.
