Enlarging Backdrop Photos
This page is a companion to my page on Making Photographic Backdrops, and goes into more detail about enlarging the photos, based on subsequent experience with the River Crossing scene backdrop.
Well after the original backdrop was done, when I set out to make the new backdrop for the River Crossing scene, I decided that the River Crossing backdrop had never been quite as sharp as I would have liked. It wasn’t bad, it just wasn’t as good as I thought it would be. After a bit of research into image enlargement algorithms and their application, I ended up buying a copy of Perfect Resize 7 as I was exceeding the 4x enlargement that seemed reasonable for the Photoshop Express algorithm, and I wanted the best possible quality I could get given the somewhat limited original image I was using. Some testing showed a minor advantage of Perfect Resize over the best I could do in Photoshop Elements, but it’s probably highly dependent on the source material and in my case, it’s not clear that it was enough to justify the extra expense of the enlargement software.
Enlargement Software
Photoshop Elements (PE), which you likely need if you’re doing any significant image manipulation, includes some basic enlargement capability. And while Perfect Resize (PR) has some basic image cropping, given that both cost the same amount (US$99), if you only buy one, buy PE as it has all of the image transformation capabilities discussed on the Making Backdrops page (and a whole lot more).
Perfect Resize is an example of a class of software called dynamic or “fractal” enlargement software. It’s intended specifically for making large enlargements from ordinary photos, which is what we’re doing here, and it does do a better job than PE, although just barely. This software works by attempting to determine the structure of edges within the image, and providing an enlarged version that creates new pixels from adjacent ones, without blurring any edges. The extent to which this can be done varies, but is at least somewhat better than simple resampling algorithms that aren’t aware of edges.
There are two main applications in this area (others exist): Alien Skin’s Blow Up 3 plugin for PE (US$199) and onOne’s Perfect Resize, originally named Genuine Fractals (US$99 for Standard or $199 for Pro; Standard is fine for this use). Perfect Resize can be run standalone. It can also handle image cropping and some other effects, which may allow it to be used in place of Photoshop Elements if your needs are simple. Both require a fairly recent computer (Intel Core 2 Duo or newer), both work on both OSX 10.6 or later and Windows (Blow Up requires Windows 7, while Perfect Resize works on XP or newer versions). Both offer free trial versions, although Perfect Resize won’t provide it unless you give them a name, address and phone number.
As far as actual enlargements go, once you get past the advertising, Blow Up’s help states that only 2x enlargements have no decrease in quality, but that a factor of “3 or 4” is good enough for many people. Perfect Resize doesn’t note a specific size, but implies that 8x is acceptable.
After some initial experiments with PE, I decided I wanted to give the dynamic software a try. First I attempted to use the free trial of Blow Up, but it wouldn’t load for some reason (I suspect a 32-bit app / 64-bit plug-in problem) and the vendor has no online help, just a worse than useless “contact us and set up an appointment” approach, which isn’t going to work for someone who does his image work outside of business hours. In any case, PR was half the cost, so I gave up and bought a copy of that.
Backdrop Image Photo
The original image I used for the River Crossing backdrop, and which I used again for the “2.0” version, was 42.5” wide at 72 dpi, for a total of 3,072 pixels and 17.75” high (1,288 pixels). This image was from a point-and-shoot camera with a 7 MP sensor, and a wide-angle lens that allowed it to be used to shoot panoramic photos. This image was limited by poor resolution, both from the limited number of pixels, and probably from the lower-quality lens of a point-and-shoot compared to an SLR. And the “1.0” version had been a bit too low-quality for close-up viewing (and while normal viewing distance was several feet, the scene invited closer attention). But I really felt the image worked well with the scene, so I wanted to keep it. This meant I needed to avoid degrading the image while enlarging it, and using every trick in the book to “improve” it (you can’t really improve an image while enlarging it, but you can do things like sharpen edges that make it look like you did from a distance).
Before I started the second round of tests I made some additional changes to the full-image photoshop file based on my observations of the first round of test prints and re-created the 4x6 test section from that. These changes were to correct some color issues in the original photo, which simultaneously had a reddish color-cast, and a tint problem that gave it insufficient green. Using Photoshop Elements I adjusted the cast and tint, which made the sky bluer and the trees greener, and gave some of the buildings a more realistic color. My first attempt looked good on the computer, and terrible in test prints, leading to a second attempt which removed the color cast and increased saturation slightly (which primarily had the effect of making the overcast sky bluish rather than gray), but didn’t try to make the trees more green.
Enlarging the Image
Starting from a 42” image at 72 dpi, I need to add dpi and widen it to fit a 48” backdrop. Beyond making it fit the backdrop, I needed to add space on one side to enable me to place the vertical avenue in the photo where it would line up with the street on the layout. This meant I needed to enlarge it to 55” in total width (I’d print that, and cut excess off after gluing it in place). There was also some excess print below the level of the scenery ground, and I’d crop most of that off to minimize the print size (prints are priced by the area of the image). Because I hadn’t liked the original attempt at this, I decided to see if I could use a 300 dpi size, to allow for close-in viewing, which meant I needed a 5.3x enlargement. In addition to the Perfect Resize version I planned to use, I also did a test with the best settings I could determine for Photoshop Elements’ built-in enlargement with a simple 4x enlargement (to 288 dpi) so I could compare the two.
But First, Some Research
Since I have limited knowledge of image enlargement, I spent some time online looking for information and guidance as to how to best do it, initially with a focus on use of Photoshop. I found a very good explanation of the different image enlargement algorithms on this site. Of the algorithms discussed, PE supported Bicubic Smoother in addition to Bicubic. I also noted that the use of sharpening made a very significant improvement. Using the calculator on the page, I determined that for a 0.5m (19”) viewing distance and a 300dpi print, I should be using a radius of 2.4 pixels. That’s also the number to use for 1.0m distance and 150 dpi. Other sites had different recommendations (usually vague “experiment and see what works” ones).
Although that first site mentions sharpening, it doesn’t really say much about how to do it. I found this page, which gives a much more detailed explanation. It noted that “more refined” was a good item to select in PE, as it sharpened “more slowly” (I think that means it iterates the algorithm more times, which I’ve read elsewhere is desirable). It also suggested using a radius less than 2, but I went with the 2.4 from the calculator above, and it suggested using Lens Blur (a high pass filter) rather than Gaussian Blur (an Unsharp Mask), but after trying both I decided Gaussian was producing a better result overall (I found Lens Blur worked better at removing pixel/grain noise, but Gaussian made sharper edges). I took the default Amount of 100% for lack of any idea what else to use. In Perfect Resize, I used a High Pass sharpen, which forced use of a 2 pixel radius.
With PE, sharpening requires the following:
- Merge any layers you created into a single “composite” image.
- On the “Enhance” menu, select “Adjust Sharpness...”
- Use the “Remove” pulldown to select “Gaussian Blur” or “Lens Blur”
- Set the Radius (as noted I used 2.4, the second link above recommends numbers between 0.5 and 2.0).
- Set Amount (I took the default 100%)
- I left “More Refined” checked, as noted above.
Pictures with lots of detail may need smaller Amount and Radius settings. Also, more sharpening is required for a print than an online image, so doing test prints to paper is necessary to see the actual results. I didn’t see quite that need for sharpening with this image, although doing test prints turned out to be very useful.
This new PE method did produce a visible improvement. Not as much as I’d hoped (I think fundamentally the source image is too limited) but definitely there. Perfect Resize did slightly better for very close-in viewing, but at 3’ (1m) or further the difference was imperceptible. I only found this out after doing test prints though. Initial work with making JPEGs and viewing them on my computer seemed to show a more significant advantage.
With Perfect Resize, in addition to the size, there are two controls that affect the results in a useful manner for a backdrop photo: Sharpening and Texture Control. The latter is really three sliders, but there are a number of presets that amount to preset values for a range of increasing “grain”, ranging from “low-res JPEG” through “general purpose” and “landscape” to “high detail”. The Sharpness options include both High Pass (aka Lens Blur in PE) and Unsharp Mask (aka Gaussian Blur). I experimented with a number of combinations of these.
Testing the Algorithms
For testing, I opened the original 72dpi JPEG in PE, and selected a 4x6” rectangle (10cm x 15cm) with a mix of detail and broad areas of uniform color. I made this into a new image (still at 72 dpi, unmodified) and saved it as a Photoshop (.psd) file. This was saved to a JPEG at 80% quality, that was then printed directly onto a 4x6 sheet of glossy photo paper using my Canon photo inkjet (set to “high quality” mode) to use as a baseline for comparing all the manipulated images. The 4x6 72dpi .psd file was also copied and used as the starting point for all of the test enlargements, all of which were made in .psd form, then saved to JPEG and printed in the same manner as the baseline print.
The original image (72dpi, 4” x 6”) horizontal test - appears slightly smaller in browsers
After printing the images, I first examined them close up (reading distance, about 18” or 0.5m) to look for artifacts and edge sharpness, as well as color bleeding. Then I took them to the layout and propped them up against the backdrop, and stood back at various distances (edge of the layout at 2’, a “normal” distance of 3’ and a “far back” distance of about 4’, or about 60cm, 1m, and 1.3m).
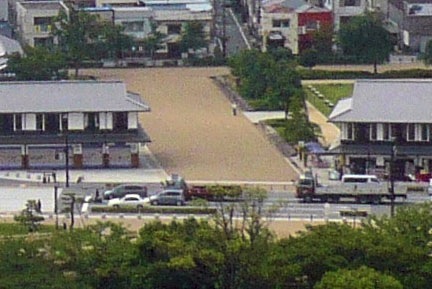
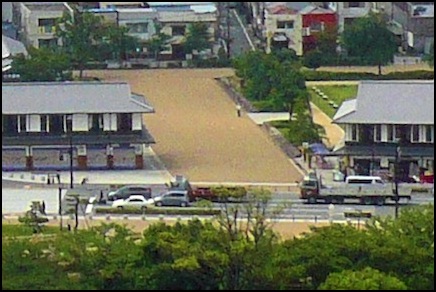
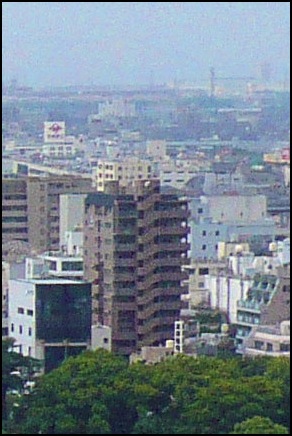
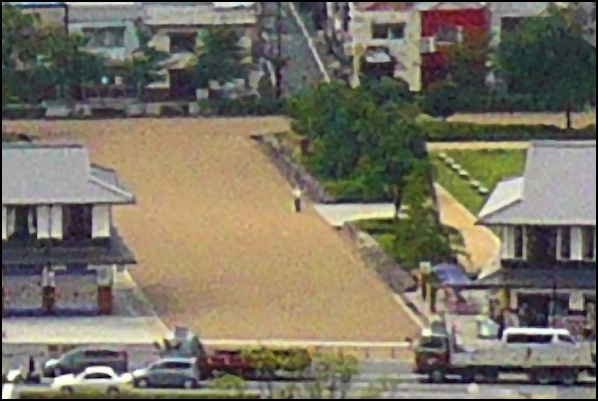
Things I looked for in the image were the large gray roofs (and how uniform they looked), the sandy open area, the detail on the cars waiting at the intersection and the sole figure in a while shirt walking on the sandy area, plus the cream, red and gray buildings at the top, right corner (the cream building has some darker squares on it in a speckled pattern; those are real, not artifacts of the image). These seemed to be things where I’d see the benefit of sharpened edges, and of any improvements to the “speckled” character of the original photo (look closely at the dirt area above to see this).
Test One
I made the following test images:
1) Baseline (72dpi)
2) Photoshop Elements, 288dpi via Bicubic Smoother, Gaussian Blur
3) Photoshop Elements, 288dpi via Bicubic Smoother, Lens Blur
4) Perfect Resize, 300dpi, High Pass sharpening, Texture Control set to General Purpose (GP)
5) Perfect Resize, 300dpi, High Pass sharpening, Texture Control set to Landscape (LS)
One thing that was immediately apparent was that from 4’, any difference was extremely minor. From 3’ there was clearly some advantage to any of the enlarged images over the 72dpi baseline, and right up at 2’ the more subtle differences due to edge sharpness and noise came through more clearly. This tells me that there’s some advantage to enlarging a 72dpi image (as there should be at these distances) even when starting from one this poor. Also, none of these looked anywhere near as good as my existing Riverside Station backdrop, which was based on a higher-resolution DSLR photo. Clearly, the point-and-shoot photo was not a great choice for a source image.
Comparing the individual test images revealed a slight advantage to Perfect Resize with the right settings, but it was easy to choose ones that looked worse than the enlargements done in Photoshop Elements. In all case, the enlarged images looked less “fuzzy” than the original baseline, with sharper edges and the illusion of more detail. But some enlargements compromised this with significant noise in the large single-color areas. Also, what I saw as significant in the test images wasn’t the same as what I saw looking at the original JPEGs those were made from. In this case, the test prints were essential for understanding how the enlargement would work under real-world conditions.
Of these test prints, #4 was the best, with minimal noise on broad areas of color, and sharp edges. However, #3 was second to this, slightly lacking in edge detail and with slightly more noise in large areas of color, but at a 3’ viewing distance it was indistinguishable. The other two enlargements were slightly worse at 3’, and significantly worse at 2’. The baseline image might have worked at 4’, but was clearly inferior at closer distances.
So, at this point, Perfect Resize with High Pass sharpening and a General Purpose selection for texture detail looked like what I wanted. But I’d only tested one part of the image, and there were more settings in PR I could adjust. I also realized my photo had some color problems. So I decided another round of tests was in order.
Test Two
In the second test (actually it was several tests as I refined my approach), I focused more on optimizing the Perfect Resize settings, experimenting with other texture options than “general purpose” and “landscape”. As noted, I worked with a slightly different version of the original image, with color corrections. And I added a second 4x6 taken from a different part of the original image, to make sure I wasn’t missing effects or artifacts in the more distant (and fuzzier) parts of the photo.

Second round 72dpi horizontal test image - color differences are subtle. Note this is roughly “actual size” of the image on the backdrop (well, closer to 3/4 actual size since most monitors these days are closer to 100 dpi than to 72 dpi).
A reduced version of the 300dpi PR image using Unsharp Mask sharpening and General Purpose texture control.
A 1:1 view showing actual pixels of the PE-enlarged Gaussian Blur (equivalent to Unsharp Mask) image. Note that this is roughly 4x the size of the image that will appear on the backdrop.
A 1:1 view showing the actual pixels of the final Perfect Resize High Pass (equivalent to Lens Blur) image.
As you can see in the “actual pixels” images above, Perfect Resize is removing some of the speckling in the image at the cost of blurring the edges of things, and High Pass sharpening does more of this than Gaussian Blur sharpening.
After this first round, I decided I’d done too much color-correcting, so I went back and changed that, then did another round of tests with the horizontal image. The results were similar. But this time I also tested with a vertical slice of the image, choosing an area that included foreground trees, a strong mid-ground building, and both background cityscape and sky.
The 72dpi 4x6 vertical test image
What I found in this round of testing was that Unsharp Mask sharpening looked best for large areas of color (like papered rooftops) and appeared to have better edges when viewed on JPEGs, and yet High Pass sharpening actually looked best in test images on the layout. I also discovered that while “low-res JPEG” texture looked best when viewed on the computer in JPEGs, when printed out and placed on the layout, the General Purpose texture detail setting was (very slightly) preferable. In both cases the Landscape and High-Detail settings looked poor, injecting (or failing to remove) speckling in the image. I also found that differences that stood out in the horizontal image were almost non-existent in the vertical image, where the effects were much more subtle. And because of how I’m cropping most of the foreground of of the image, that means that what’s left is mainly going to be parts of the photo where the differences between PE enlargement and PR are negligible. However I’m also doing much more than 4x enlargement (the number my PE tests were done at), so there may still be some value in PR.
Final Processing
Now that I knew what I wanted, I went back to the original 72 dpi image (after color-correcting as described above) and took a close look at it. I noticed that it had some perspective distortion, typical of wide-angle lens photographs, where buildings near the outer edges leaned slightly away from the center. It was also slightly non-level, with the left side tilted slightly down. I used PE to correct this, with a combination of the Free Rotate and Skew controls. After several false starts, I had an image I liked. I cropped this to make it rectangular. Then I did some math.
I was starting from an image which now had 2,996 horizontal pixels at 72 dpi. I wanted to raise this to 300 dpi, which on the face of it would be a 4.16x enlargement (300/72). However, I had the previously mentioned need to widen the original to at least 54 inches (now from 41.6”). And further, I had a vertical portion that was presently 13.75” on the image, and needed to be 19.5” to fill the backdrop (I’m getting better at keeping track of where the top is). This meant I needed a 1.42x enlargement (19.5/13.75), which would be the larger of the two compared to what I needed to widen it, and actually make the full image 59” wide. Combined this meant I needed a 5.916x enlargement (1.42 x 4.17, those numbers are rounded a bit and the actual number on the calculator had more decimal places). Thus I would need 17,726 horizontal pixels in the final image (2,996 x 5.916, again I’m showing a rounded number which is why the pixel count doesn’t exactly match).
I opened the PSD file with Perfect Resize, made sure the sharpening algorithm was set to High Pass, and the Texture Processing to General Purpose, then selected 300dpi from the size pull-down (do this first). That changed the pixel count. I then made sure “constrain proportions” was selected and overrode the horizontal pixel count, entering the 17,726 number I’d calculated. Then I clicked apply, and eventually it prompted me to save the new PSD file. I did. Then I opened that in PE, and saved an 80% JPEG copy, which was the file I’d actually take to the print shop.
4x6 section from the final image, reproduced at roughly actual size on a 100dpi monitor
Summary
Native PE enlargement did degrade the original somewhat in terms of noise, but the advantages in edge sharpness at closer distances may be worth it. The Perfect Resize image, even though made larger (5.9x instead of 4x) appears very good, and clearly better at closer viewing than the original and slightly better than the others. Whether the cost of PR is justified is another matter, but given that the backdrop print itself costs more than the software did, and I’ll likely be looking at the backdrop for years to come, I think the investment of both time and money in finding an optimum enlargement was justified.
After a number of tests, I decided that I liked the Perfect Resize image made using High Pass sharpening, with the texture detail set to the General Purpose setting. However, for the most part the differences were subtle, and I suspect both subjective and strongly dependent on the individual photo.
And one big take-away was how important the test images proved to be. They showed me color-casts I couldn’t see on the computer. And they revealed that details that mattered in the JPEGs were subtle or irrelevant in the printed images, while at the same time showing me that things that didn’t look good on JPEG (like High Pass) looked better on the printed image than some of the alternatives.
Note: Using the small 4x6 test images has another benefit: they were fast, a PR enlargement of one took seconds. The final PR run, enlarging the full image to 5.9x size, ran for 90 seconds on a Core i7 quad-core CPU (the activity monitor showed all 8 virtual cores at close to 100%, which I didn’t think was possible) and produced a photoshop file 353 MB in size (saved as an 80% JPEG it was still 9.1 MB in size, compared to the 1.3 MB original). That’s really not something I’d want to do for every test.
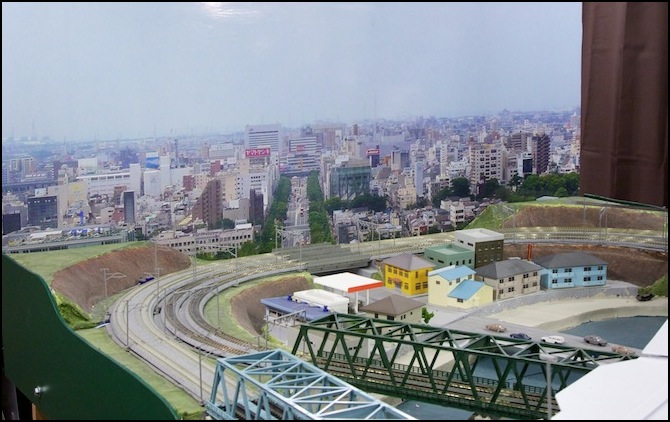
Below is the finished version, mounted behind the River Crossing scene.