


Backdrop Construction
The purpose of a backdrop is to suggest that the scene modeled is part of a larger environment, implying depth that doesn’t exist. In rural areas, a few faint mountain peaks painted on the wall can provide a reasonable sense of depth. This is harder to achieve with urban environments. However, photographs can do a very good job, if chosen carefully. The process of selecting and manipulating photographs to make a backdrop is described on the Making Backdrops page, along with a companion page that goes into more depth on enlarging images. But once you have an image, you need a structure to attach it to, and a means to attach it securely.
My first attempt at this used photographs sliced up and printed on 8.5x11 inch “presentation paper”, attached with spray glue. This worked badly. The paper didn’t reproduce photos well, and the glue didn’t hold to painted wood (and as we’ll see below, painting the wood first is important). Six months after doing the backdrop for my River Crossing scene this way, it was clear it wasn’t going to be the long-term solution. So I did the backdrops for the other two scenes on the layout differently, and eventually went back and fixed the first one as well. The new approach was to use a print shop to print a single large photo on coated glossy photo paper and glue it to the backdrop with an acid-free paste glue designed for scrapbooking use. A year after mounting them, those were still looking as good as new, so I re-did the River Crossing backdrop in the same manner.
It’s been three and a half years since I made the first photo backdrop for the Riverside Crossing scene now. Since then I’ve made a total of seven four-foot wide backdrops for different layouts, of varying height, using this approach. All have remained as good as the day they were made. The one lesson I did learn along the way is that hardboard will tend to bow in or out in the center of a four-foot span, so mounting rigidly to keep it straight, perhaps with a horizontal support across the back, is important. Two developed a visible problem, and I think that’s due to the attachment to the back of its layout being not quite as well supported (there’s no other thing behind them to hold them in place).
Material
I use 3/16” tempered hardboard (aka., Masonite) with one side smooth as my backdrop mounting surface. This is painted with a couple of coats of interior latex primer to seal the wood after first having 1x3 dimensional pine supports glued to the back with yellow Carpenter’s glue so that the backdrops can be bolted in place. While the original backdrops only have a pair of supports, these back up against each other, and provide a measure of rigidity. After noticing some curving to the freestanding River Crossing scene backdrop, I made a more complete support structure for it to prevent that. I failed to remember than when I built the Hilltop Scene backdrop, and as a result it has a more pronounced curve than I’d like and may need to be re-done.
While I use fairly thick hardboard, thin hardboard is available that can be curved at corners. I avoid that problem by not having corners where the backdrop meets, and use heavier material to minimize the need for supports. But I’d do things differently on an around-the-wall layout, and more supports would be needed.
Note: even if you don’t use photographs, hardboard can provide a superior surface for painting than a wall, and should still be sealed to prevent moisture infiltrating over time. Unpainted hardboard has a tendency to swell, particularly at the edges, in damp basements.
I use dimensional lumber (boards) to make the supports. This material is rarely perfectly straight. I go to a lumber store where I can pick through a large inventory and pull out the straightest boards for my use. Over time these could warp as they dry out (if not perfectly dry to start), which is another reason to paint them.
Painting
I paint these (front, back and edges) with interior latex primer. I wait at least a week after gluing the supports before painting to ensure all moisture in the glue has a chance to escape so that it forms the strongest bond it can, and a week or two after painting before attaching the photo, to ensure the paint has cured (primer cures in a couple of days). If using finish paint rather than primer, you would need to wait longer, as I’ve seen that remain tacky for over a month, which means it’s still curing.
There are two benefits to painting. First, you prevent the material from swelling when it’s damp, and shrinking when it’s dry. And while this may be minimal in many environments, it could affect the mounting of the photo. Also, over time hardboard will tend to absorb moisture, and over the course of years I’ve seen unpainted edges become thicker than the rest of the board. The second benefit is that wood is by nature acidic, and acids tend to make photo colors shift over time (generally becoming “yellowed”). Mounting boards for photographs typically use acid-free materials, but since you can’t get acid-free wood, sealing the acids inside with a layer of paint is the next best thing.
Scene Backdrops
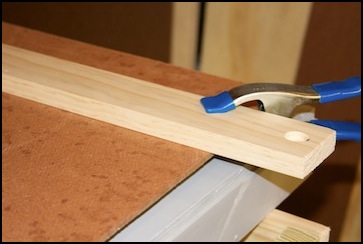
Backdrops for the two main scenes (Riverside Station and Urban Station) were fixed to the four center tables. These were 18” (46 cm) high initially, and recycled from the earlier HO layout. They were originally just sheets of masonite (hardboard) with the shiny side painted with blue latex paint. On the old layout I’d just used c-clamps to attach them to the baseboards, but that method made exact positioning difficult and tied up a pair of c-clamps per backdrop. To mount the backdrops on the new layout I wanted a more permanent structure, and so 1x3 boards were attached to the back (rough side) with wood glue and clamped (shown at left).
The boards first had a 3/4” hole drilled halfway through, and a 1/4” hole drilled the rest of the way. This is to allow a 1/4” hex bolt and washer to be used to attach the backdrop to a table, without the head of the bolt protruding (since the board will be backed up immediately to the table behind it, and I want just the 3/4” gap needed for the board thickness, and no more. One board was set 4” in from the right side, the other 7” from the left, so that when two are placed back-to-back, they will be offset. And, of course, I got this slightly wrong, and had to offset one of my backs about 1/4-inch (which offset the one next to it) to avoid hitting the support behind it. Measure TWICE, cut (or glue) once. Some year I’ll learn to do that.

The backdrops are mounted so that the bottom is 3/4” above the table top (shown above at right, and below). This means that one layer of foam must be present to hide the gap, but that there will be a narrow access space for access to wiring if the lower layer of foam doesn’t extend all the way to the back. This will be useful if I need to drop power wiring from track away from a hole, and splice it to heavier gauge wiring to get to the hole leading through the table top, although it won’t be readily accessible once the tables are bolted together. I’d planned to do something similar at the front, but in the end mostly I didn't.
Before I decided to use a backdrop photograph, I’d thought I’d simply leave these as a blue sky (maybe with some clouds painted on), so I painted them with a blue color after the primer had cured. They actually remained this way for quite a long time before photographs were selected and attached, during which time the backdrops were spattered with scenic materials, so this might actually be a good interim step, with the photo only added after the scenery is done (although I didn’t wait that long).
Although three of the backdrops were recycled from an old layout and already painted a light blue, I’d never liked the effect it gave, and I needed to paint a fourth. Plus the paint on the original ones didn’t go all the way to the bottom. So I repainted all of them, first with primer, then with the new sky color (see photo below). I went with a darker blue, intended to represent the sky away from the horizon (assuming lower elevations will be hidden behind structures and scenery). The result was a bit too dark, and I later repainted them to an intermediate shade I liked better, but at this point they were at least consistent.
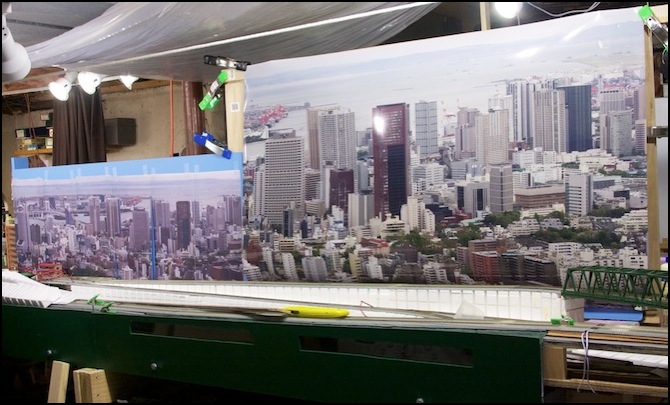
Two things of note: the edges between adjacent photographs are very visible in this method, even if the boards line up. It’s better to use a long backdrop, or carefully plan the gap to be between two visual “scenes” of the layout, rather than smack in the middle of the scene as I did. Also, it’s really best if the board is one sheet. Butting two horizontal sheets together for more height (as I describe below) leaves an irregularity after the photo is glued on, no matter how careful you are, which shows up in some cases by reflecting the overhead lights in a spot or smear.
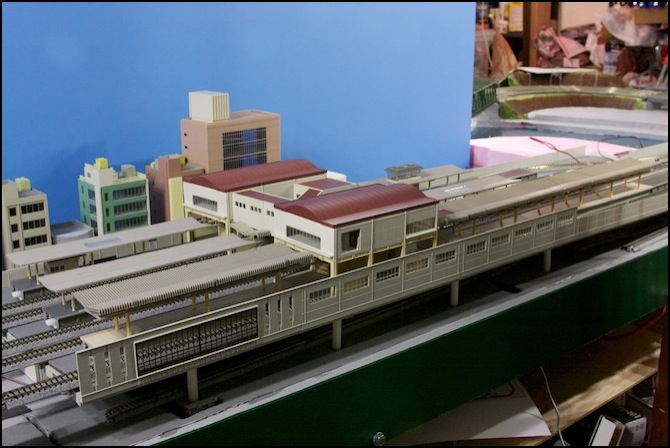
The photo below shows the finished Urban Scene backdrop, with the original track-lighting spotlights causing glare at the top. Not the ovals below three of the circular glare patches: that’s the result of the lower board being slightly in front of the upper board, causing the photo the angle back as it goes up. This is despite mounting a board across the back to hold the two “perfectly” flush (obviously, it didn’t do that).
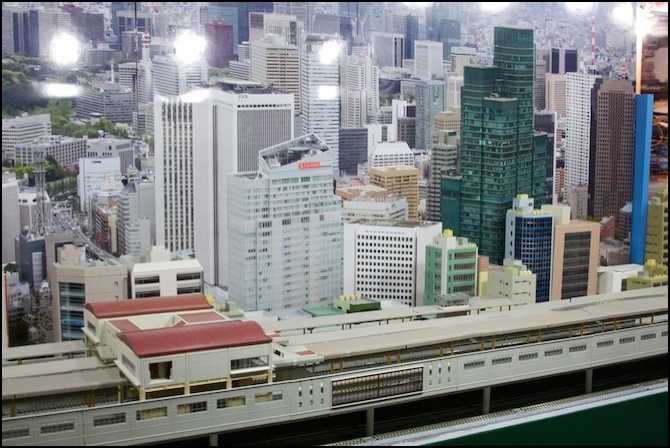
Urban Scene Backdrop, with glare from track-lighting spotlights
Extending the Backdrop
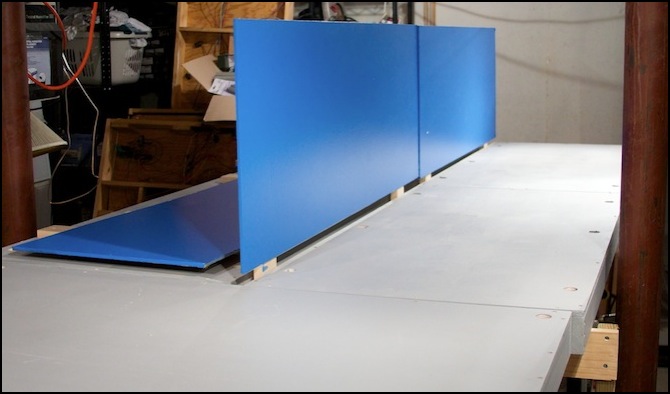
Due to a problem of my own making (I made the photos too big) I went back and added more height to these 18” backdrops later, making them 29” (74cm) tall. This is really too high, as the image tends to dominate the small scene. I think the ideal height is something less than the depth of the scene. The original 18” backdrop height may have been too short, but 20-22” is probably as high as I should use for the 24” deep scene.
Old (left) and new (right) heights for the Riverside Station backdrop
River Crossing Backdrop
This one is slightly different. I made it 24” (61cm) high, which seems to be a reasonable height for a scene that can be viewed from the side (about 24” deep) or across the other scenes (more than 48” deep). Also, the original approach used just two supports, but the unsupported ends began to curve away from the table. So when I re-did these, I added 1x2 bracing on the back to firm it up, and added another pair of bolts at the outer ends (making four total) to lock it tightly to the table.
I also decided to paint the back, to prevent the hardboard from changing shape due to varying moisture over the course of the year. One reason for this is that when I mounted the photos, I noticed for the first time that the edges of the original boards (which are twenty years old now) had swelled slightly. This wasn’t enough to prevent use as mountings for the photographs, but it did complicate that a bit. And more importantly, it suggested that even in my dry basement, long-term moisture absorption could be an issue. I haven’t noticed any problems with the photos on the existing backdrops (which are only painted on the front), but those have only been attached for a year, so I decided to err on the safe side here by fully sealing the hardboard with paint. I’m going to use that on all future backdrops as well.
To make these, I re-used the original backdrop, but sanded the front to remove any lingering glue from the first backdrop, then repainted with primer. I then let this sit for a while before attaching the new backdrop photo, although it was already printed and waiting. This also gives the inks on the photo time to cure (the photo will give off a faint odor for at least a week, so the inks are still drying for at least that long).
Note: as usual, I use a foam “trim roller” to apply the paint. This produces a smoother finish than brush painting (it’s not perfectly flat, there is a bit of a “pebbled” texture).
Sanded (left) and re-primed (right) River Crossing backdrops
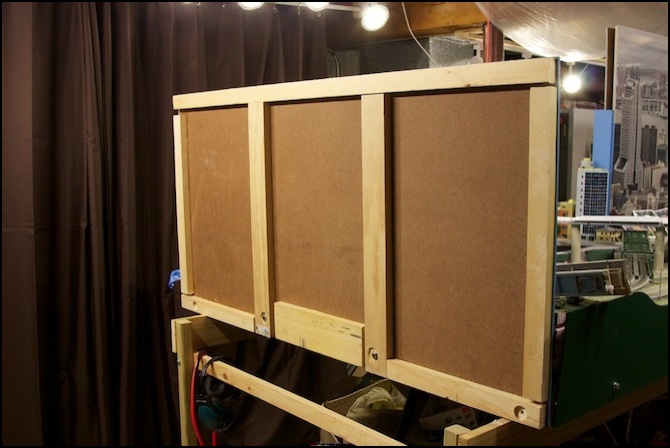
River Crossing Backdrop from behind (before painting)
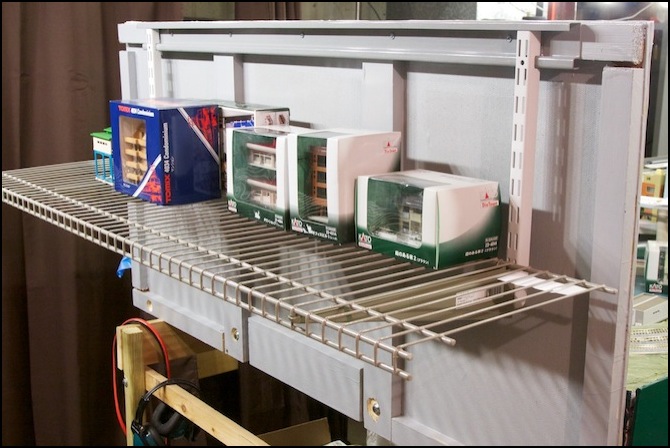
Storage Shelves
I realized after constructing the backdrop, that I could use the reverse side of it for storage, so I added a support bracket and some shelves. This is limited to storing light materials, to avoid bending the hardboard (although the pine boards should make it fairly rigid).
Mounting Photos
The next step is to actually attach the photos to the backdrop. As mentioned above, my backdrops are made from painted hardboard and I’m printing the images on coated paper. This means the paper is somewhat porous, but the backdrop is less so. And that limits the strength of the attachment. On the other hand, painting the backdrop also minimizes the problem of acids from the wood altering the image color over time.
As described above, note that wood can expand and contract due to changes in humidity. My area isn’t subject to radical changes, and I have a dehumidifier in the basement to help limit this as well. And hardboard is less prone to this problem than lumber, so I haven’t really seen any problem with this other than mild swelling of the edges of twenty-year old backdrops. But I decided so seal both the front and back of the backdrop with paint anyway. If you live in an area subject to significant changes in humidity, this may be an even better idea.
For mounting to the painted hardboard, I used an acid-free glue called Paper Mod Podge, which is a water-based PVA type of glue developed for scrapbooking use. It’s reported to do a good job attaching coated paper to painted wood, and it worked well in my experience. You can find this in craft stores as well as online. Note that there are a number of different kinds of PVA glues under the Mod Podge name, and only Paper Mod Podge is acid-free.
To apply the glue to the large backdrops I used the same small foam trim roller (in 4” or 100mm size) that I’ve been using for all of my large-area priming and painting. I also used a solid rubber roller (sold for ink stamping and called a “brayer”) to flatten the photo. I use disposable nitrile gloves when working with any chemical, although Mod Podge is fairly harmless. Gloves also make it easy to ‘clean’ my hands if I get glue on them, by discarding the old glove and putting on a new one. To avoid contaminating the glue or the photo, I used powder-free ones I bought in an auto-parts store, rather than the powdered ones (sold in paint stores) I usually use.
I used about half a 16oz bottle of Paper Mod Podge for each 48” backdrop panel. After stirring well with a clean wooden paint stirrer (the oil in it tends to settle out), I used the foam roller to apply a thin layer of the glue to the backdrop (the hardboard) and then gently set the print down atop it. The glue grabs pretty well, but not so strongly I couldn’t pull the print into position with a bit of work (pressing down and dragging with my thumbs). I made sure the top and the edge where the two backdrops meet in the center were square; the rest I can trim later.
Then I rolled the print flat using a rubber roller, called a “brayer” and sold in craft stores for ink-stamp use. I worked gradually from top to bottom starting at one end and rolling away from that end for 12-18”, to push any excess glue ahead of the brayer (under the print). At first I could hear air bubbles being squeezed out of the glue with a “squishing” sound. I did this repeatedly until I could barely hear anything, then moved ahead to do the next section. After doing the whole print, I went back and started over. I kept this up for 15-20 minutes until I couldn’t detect any change from further rolling (that’s also about how long it takes the glue to set up so that you can’t reposition the print).
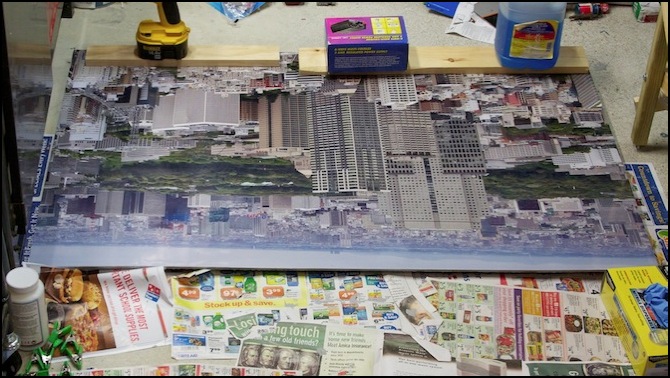
I had a couple of problem areas. The lower edge in the photo above just didn’t want to lay flat, and the reason was that the hardboard wasn’t flat. The backdrop was recycled from the old layout, and is nearly 20 years old and was only painted on one side. Over time, the lower edge swelled a bit, giving it a small lip. I rolled it as flat as I could, then lay some wood along it just above the swollen part, and put down some fairly heavy weights to make it sit flat. This worked nicely, and the image was glued down. I had a similar problem on the other panel, although at the top (which was new) this time. The glue should set in a couple of hours, but I left them alone for a full day before taking the weights off and standing them up. When making the backdrop for the Urban Tram layout, which was brand new, I had no problems. This suggests that even a relatively short period (a year or so of storage) in my fairly dry basement is enough to make unsealed hardboard swell.
I’d planned to use small clips to hold the print in place while the glue set, but it turned out that the tack of the glue, after I’d spent the first 15-20 minutes rolling it flat, was enough to hold the print firmly in place without them.
The final step was to trim off any of the image that overhung the edge of the backdrop panel, although I didn’t bother with overhang on the bottom (which will be hidden behind scenery). Then I re-attached the backdrops to the layout tables and put them back in place. The results speak for themselves:
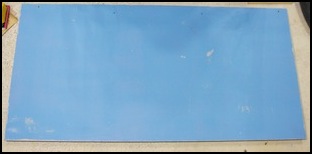
Plain Blue Backdrop in Urban Station scene
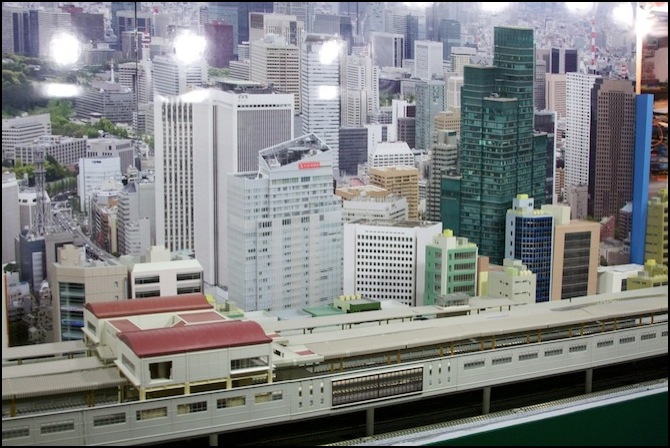
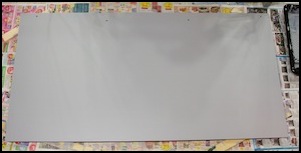
Backdrop with mounted image (white spots are glare from lights)
One thing I didn’t think about until after mounting the image: would the buildings at the front of the image fit in well with the model buildings at the back of the scene. Selecting the right print really needs to take this into account.
