


Village Construction
The title might be a bit overdone, but I’ve moved from the “thinking about it” stage to the “building mockups” stage. It’s still planing of a sort, but it feels more like construction. I was ready to start cutting styrene a couple of days ago, but now I think I need a little more contemplation and review before I do that.
I’ve also started taking apart the buildings to prep them for painting, although I’ve realized that I need to adjust my positions slightly, which has diverted my attention from that work. I’ve also started working on my detailed design for the roads and intersection, which is partly what’s caused that re-think about posiitoning.
After more research on road sizes, summarized on the Roads and Highways prototype page, and a good deal of thought about the actual size of my roads, summarized on my Cars and Roads modeling page, I started drawing a 1:1 scale graphic of the road in my layered drawing program (Omnigraffle). My hope is to replace some of the layers with photographs of concrete, asphalt, and similar, as well as adding in details like manhole covers, and then print the final version as either a decal or photo that would be layered onto styrene. Using styrene as a backing has one benefit for use of a decal: printers can’t print white, so decals leave that color clear. A decal applied to white-painted styrene will look correct even if it contains white lines. I may use a similar technique to create the sidewalk as a separate item, although I’m also considering just using painted “tile” sheet styrene and applying separate delays for things like manholes and “braille” safety strips at crosswalks.
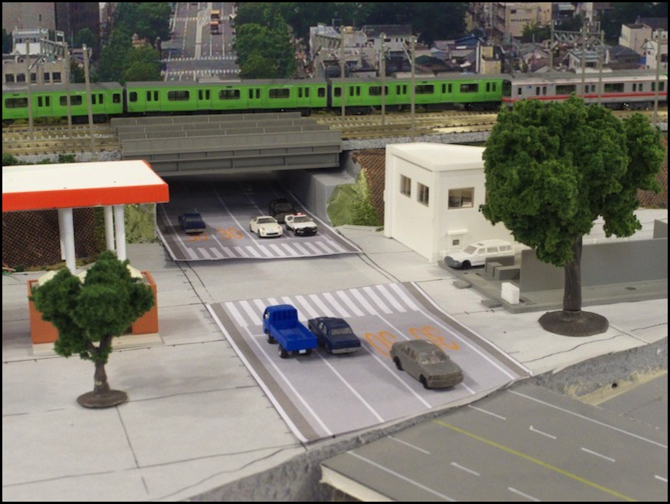
Right now I only have one short section created, and I’ve printed two copies for the mock-up above. Eventually the one towards the river will be duplicated and customized to fit that part of the scene. And there will be a third part for the middle of the intersection, plus bits for the two side roads (those may start with extensions off the intersection graphic).
What you see in the photo above for the roadway are two lanes in each direction, with a small side area representing the drain gutters (the dark gray at the edges is a concrete-color). The gutters are actually formed of small rectangles with a faint outline, representing cast concrete. The originals I used as a basis were square, and the ones above are 4mm x 6mm rectangles, but about 2mm of the “road” will slide underneath the sidewalk so the visible part should be roughly square. This lines up nicely with the “temporary” foam-core bridge (as I made it about three years ago, it’s been “temporary” for some time now; I really need to get around to scratchbuilding a real bridge, perhaps using the same techniques for the roadway surface).
The gray of the roadway as seen above is too light, and will be replaced with something darker one way or another. The orange writing on the road that you probably can’t read is a “30”, indicating the speed limit. That’s not present at every intersection, but I’ve seen it at a number of them (using Google Earth, a great research tool for street marking usage).
One problem that I’ve run into is that I was budgeting too little space for sidewalks in my original plans. What I realized looking at Google Earth is the for this kind of road, I want to have something like 2.5 to 3.2 cm (1” to 1 1/4”) on each side for sidewalks, to allow room for an edge-of-road fence and small planters plus room for two people to pass. I had been assuming more like 0.5 cm, which is way too little.
One way to address this would be to make the road two lanes instead of four, which would give me room to extend the sidewalks under the train bridge as well. But I don’t like that. This is supposed to be a major artery, and those more often than not are four lanes (or more for the really big ones). Two lanes with a big sidewalk isn’t going to look right, any more than four lanes with a small sidewalk would (although there are prototypes for the latter). Another option is to reduce the lane width, right now I’m using 20 mm, but 19 mm would be prototypical for this kind of road in some places, and I could possibly shave another mm or two without looking unreasonable. I could also just keep the road as-is and set the buildings back further.
Setting the buildings back on the left side won’t be a problem. Doing it on the right may cause me to eliminate one of the buildings I’d been planning and replace it with something smaller. This needs some more thought and I need to make up some test images with other sizes and see how they look, which is harder now that the buildings have been taken to the workbench and mostly disassembled. Oops.
But it’s progress, of a sort. I have a good handle on what colors to use, and how wide the lanes need to be, and where the crosswalk and stop line go in relation to the intersection. And I worked out the mechanics of drawing the stretched numerals for the road (a combo of MS Word and Adobe Photoshop Elements to create a graphic from colored Helvetica numerals and then distort the resulting image, which then gets pasted back into my drawing program as an element on a layer of its own that I can duplicate and re-position at will).