


Model Railroad Photography IIIb - The Camera
Well, that didn’t take long. After my post a couple of weeks ago about the advantages of cameras with smaller sensors, I continued looking at what was available, and quickly discovered that RAW-capable point-and-shoot cameras were much more common now than they had been even two years ago. At the same time, cameras with tilt-and-swivel rear LCDs were rather rare. And then I stumbled across the Samsung EX2F. And what I found was compelling enough to get me to buy one (it helped that they’re on sale at present, significantly marked down perhaps in advance of a new model).
Now Samsung isn’t a name that comes to mind when you think about cameras, or at least not when I do. They’re a big company with a lot of different lines of business, but I think of them (outside of major appliances) as a smartphone company. And many of their point-and-shoot cameras are smartphones-without-the-phone with better lenses.
But the EX2F is something different, although it clearly shares that genealogy. It has a number of features aimed at “enthusiast” photographers, and its performance (in RAW anyway) has been rated very highly by professional photographer reviewers (like this one). Nothing is perfect, particularly in a device that’s as much of a compromise as any small-sensor enthusiast-oriented camera has to be. The camera has both good and bad. I think the good parts outweigh the problems or I wouldn’t have put down close to US$350 for the camera, memory card and accessories.
Having done that, here’s a quick review based on a couple of days of using it. I’m still learning the camera, and have yet to do any really serious layout photography with it, just a number of tests. But overall I’m liking what I see.
The Bad Stuff
Let’s get this out of the way: Samsung’s customer support is best described (by those who have direct experience) as incompetent, assuming you want to be charitable. I don’t plan to ever call them, so I don’t care. But if this was my only camera, I’d weigh that very differently. Google around, and you can find some real horror stories. It turned up 267 Million pages on a search I did! I’m sure some had nothing to do with poor customer service, but certainly the first bunch I leafed through were all abysmal.
And the enthusiast stuff has a feel of being added to a camera that was originally aimed at a different market, and added in a hurry. Some of the “features” it has won’t work in tandem with other features: I can’t get “Selection Focus” to work if I’m in Manual mode, and things like face recognition have similar issues, although mostly those are features I don’t care about. One reviewer said that the JPEGs were essentially unusable and that he only used RAW. He was a professional photographer though, and perhaps overly critical. I’ve shot JPEGs and many turned out well. It has to be said though that some turned out horrible and for no good reason (two different photos of the same thing seconds apart had wildly different white balances selected, one of which turned everything yellow). Since I plan to only use RAW, again that’s not a negative for me.
And firmware upgrades: let me tell you about firmware upgrades. I bought the camera new from a volume online retailer, and it still had last Fall’s firmware on it. This suggests they haven’t sold well, which may be why it’s on sale now. Some features require the new firmware, so upgrading was important (I forget what, but some menu items were missing before I upgraded). Firmware upgrades are more complicated than they ought to be. I’m used to these just working on my Canon cameras.
First, you need to use their iLauncher software to do it. There’s no longer a manual “download the files and put them on the memory card” option. And the software can’t be downloaded either as far as I can tell. Don’t lose the CD that came with the camera. CD? What decade are they living in? I usually throw out CDs figuring I can download the latest version. I’m glad I didn’t.
I installed the iLauncher app on my Mac, and it updated itself and offered a firmware upgrade. I applied this, and it worked. Then I took a couple of photos, and plugged the camera in again, and it told me it had a new firmware upgrade (why not go straight to the second one?). I went through the same process to download and install it, but I didn’t see the same firmware-install delay. And, after a bit of checking sure enough, the second firmware upgrade hadn’t happened. It was however a newer version than what was in the camera, not just a spurious notice about the same version.
As an aside, so far the only way I know to detect the firmware version is to shoot a JPEG and look in the EXIF info on the photo. It’s not recorded in the EXIF for a RAW, and there’s no “info” screen on the camera to report it.
Much research followed, wherein I learned that Samsung used to let you download firmware, put it on the memory card, and “it just worked”, but they’d removed the files from their download site this spring, and now you had to use their iLauncher app to put the files on the memory card, and the old instructions for manual use not longer applied (the number of files was different). But iLauncher on the Mac was doing something wrong, and the only people who’d managed to get firmware upgraded to this latest version (303194) had apparently used a PC. Oh, good, nothing like removing working functionality and replacing it with something broken.
After a good deal of frustration, I fired up Windows XP on my Mac in VMWare Fusion (which works fine, but annoys me whenever I have to do it), and installed the PC version of iLauncher. That installed the new firmware just fine. What a company.
At this point I could start actually taking photographs. This was made more complicated than necessary by Apple (I can’t blame Samsung for this one), who 11 months after the camera came out still don’t support RAW conversion for it in their software. So I had to install Samsung’s RAW converter and figure out how to use it to generate adjusted TIFFs I could store in Aperture (Aperture is my photo library management program as well as my RAW converter, so everything ends up in there). I don’t know if this is due to Apple’s ongoing feud with Samsung; they do support other models of camera by them. It may simply be that they don’t see a demand for RAW with point-and-shoot (in which case, I think they have missed a rather significant shift in the camera market). Or maybe they just don’t consider this an important camera (that “low sales” thing suggests they could be right if that’s the case). I filed an enhancement request with Apple anyway for RAW support. But for now, I’ll muddle along with the Samsung converter.
The Good Stuff
All that annoyance aside, it does work. Their RAW software is not at slick as Aperture, but I can make it do what I need, and the results speak for themselves (see below). The camera’s small size and generally easy-to-use controls work well for my needs, and while it’s not quite as easy as my DSLR, it will fit places that camera won’t, and produce photos with more depth of field than the large sensor of the DSLR.
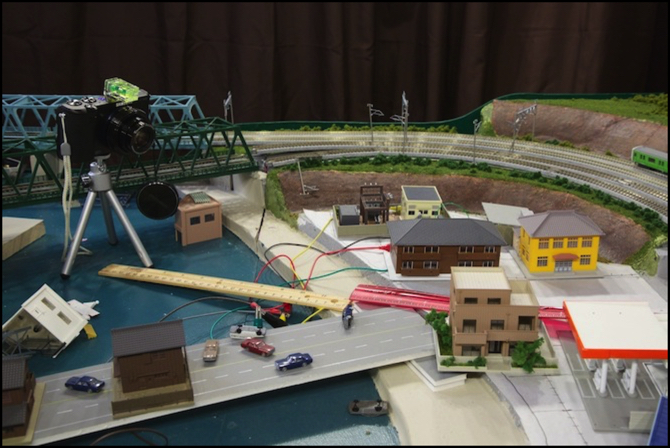
In the photo at the top of the page you can see the camera set up for testing, mounted on a small tripod (not the best tripod, it must be said, but it works). This lets me get the camera closer and lower (and if I use a beanbag, even lower) so I can do “ground level” photography.
Photo quality is good. The photos below show a comparison between my old 40D, which I’ve used for most of the photos on this site until recently and the Samsung. Both were set to about the same focal length (41mm equivalent and 45mm equivalent), both were set to an f/11-equivalent f/stop (f/5.9 in the case of the Samsung as it was as close as I could get to 5.5) and both were at similar shutter speeds. Both also had similar RAW processing done to fix exposure, white balance, and contrast.
The difference is that the Samsung at ISO 400 was well-lit, while the 40D needed to be set to ISO 1600 and still came out a bit dark. After adjusting, both were similar, so that’s not a major problem. And the 40D at ISO 1600 has less noise than the Samsung at ISO 400 (although both are “good enough” for a 650-pixel web photo). If I were taking photos for print, I’d use ISO 100 and a long exposure on both. The big difference there is that the Samsung will fit on my tiny tripod (the 40D on the small tripod just falls over; the tripod head’s clamp isn’t strong enough for the weight of the lens) and is small enough to place beside the bridge rather than atop it.
And, as you should be able to see below, the depth-of-field is significantly better on the Samsung. Ultimately, that was the reason behind all of this.
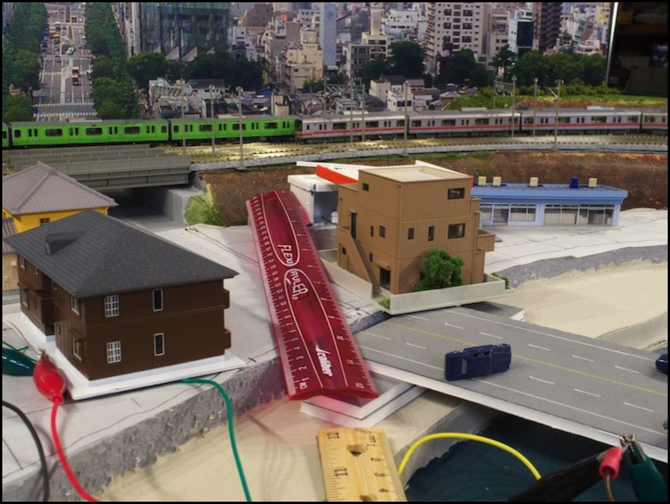
Samsung EX2F, f/5.9 (f/11-equivalent), 1/20-sec, ISO 400, 41mm equivalent lens
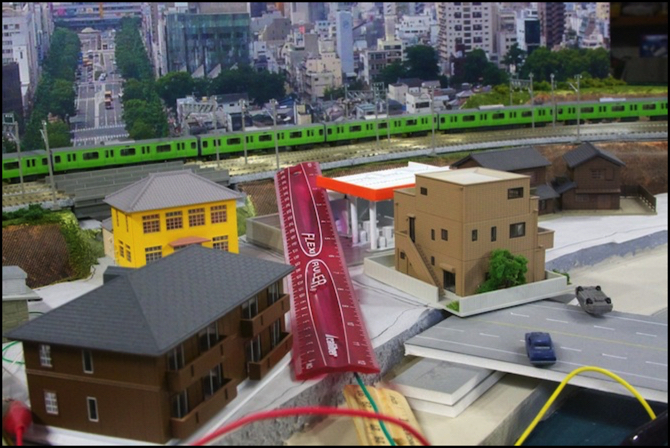
Canon 40D, f/11, 1/25-sec, ISO 1600, 45mm-equivalent
Look closely at the wooden ruler (well out of focus in the 40D, but right on the limit of in-focus on the Samsung) and the green train just beyond the end of the red ruler (more subtle, but it’s in focus on the Samsung, although just barely, but not on the 40D). The Samsung’s limit at these settings is about 30” (~76 cm), as you can see the train on the right rear is out of focus. For another comparison, look at the brown buildings on the right in the 40D image and the blue convenience store on the right in the Samsung image. That’s the kind of “edge of scene” focus I wanted, and the Samsung delivers.
Don’t mind the faint green tint on the 40D photo; that’s just me not getting the white balance quite right. You wouldn’t be likely to notice it if the two weren’t side-by-side.
The Samsung is, I think, a good choice for what I want. The 1/1.7” sensor is large enough to be better than a typical point-and-shoot, while still being small enough to have the depth-of-field advantage. The camera has a VERY fast lens (down to f/1.4 if you want) which has benefits even at higher f-stops, giving the camera a rep for good low-light photos (in RAW), and the lens quality is good. The manual controls are, for the most part, easy to use (ISO and focus issues aside). And the pivoting LCD makes use of the camera in odd locations much easier.
Useful Features
Lets go over what it has in its favor beyond image quality.
First size, at 4.25” W x 2.5” H x 2” D with the lens retracted (that’s 11 cm x 6 cm x 5 cm) it’s small enough to easily fit within the scenery, and the tilting LCD lets me compose the scene and set focus from above, when I can’t get right behind the camera. Yet it’s large enough that even my large hands can easily hold it precisely where I want it. There’s a good grip bump on the right side that helps, plus a small rubber square on the back for my thumb
The battery is good for several hundred photos (even in RAW, that’s probably only an 8 GB memory card, relatively inexpensive). It’s rare for me to shoot more than a couple of dozen in one session anyway. Like most memory card cameras it uses USB to mount the card as a file system on a computer, so you can just drag photos off the card for use. Full-size 12 MP RAW files are about 27 MB, and convert to 36 MB TIFF files if you don’t use compression.
In manual mode, there are front and back dials that control f/stop and exposure, making it very easy to adjust. Manual focus requires going into a menu, but that’s fairly easy as there’s a shortcut on the dial. Changing ISO is not, as you have to click your way into a deeper menu without any shortcut, but I rarely change ISO when doing layout photography, so the controls I need are right there. And selecting the timer uses a thumbwheel on top (which is an odd way to do it, but it makes it very easy).
The camera has an obvious blue LED on the top to show when it is turned on, and it flashes red when the camera is busy writing a RAW file to the memory card (which prevents taking another photo). That’s very handy.
The rear LCD has lots of icons that show what settings are selected overlaid on the scene through the lens, which helps to confirm that you have the camera set correctly when you’re working manually, and they are large enough to be easily read from a couple of feet, an important consideration if the camera may be placed well into the layout.
The LCD also has optional grids you can overlay, including a “rule of thirds” one, which is a handy reference when composing a photo, and verifying that the camera is level relative to the scenery.
The menus are not extensive, but are fairly easy to use. I kept wishing the LCD were a touch screen though, and trying to select things by tapping on it (you need to use the four-way pad beside it).
The camera has a hot shoe, which I don’t need today but could potentially use in the future if I invest in remote flash heads. And in the meantime, it’s a good place to clip a cheap bubble level, as seen in the photo at the top of the page. It also has a tripod mount, which I consider essential.
As noted you can focus manually, and minimum focus distance (at the lens’s widest setting) is 50 cm (19.7”), slightly longer than I would have liked but acceptable.
The zoom range of 24 - 80 mm (50mm equivalent focal length) is a good one for layout photography. And while the rear LCD doesn’t tell you what the focal length is, it does report the magnification factor, and “2.0” is approximately a 50mm length.
It can take video, and I haven’t said anything about that since I haven’t even read that part of the manual much less tried it; I have much better solutions for video. That said, I may use it someday.
It has a pop-up flash, and while flash is useless for layout photography, I’ve often used the one on my 40D when taking photos of electronics or similar things where the harsh lighting isn’t going to be a problem, so that’s nice to have.
The iPhone Connection
Actually, there’s one more thing, but it turns out not to be so useful for me. The camera has WiFi, and you can get an iPhone app that works as a remote back-of-camera display and control, so you can stick the camera somewhere really awkward, make the camera its own hot-spot and then connect to that from the iPhone and control it, setting flash, timer and focal length (plus image resolution). There are other apps for things like uploading to social media sites, but I have no interest in those.
The problem with the Remote Viewfinder app is that it forces the camera to take a 9 MP JPEG (or smaller) rather than the full 12 MP size (and it can’t do RAW), and gives you no control over f/stop or shutter speed (although it does appear to honor the ISO setting). I suspect I won’t be using this much. Also, you don’t get a copy of the photo on the iPhone (although they have a separate app you could switch to for that). I can see how this feature would be useful for family photos: you can set the timer, compose a photo with you in it, then hide the iPhone before the shutter snaps. But without at least an aperture-priority mode, I can’t use it for layout photography. Maybe Samsung will add more flexibility eventually. I could live with JPEG for some things, as long as I can control depth-of-field.
iPhone users also need to get the right App. Samsung makes a “combination” app that includes this feature, but it doesn’t support the EX2F despite being last updated in May. The one I used was an older standalone app last updated back in November. I also saw a newer one from March, but it didn’t show up on a quick search (something odd about how it was named, I think) and I couldn’t find it later when I went to test the camera. It may have been a one-camera-only app, but I need to track it down and see.
Macro Photography
I’ll close with one more photo, an illustration of why Macro mode isn’t very helpful for modeling. This little fellow guards my laptop’s keyboard against intruders.
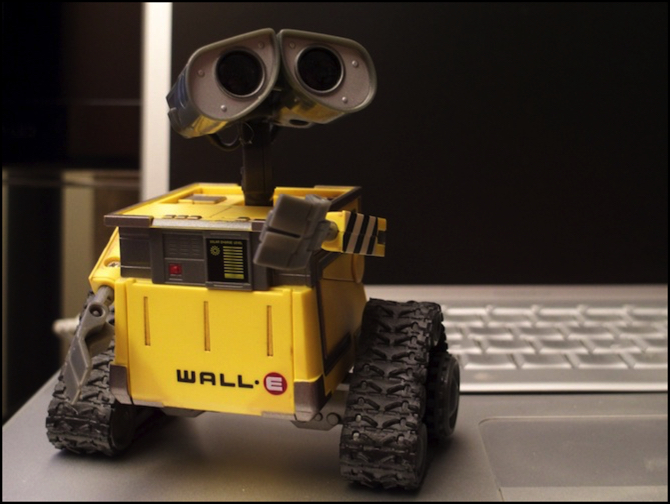
11 cm model @ 20 cm (macro), f/3.2 (f/6.4 equivalent) with lens at 50mm equivalent, 1/8-sec exposure, ISO 400
You’ll note how shallow the depth of field is here: both the tip of the extended claw and the back corner of the body are out of focus, and they’re a whole 9 cm (4”) apart. I could have gained some more depth of field with a higher f/stop, but I needed either more light or a tripod for that. This was hand-held despite being a 1/8-second exposure (the image stabilization of the camera works pretty well).
I can see this being useful for some kinds of photos though, like shots of a scene on a station platform, where you want to focus on the scene and make it big, but defocus the background. I’m not sure my modeling skills are up to photos that close up, but it’s something to think about.
The Why of It
You might be wondering why the sudden interest in close-up photography with lots of depth of field. Partly it’s because my modeling is shifting to detailing scenes at the building level rather than the larger-scale “roughed-in scene” things I’ve done (this is a shift that started over a year ago). Getting up close has different requirements from shooting a wide area from a distance. And partly it’s just that I’ve become more aware of the depth-of-field problem since buying my new SLR. I always knew I had limits with the 40D, but they really showed up with the new 5D.
I want to be able to take this kind of up-close photo to show up problems in the details, which will motivate me to get them right in the first place. A camera lens 2’ from the scene is much less forgiving than the eye of someone standing several feet above and to the side.
As you can see at the top, my Village scene right now is a mess (and has been for some time). The tracing paper under the buildings is so I can plan out the exact building placement, and the layout of streets and alleys between them. And after neglecting that for many months, I’ve started working on it again. I’d really like to have streets, sidewalks, and a finished river embankment here. The camera will help me test out alternatives as I work on placement, and serve as my “critical eye” as I start doing the actual street scenery.