


Let There Be (More) Light
27 July 2012 22:05 Filed in: Construction,Electrical
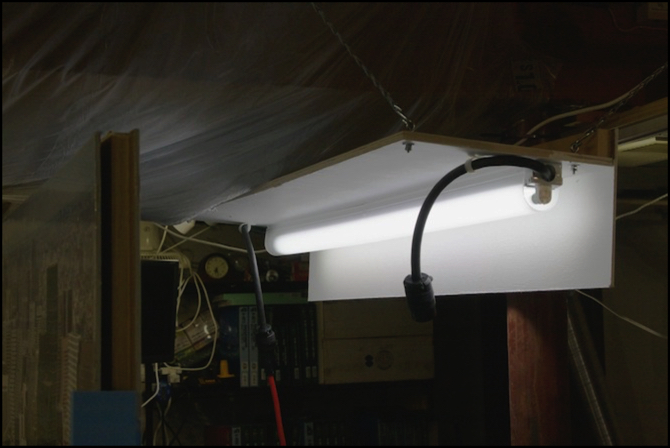
I finally decided to experiment with fluorescent tubes, after living with the track-lighting with CFL (compact fluorescent light) bulbs I’ve used to light the layout for the past two and a half years. I’m sorry I waited this long. The new fixtures, the first of which is shown above, weren’t cheap, about US$90 each by the time you add up all the parts. And they’re fiddly to hang properly given my less than perfect basement ceiling. But I’m getting twice (or more) the light from one 26W bulb that I was from four 14W ones, and it’s much more even lighting. I’m still debating using two tubes on the fixture, although that will raise the cost each substantially.
For photography purposes I’d like more light, preferably on a second circuit I can switch independently, so I don’t have to waste the power when I’m not taking pictures. But as I get adjacent fixtures installed, the spillover from those will raise the lighting here somewhat. And adding a second lamp unit with separate wiring will cost about US$68 per section, so it’s a fairly expensive add-on for occasional use.
The structure I’m using is a sheet of plywood 1-foot wide by four-feet long (30 x 122 cm) to which everything is attached. Connected to the front is a sheet of hardboard that sticks down about 6 inches (15 cm) to hide the bulb from the front, and to reflect light onto the layout. The fixtures are wired with individual plug-and-socket cords at each end, so I can remove or add them individually. Each board is (presently) equipped with one T5 bulb and a plastic diffuser. The inside surfaces are all painted with white primer to reflect the light towards the layout. I’ve written the design up in more detail on a new Lighting Valence page.
One thing that kept me from doing this for a long time is the ceiling above the layout. While for the most part the beams run parallel to the layout, the main house beam (and its support posts) runs right across one end of the Riverside Station/Urban Station scenes. The posts limit how far in front of the layout a continuous structure can go (less than an inch) and the beam limits how high up they can be. Beyond that there are a number of vents and pipes that block access to the beams in sections, making hanging things somewhat problematic. The plastic sheeting, by the way, is stapled to the beams to keep dust and debris from the insulation from falling on the layout.
I finally decided that I could suspend a structure like this at the same height as the top of the backdrop without it looking bad or blocking my view, and this would clear the obstacles. This works fairly well, although having the valence right at the edge of the layout means that the front side of trains near the edge of the table aren’t lit very brightly. I’ll make up for that by using the existing track lights as fill lights to raise the general illumination of the rest of the room (I think; I’m still working on that aspect).
So far I have one fully built, and the wood for a second assembled and painted. I plan to use those over the Riverside Station scene for a time to decide how well I like the single-bulb approach before building more. With the new fixture, the bulb is located directly above the track along the front edge of the layout, 26” above the track (66 cm). There is a 21” (53 cm) opening between the table-top and the bottom edge of the valence, which gives me a good view of almost the whole backdrop.
Tabletop illumination directly below the center of the bulb is 750 lux (yeah, I bought a light meter), and at the back of the scene it’s 560 lux. This is bright for residential lighting, about average for an office environment. This compares to 320 and 170 lux with the track lighting. At the end of the scene, with only one bulb in place, the light falls off somewhat, down to 400/320 lux. But the track lighting had real problems there (the post meant it had to be fairly distant), with only 120/140 lux. As I add more fixtures, the ends should be more evenly illuminated.
Although the bulbs are rated to have a color temperature of 4100K, my camera is reading the illuminated scene as 4000K. This is perhaps a bit “bluer” than the old lighting (which was nominally 4100K, but seemed to have more red, and the camera often read it as around 3500K). But it’s not enough to be noticeable except when both lights are on and pointed at adjacent sections of the layout (and even then it’s really subtle).
The quality of the light seems improved as well. I’m not sure if that’s just the lack of hot-spots thanks to the diffuser, as it may also reflect the improved color-rendering of the bulbs (CRI 85, versus some unspecified number that was likely lower). Whatever the cause, It’s a softer, more natural-looking light.

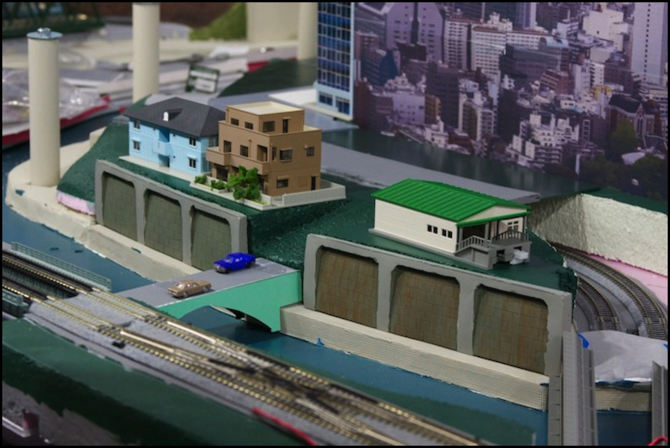
New Lighting Test
And it photographs well. The above was taken at 1/30-second, f/7.1, iSO 800. A past picture (below), also taken at 1/30-second and f/7.1 required ISO 1600 (which is rather grainy on my camera). It also had a strong green color-cast, and the lighting just seemed “harsher” even after that was corrected. The new lights aren’t without a color-cast, but it’s much milder.
Old Track Lighting Test
I am, as you may have gathered, pretty happy with the results of this trial.