


Pylons
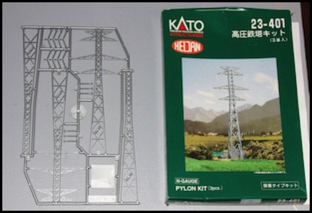
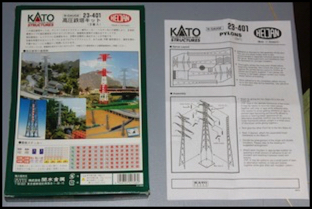
No, I’m not writing about the ones from the 70s TV series. These are the electrical kind, Kato kit 23-401, which is actually a Heljan-produced model, although apparently not one sold directly by that company. The kit contains material for three high-voltage electrical towers of a common design. In fact, they’re nearly identical to those in a photo of Shin-Yokohama described as owned by JR East (see my Electrical Reference Images page). List price from Kato USA is US$19, but I’ve seen them for less. Frankly, they’re overpriced for what you get.
This is a very common style of tower. Aside from their use in Japan, there is a power line a few miles from my house with identical towers. This gave me a chance to look at some directly, rather than in photographs.
A very similar tower near my house
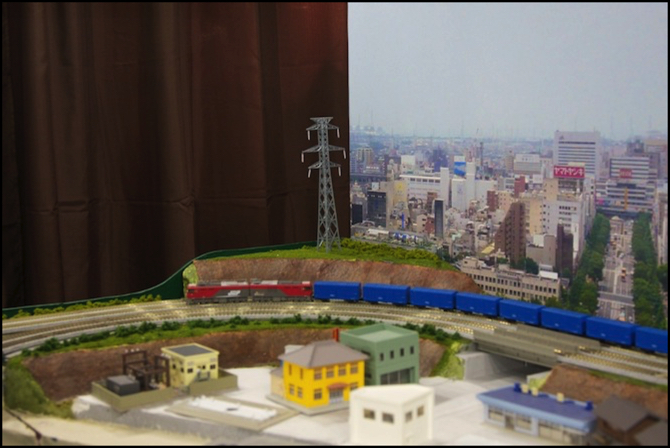
I’d decided to build a pair of these as an accent to the River Crossing scene last summer. The way the track in that scene runs right up to the backboard, and nearly all of the scenery is below track level, in the Village area, really cried out for some kind of visual distraction at the back of the scene. And once I saw this kit in the store, I hit on the idea of putting a pair of them on the back corners, and running “power lines” between them, as a bit of scenery well above track level to add some dimensionality to the scene. And as I work on finishing up the scenery there, I finally found time to build the kit I bought last year.
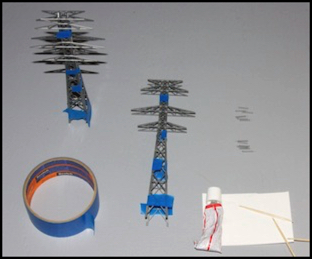
The box, with parts and instructions
This isn’t a complex kit, just four sides, an optional base, and six insulators (in one of two styles) to glue together. It’s also rather lacking in detail, which isn’t really a problem for an N-scale kit. However, Tomytec recently introduced a couple of similar kits (Visual Scene Accessory 084 Power Pylon A and 085 Power Pylon B, the “B” style is nearly identical to the Kato model), and those have additional details such as molded-on reinforcement plates at joints and a maintenance catwalk. The Tomytec towers cost more, but come in pre-assembled sections that can be glued together; I probably would have bought those had they been available at the time.
But I didn’t, so I had the “fun” of assembling this kit. I have one word of advice if you’re thinking of it: don’t. The problem is that the four sides need to be glued together. They’re beveled to make a good joint, but nothing on them will align the parts or hold them together, and you need to glue all four nearly simultaneously to get all the gaps closed, and correctly aligned or the arms won’t meet properly later. I did this, and it almost worked, but it involved lots of tape, care, and holding things in both hands until the glue set. And I still ended up with one stretch that didn’t touch and now can’t be glued. They both stand on their own, so I’ll count that as success.
I let the sides set for 24 hours for maximum strength before attaching the insulators, as that requires bending the arms which puts quite a bit of stress on the joints of the sides. Once the towers are together, gluing in the insulators is, if anything, worse: you need to pinch the two opposite sides together so the arms meet in a point, but the insulator goes between them. And there isn’t even a notch for it, so they won’t quite meet up smoothly no matter what you do, and the actual gluing surface is very small. Styrene cement will weld them together just fine, but you need to somehow clamp it firmly yet gently until that sets. Tape didn’t work, and my clamps were too strong and bent the plastic. In the end, I used my fingers and just held them for several minutes each. Thankfully, styrene cement comes off fingers fairly easily, so I didn’t become part of the model.
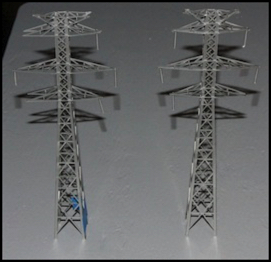
Gluing the body (left) and the insulators (right)
I’ve been building plastic kits since I was in junior high (and that was a long time ago) and I’ve never had this much trouble. Particularly for what is, in the end, not a particularly special model.
The finished tower on its base stands 20cm tall (Tomytec’s is reportedly 28cm). This equates to 30m (just a hair under 100’) in Japanese N-scale, which is about mid-size for such a tower. It is molded in a silver-gray plastic which could be used as-is, but isn’t quite the right color.
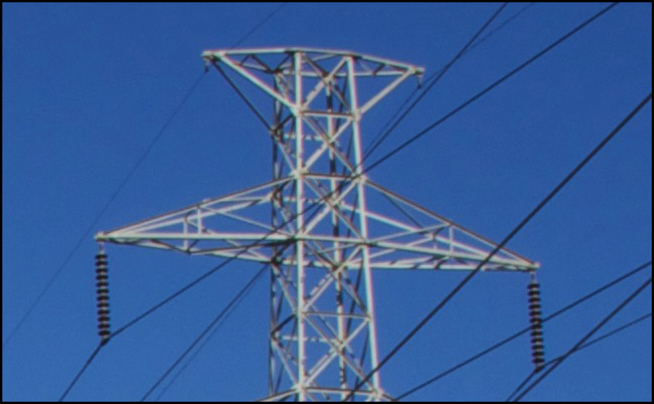
This kind of tower is made of galvanized steel, which has a flat light gray color that appears almost a light white in direct sunlight (see the close-up photo above, and the other below), but not shiny. Such towers are good for 15-35 years before beginning to rust, after which, if not repaired, they’ll rust quickly and fail in a few years. As it ages the material will first develop rust stains, in the form of a light “coffee stain” discoloration. Later, this progresses to a more complete red-brown coloring of large areas, particularly near joints. It’s much cheaper to repair such towers at the coffee-stain stage, so ones in a well-maintained system won’t show large rust areas. Insulators are the only part of the tower in a different color, and may be light gray, white or black (or other colors, but those three are the most common I’ve seen).
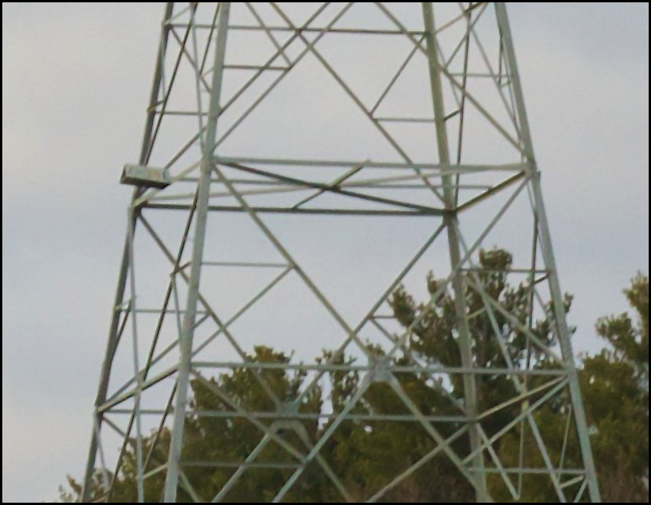
Another detail photo, note how the metal looks gray against the trees, but lighter against the sky (also note the faint rusty tinge in places, and the use of reinforcement plates at joints; and no, I have no clue what the box on the left is for).
I didn’t like the “plastic” look of the original color, so after assembly I first spray-painted mine in a flat gray (Tamiya Haze Gray, I think, although it may have been Medium Gray; both cans were on the bench and I don’t recall which I used). This gave me an overall color of a flat rather dark gray. Then I painted the insulators flat white for a high-contrast color. The result was acceptable, but lacking in character, and the flat even color made the lack of detail on the sides even more apparent; they were just too “smooth” to look right.
To address that, I “drybrushed” on Tamiya Flat Aluminum, using a small, flat brush that had had most of the paint wiped off it onto a paper towel. This created an irregular highlighting while leaving the gray color mostly intact. It also tended to deposit heavier amounts on the edges of the plastic strips that formed the tower, helping to define them and add dimensionality. It’s a subtle effect, and a bit blotchy in places. I’m not sure how visible it will be from several feet away or in photographs, but at a couple of feet it does break up the uniformity of the gray and make it look a bit more like the real thing.

Towers with drybrushed aluminum (left) and without (right) - photo taken with a flash
It would appear in comparing the model to the earlier photos that I used too dark a color of gray, and perhaps I did. But see how it looks in the photo at the top of the page, under the actual layout lighting. Part of the difference is that the flash is very “blue” and has a color temperature around 7000°K, whereas the layout lighting is much warmer (redder), with a color temperature around 4000°K. This affects how the colors look.
I decided not to add any “rust”, as amounts small enough to be prototypical would likely be invisible, and larger amounts wouldn’t look right for well-maintained structures, which is what I’m modeling.
Finally, I don’t plan to use the supplied base, which is just a featureless square of plastic, but instead put each leg onto a small support formed of Evergreen tube styrene sunk into the foam forming the landscape, painted in a “concrete” color. I’ll use Tamiya Medium Gray, a lighter and redder gray than the spray paint I used on the towers, which it looks like weathered concrete.
But before I get to that, I need to do more thinking. As you can see from the photo at the top of the page, the height isn’t all that tall relative to the layout and the photo backdrop. This is something that might lead me to use the Tomytec towers instead, and relegate these to use elsewhere on the layout or on my Tram Layout. The other problem is that placing these on the two corners makes for a nearly 4’ (122cm) span between them, which is long relative to their 7.8” (20cm) height. Once I string “wires” between them this may emphasize that they’re too short. Finally, the aluminum paint doesn’t look as good in person as I’d hoped, and I may need to either re-do the tower in a lighter color gray, or add more dry-brushed aluminum. More to think on here.
Note: I’ve created a photo album with larger versions of the photos shown here.