


Fun with JMRI
Some weeks I don’t get much done. Well, that’s not quite true, I did a lot of work on the website this week, but the railroading time suffered. I did find some time to play with the test track I’d set up last week though, configuring JMRI to report block status based on the BDL168 outputs.
If you’re not familiar with JMRI it’s a free software package that allows a computer to interact with any of several DCC command stations that support computer interfaces, including Digitrax. It’s also available for Windows, Linux and Macs. And while not the most Mac-like program, it works, even on the ten-year-old iMac I’m using for the layout controller.
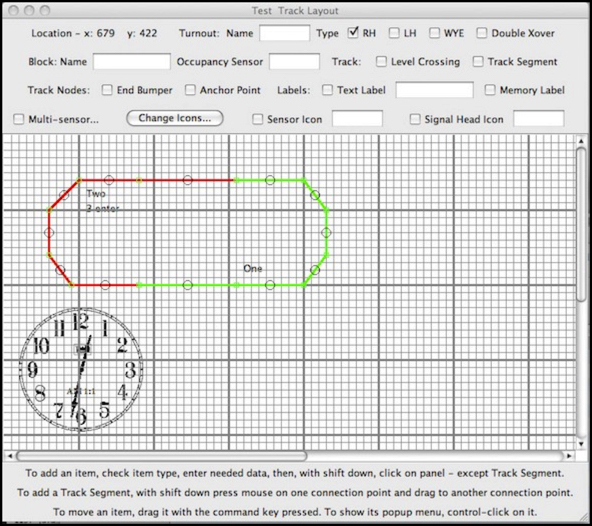
So what I have is a test track that’s an oval divided into two electrical blocks, each connected to an output of the BDL168. I named them, creatively enough, “One” and “Two”. And I used the Layout Panel editor (seen above) to draw a schematic of the track. The image above shows the Layout Panel in edit mode, with the track, a clock monitoring the DCC Fast Clock (there’s one built into JMRI) and two text labels reading “One” and “Two”. The last bit, just below “Two” reads “3 enter” and I’ll come back to that in a bit. In this diagram, red shows occupied (it’s configurable) and green shows clear, and at the time this was taken, my locomotive was in block two, causing it to turn red. Even on my old computer, the change is nearly instantaneous once the locomotive crosses the insulated rail joiners from one block to the other.
Each segment (marked by the black circles) is assigned to a block, and each block is assigned to a sensor output. In JMRI, sensors are given names based on the communications system used (“L” for LocoNet in my case), the type of device (“S” for sensor) and the address (33 and 34, respectively, for blocks one and two; the numbering is a bit arcane, see my LocoNet Addressing page for details although I’ll go over the basics down below).
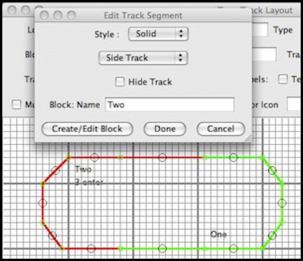
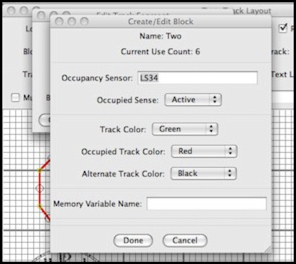
If you right click on a track segment, the Edit Track Segment window comes up. Here you can see this is configured for block “Two”. Clicking the “Edit Block” button brings up the Edit Block window, which lets you configure the sensor (LS34 for LocoNet Sensor 34) and set the track colors for the two states. You can also see that block two is in use by six elements (the six track segments), which are just the graphics on the screen, they don’t have any relation to the actual track.
Now for the last bit, remember the “3 enter”? That’s the output of a “reporter” (in this case LR35, the reporter for the second RX1 transponding sensor on the BDL168). There are other useful things you can do with these involving scripts, but you can also put a text box on the panel that will be filled in with the most recent report from the reporter. In this case it’s the DCC address of the loco and the action (“enter” for “this locomotve entered the block” or “exit” for “this locomotive exited the block”). So I put LR35’s window under the block two label so I’d know what event had most recently been reported for block two.
This is all rather simplistic, but I’m really just trying to gain familiarity with the system at this point. And as yet I haven’t tried to figure out why the transponding sensor for block “One” (which is LR33) isn’t reporting.
BTW, those addresses: the sensors are numbered as 16 sequential numbers based on the ID configured on the BDL168. My test BDL is numbered 3, so the address is (3-1)*16+Output, so output 1 is 33 and output 2 is 34, etc. For some reason the eight RX transponding detectors are numbered based on alternate numbers, so sensor 1 (AA in Digitrax nomenclature) is 33 and number 2 (AB) is 35. Odd.
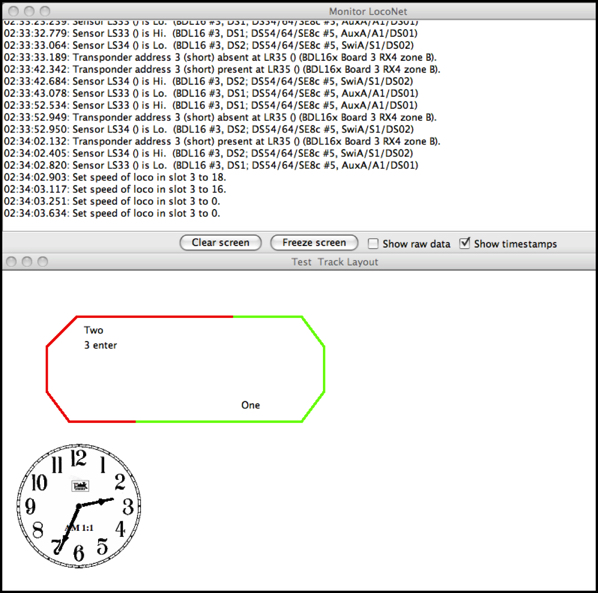
So, with the panel all set up, I can run the locomotive around the oval and watch the report. I’m using JMRIs “LocoNet Monitor” window in the image below, above the panel window, so I can see event messages on the LocoNet as I watch the panel change.
You might notice the log messages are a little bit different from last week. That’s because I upgraded to the current version of JMRI this week (my old copy was a year old).
So, now that I have a handle on basic JMRI, it’s time to get back to testing my board, and figuring out what’s wrong with the transponding sensor for output 1.
Administrivia
You may notice the General RSS feed notes a number of pages changed in the last week, and wonder why you didn’t see any of those messages before today. That’s because I use the feed generator as a log, updating my local copy whenever I update a page. But at present I’m not actually publishing those pages (or the feed) all that often. Mainly because with the way the software is right now, it’s a very manual process and I need to push most of the site out one section at a time, which takes about an hour, so I avoid it. My goal is to be able to make those updates more frequently and with less effort. I’m not there yet.
The other thing to mention is that I’ve decided what to do about blog comments. The downside is that it’s likely to take a while. I had three options:
1) Switch the Musings block to another software system (a local copy of the WordPress code). Nice, but like swatting flies with a hammer. I really don’t want server-side scripts generating each page, and I really didn’t want the effort of changing all those pages again.
2) What I’d been planning to do instead was to use a third-party service, which is the normal model for RapidWeaver. The problem is, there’s exactly one service (well two, but the other is reported to have issues and lousy support, plus it has a cost). And the one service has this model that they control the comments, making exporting them if you want to move to another system very difficult. Plus their goal is to build a social network kind of service, which is pretty far from my goal of “record a few comments”.
3) So, I’m left with option three: roll my own. There are actually a few freeware commenting systems out there, basically PHP scripts that use a flat file or a MySQL database. My hosting provider makes both PHP and MySQL available, and I’m not afraid of a little coding (I suck at script programming, but I’m not afraid of it). So, in my copious spare time, I’m going to integrate one of those systems with the website. I’d hoped to get started this week, but instead spent time updating pages on the site and converting others. In short, it’s going to be a while. I’m hoping for mid-October at this point. I’d wanted comments sooner than that, but not enough to go with solution #2, although I’ve spent the last two weeks dithering over that decision while converting pages.
And that brings up a third point. As noted last time, I’ve tracked my software stability problem to my use of Stacks, and am converting pages from that back to simple styled text (fortunately for my sanity all of the Musings postings were already Styled Text, it’s only the other pages I need to work on). In addition to removing problematic memory-leaking pages, conversion makes the site smaller; I’ve knocked nearly a quarter of the total size off, but that’s still not enough to allow a clean export of just the changed pages, so there’s more to do.
The conversion is going well, but along the way I realized something. Each time I convert a page, I break any existing links to it because I’m effectively deleting the old page and creating a new one of the same file path, and Rapid Weaver’s “intelligent” internal links can’t cope with that. So, at the moment there are likely dozens of broken links scattered around the site. I’m going to have to devote some serious time to finding and fixing those, soon. In the meantime, if you hit a broken link, sorry about that. The page you’re looking for should be there, or the link wouldn’t have existing in the first place, but you’ll need to navigate to it via the sidebar, which may be unobvious if you don’t know what section it’s hidden away in. Cleaning up that mess is high on my list, but so is creating more of it by converting more pages.
