


Computer Support
A computer is part of my model railroad. Why, and how do I use it? Well, the answer to the last question is “not very much”, so far, but I have plans. I recently had to re-do the monitor support attached to the layout, and I thought I’d discuss the reason it’s there, as well as the work on the support itself.
I’ve mentioned computers several times before in conjunction with the layout, although in a number of different contexts, but most of those were about decoder programming and benchtop testing. For those I use my laptop along with my Zephyr command station. But the layout itself has the DCS100 command station, and a permanently-installed computer. At one point I’d planned to use an old iMac for both roles, but it died (even old Macs eventually stop working). When it did I started using the laptop, as it was convenient and modern enough that I could rule out some problems I’d thought might be caused by the iMac’s slow CPU (they weren’t; JMRI really doesn’t need a whole lot of CPU, at least not for what I’m doing so far).
But using the laptop with the layout would have meant moving it and attaching it to the layout somehow (there’s a shortage of tables near the layout that aren’t already in use for other things). And it would have disrupted other work I wanted to do with it. Fortunately I had an old Mini, which was no longer capable of running the latest software and had outlived the original purpose it was bought for, and thus wasn’t being used for much but wouldn’t have brought much if resold.
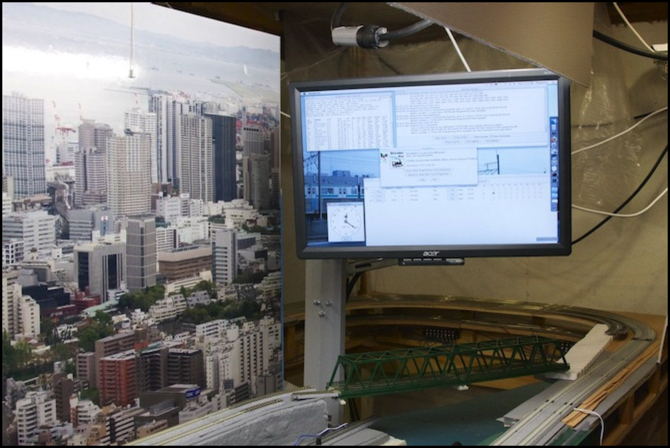
I needed to add a monitor, keyboard and mouse, but inexpensive ones were all that were required. I wasn’t going to be doing a lot of typing on it, and display quality only needed to be good enough for a track plan viewed from several feet, so a large number of pixels or photo-quality color wasn’t a requirement. The monitor is mounted above the “unsceniced” end of the layout, on a short post with a pivoting arm attached to it, so it can be swung to be visible from either side of the layout.
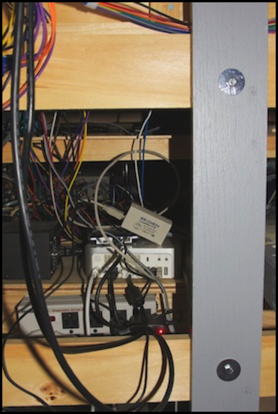
Computer, next to gray monitor support
The computer sits on the electronics shelf behind the main power panel, along with a small USB disk it backs itself up to periodically. It’s connected to the layout’s main LocoNet bus via a RR-CirKits LocoBuffer USB (my second, there’s another one on the workbench with the Zephyr).
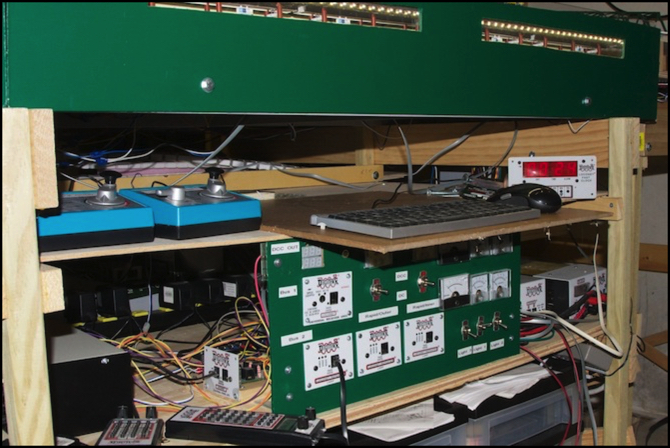
Computer Keyboard and Mouse with fast clock, above main power panel
The keyboard and mouse sit above the computer on the same shelf that holds my DC throttles and my fast clock display, just under the RiverSide subway station. They are presently on a small sheet of hardboard held in place simply with a weight on the back, serving as a simple keyboard tray I can pull out for use, and push back out of the way the rest of the time. I may eventually replace this with a real keyboard tray and a more solid mounting.
Mounting the Monitor
When I first installed this, a number of months ago, I made a quick-and-dirty mounting post out of a spare 2x4 I had lying around. This mounting was strong, but wasn’t anchored very well, and over time the board to which it was attached twisted under the weight of the monitor and arm (the arm probably weighs more than the monitor, actually), causing the monitor to no longer be level. So I recently replaced it.

Monitor Mount - Pivoting Arm
The new support is a 1x3 of oak, mounted to the layout support structure at two points, to provide sufficient strength and stability. I used oak because it’s a more rigid post than a similar size pine board would be, and I wanted a smaller post than I used to have. This is attached to the support using the same kind of 2” bolts that I used to hold the support structure together, allowing the post to be removed for maintenance or future relocation of the layout. Since the post will be visible, I painted it with the usual gray primer, although I intend to hide as much of it as possible behind future scenery.
Attached to the post is an Ergotron 45-243-026 LX Wall Mount. They make a number of different monitor mounts, of varying quality, but this one is quite solidly built and seems to work reliably (I’ve had it for a couple of years now, with no problems). It’s not exactly cheap (currently running around US$120), but I’ve bought cheaper ones for other monitors, and regretted them. I had to shop around a bit for an inexpensive LCD monitor that also had the holes on the back for a arm-mount (not all do, particularly at the low end), but found one eventually (I don’t recall the price, but it wasn’t too high).
Using the Computer
The computer runs JMRI. Today, this is mainly useful for monitoring the DCS100 and throttles as they communicate with each other and with trains via the LocoNet (I run the LocoNet monitor and the Slots pane to monitor the status of trains known to the command station). You can see more about how my LocoNet is wired on my LocoNet Overview page.
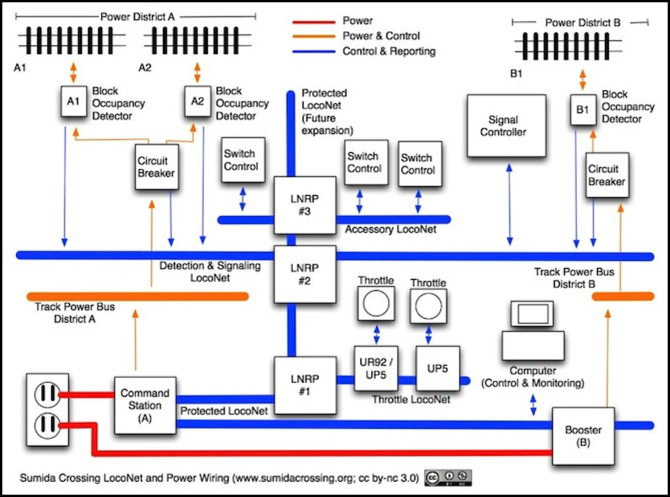
LocoNet Control Bus with Computer (schematic)
I will eventually draw a track diagram and have sections of it highlight based on the status of my occupancy detectors. I did a simple one of these when I was testing Transponding a year and a half ago.
I’m also planning to use JMRI’s scripting capabilities to control the indications given on signal heads along the tracks (driven by an SE8C control board), but again that’s a “future” project. My plans for this (which haven’t changed in years) are detailed on my DCC Signals page.
I’m also using the computer as the source for my synchronized “fast clock”. Although my throttles have a built-in fast clock display, there’s a known bug that keeps these from synchronizing properly, and so my choice was either clocks on the throttles or a central clock on the computer that can be displayed both there and on remote numeric displays. I chose the latter (details are described on my Fast Clock page), to be used with displays from Logic Rail Technologies (their LNFC-1), of which I’ll eventually have at least two and possibly more.
Automation
I’m not immediately going to use the computer for automation, but I’d like to eventually put at least the subway under automated control, so trains there will run and stop at stations as a form of background activity while I’m running trains on the main tracks. That’s well in the future though, as I have many other more interesting projects to work on first.
And that’s all there is to it. It’s not really an essential part of the layout, but with the eventual signal control and occupancy-monitoring display panel, it will be a nice enhancement to it. Further work on the display panel has been on hold waiting for me to finish wiring up the power management electronics that include the occupancy detectors, but I really need to just sit down and spend a couple of weekends soldering and finish those (I keep saying that) so I can get on with running my trains on DCC, for which the power management systems are required for all but the two tracks of the Express loop I’m using at present.