


Photographic Backdrops
08 January 2012 23:41 Filed in: Construction
I’ve written about my backdrops several times before (see the Backdrops tag at left for a complete list). But as I’m now re-doing the final “1.0” backdrop using my “2.0” approach first applied to other scenes a year ago, and there has been time to let the lessons I learned sink in, it seemed worth an update and recap.
Why Photographs?
The goal of any backdrop on a layout is to provide the illusion of depth to a scene that’s modeled relatively shallowly. Consider that in Japanese N-scale a 2’ (61cm) deep scene is modeling a real-world depth of just 300’ (91m). That’s pretty small. And the typical viewer is not at ground-level, but at the height of a tall building, from which in the real world you could see for miles.
Depth can be enhanced by using low-relief models at the backdrop (i.e., just the front wall of the building, and maybe a short bit of the side), but at best this adds a small amount. The backdrop itself needs to extend the scene. In a rural environment this isn’t too hard, some trees and clouds, and perhaps the distant and faded tops of mountains is enough to provide a framework. The human brain is very adept at filling in the details from a rough sketch, and as long as the viewer’s attention is kept on the foreground, perhaps that is all that is needed.
But urban scenes are a different matter. First, even a rough sketch needs a lot of detail. Unlike treetops, buildings don’t all look roughly the same from a distance, and ones that do will look “wrong” to the viewer. Painting an urban backdrop is possible, and I’ve seen a number of photographs of good ones over the years. But it’s outside my skill-set to do that kind of painting, and I don’t want to spend a lot of time on a backdrop; I want something I can knock out in a few sessions of work so I can move on to other things. And that led to using photographs.
Creating the Image
I’ve gone into my process for creating backdrops in some detail on my Making Backdrops page, so I won’t repeat that here, but a short summary is useful: I take “found” pictures from online sources (Flickr, mostly) as the starting point, and I process these as needed to address size and pixel count. Pictures taken with a DSLR generally have the high-quality lens needed for a crisp image, and the 8 MP or larger pixel count needed to make a 4’ (1.2m) wide image that looks good. You can find out what camera and lens were used by looking at the EXIF tags (also called metadata) in the original image. Many photo-manipulation programs will show this, Photoshop Elements, for example, shows it as “Camera Data” under the “File Info...” selection of the “File” menu.
The selected image needs to be roughly viewed square-on (although you can correct for minor problems using a program like Photoshop Elements) and needs to be wide rather than tall (called a “landscape” image for obvious reasons). It also needs to be about 150 dpi, or about 7,200 pixels wide for a 4’ scene. Since there aren’t many 7,200 pixel images out there, this means that you will need to enlarge an original. And about 2x is the most that’s reasonable using a basic tool like Photoshop Elements (at a stretch you may be able to do 4x if the source is good), so you want to start with an image that’s close to 3,600 pixels across. That requires about a 9 MP camera image (I’ve used 8 MP images with success), which is another reason to choose DSLR images (although some point-and-shoot cameras have similar resolution now).
Note that typical backdrops are much wider than they are tall, while photographs tend to follow a 2/3 or similar ratio of height to width. There are two answers to this dilemma. First, you can make a panorama from two adjacent photos (and it’s surprising how many pre-made urban panoramas or adjacent photos you can find if you look). Second you can cut off the foreground of a photo and only use the upper, more distant, portion. This latter approach is what I used on the backdrop of my Urban Tram layout, where the bottom of the photo was going to be hidden behind buildings and other foreground objects (a raised viaduct), and the image needed to be of distant buildings.
More distant buildings will be somewhat faded and “grayed out” due to atmospheric haze, and that’s an important consideration. Sometimes you want the buildings to blend in with the model buildings, and a crisp foreground image is what’s needed. I used that approach on my main layout, and it was particularly effective with the Urban Scene:
I’ve learned that the choice of enlargement algorithm can make a significant difference, as can the use of “sharpening” (which is really just enhancing contrast at the edges of objects in the photograph). I’m also beginning to think that there may be some value to use of more than 2x enlargements, using commercial image-enlargement software. This is an area I’ve started to investigate as I work on the 2.0 version of the River Crossing Scene backdrop, using a program called Perfect Resize (formerly named Genuine Fractals). What I know so far is written up on the Making Backdrops page, and I’ll add to that as I progress.
With the image processed to your liking, and output as a 48” wide (or whatever size you need) JPEG, you’re ready to proceed.
Constructing the Backdrop
First, you need a backdrop on which to mount the image. I use 3/16” (5mm) hardboard, often called “masonite”. This is relatively firm, and has at least one side that’s smooth. The side to which the image is mounted needs to be sealed to prevent wood acids from affecting the photographic paper (a coat or two of latex housepaint primer is sufficient) and if you have significant humidity changes in your layout’s room, you should probably seal front and back to avoid expansion/contraction of the backdrop, which could affect the attachment of the photograph. I run a dehumidifier in my layout room, and while normal humidity varies substantially over the year most of the time it’s in the 40-50% range, and I haven’t seen problems in the course of my first year with the back side unpainted.
Note: although unsupported hardboard will sag, installed vertically that doesn’t appear to be an issue. The backdrops I re-used from my old layout are about 20 years old, and were held up simply with one C-clamp at each end for most of that time, with no apparent distortion other than at the edges where the unsealed material has swelled in some places.
I now attach the backdrops by gluing dimensional lumber to the back (before painting, so the wood glue can make a solid bond) and then drilling those halfway through with a 1” Forstner bit and the rest of the way with a 1/4” bit, this allows a 1/4” bolt to be used to attach to the layout table, with the head of the bolt (and a washer) recessed into the support, so it can fit flush against a wall.
Note: after painting with primer, allow the backdrop to sit for at least a week, and several are better, to ensure the paint has fully cured rather than simply dried. Once the image is attached, it’s going to be more difficult for the paint to cure.
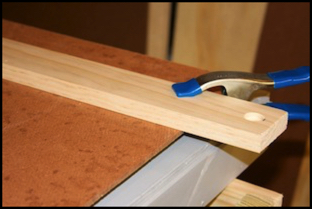
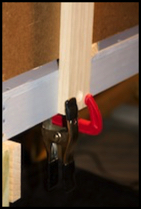
Gluing and drilling the backdrop supports
Attaching the Image
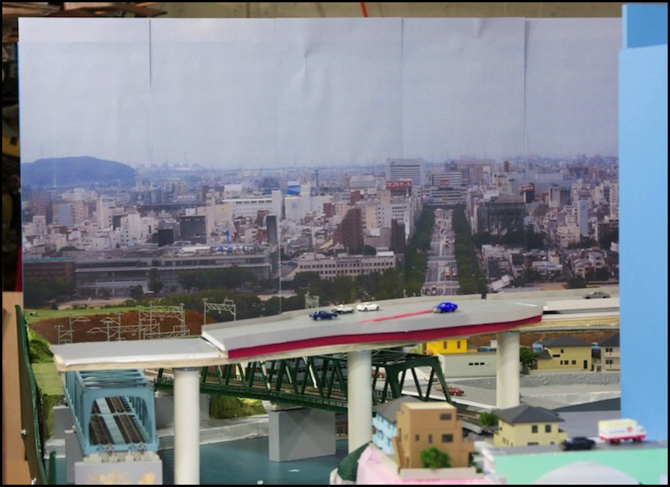
With the backdrop ready, and the image prepared, now comes the question of how to print it out and attach it. My first attempt, which I’ll call the “1.0” approach is shown at the top of the page. This involved printing the image to multiple pages of letter-size paper (8.5x11 inch) and using a spray glue to attach them to the backdrop (I used a photo-safe glue, which turned out not to work well on painted hardboard). I used acid-free “presentation paper” for this.
Use of “photographic” or “photo-safe” acid-free paper and glue is important, as acid will yellow paper over time, causing color changes in the image.
There were two significant problems with the 1.0 backdrops: color, and attachment. The appearance (color rendition) of an image reproduced on presentation paper isn’t as good as real glossy photographic paper. And the glue I used apparently presumed it was bonding paper to a porous backdrop (e.g., a matt board or similar). Without that, it didn’t form a firm bond, and over time the sheets of paper peeled away.
So a year ago, I switched to my “2.0” approach, using a print shop to produce enlargements on a single large roll-fed sheet of photographic paper and gluing those with a glue designed for photo scrapbooking use (“Paper Mod-Podge”, which differs from normal “Mod Podge” glue in being acid-free), which works with non-porous substrates. This isn’t cheap, as a full-size backdrop cost me about US$120 each. But it worked and a year on, all four backdrops (two each for the Urban Scene and Riverside Scene) are holding up well. I also used this for the Urban Tram layout’s backdrop (see those links for photos of the backdrops in place).
Photographs printed on an ink-jet need time to fully dry. I notice a strong ammonia smell for several days after bringing the photo home. What I do is unroll the image atop a table or other roughly smooth surface and leave it that way for a week or two. It doesn’t have to be perfectly flat, and I’ve draped them over a couple of cardboard boxes when I ran out of workbench. This lets the paper relax into a flatter form, which makes it easier to attach while also letting the ink dry, to minimize problems during the gluing (since you need to run a roller across the printed side to press the paper into the glue).
With painted backdrop and image fully dried, I lay the backdrop flat on the floor, apply the glue (using a disposable foam “trim roller” of the same kind I use for painting), place the image atop the backdrop (with the glue I used some repositioning is possible, but it’s still important to be close to correct) and then use a rubber roller (called a “brayer” and sold in craft stores for ink-stamping) to roll it flat. While doing this it’s important to keep glue off the roller (this can be a problem at the edges, and I needed to clean the roller a few times with a paper towel). I also used disposable rubber gloves (a powder-free version) so I could quickly “clean” my hands by changing gloves if needed. Once glued, I let it sit undisturbed on the floor for 24 hours for the glue to fully set up before mounting the backdrop to the layout.
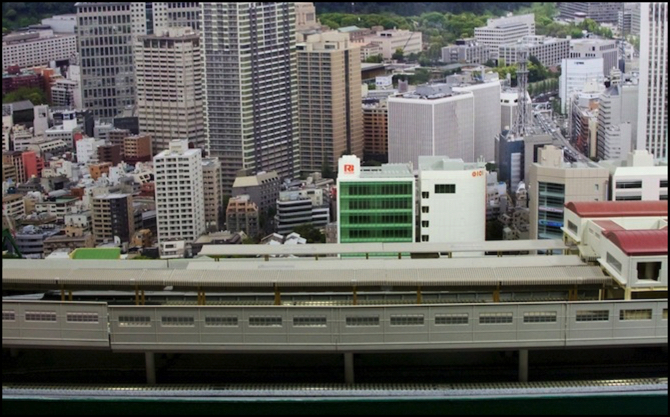
The end result was quite satisfactory. Here’s my Urban Tram Layout with its backdrop, done the “2.0” way, which you can compare with the “1.0” image at the top of this Musing. In this image I deliberately choose a section of the original photograph where the buildings were faded due to distance (cutting out a foreground with crisper and more color-accurate ones) as this lent a sense of “distance” to the result. That’s not always going to be the best choice, but in this case it was how I felt the image was best used for this layout’s needs.
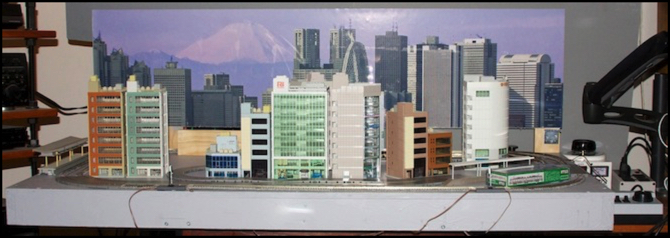
Urban Tram layout with backdrop